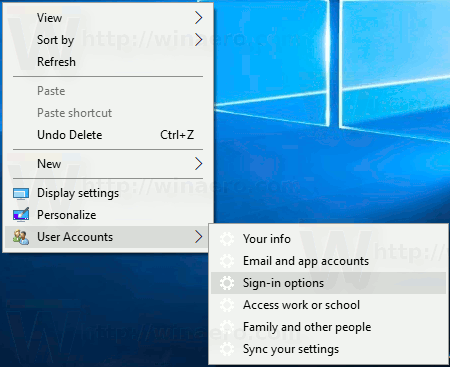
You can add User Accounts Desktop context menu in Windows 10. This will allow you to manage various settings related to user accounts available on your PC directly without opening Settings. Let's see how.
Advertisеment
 You can add a special submenu "User Accounts" to the context menu of Desktop in Windows 10. It will include the following items:
- Your info
- Email & app accounts
- Sign-in options
- Access work or school
- Family & other people
- Sync settings
All these options are available in Settings, under "Accounts", but you will be able to access them much faster using the commands from the context menu. The menu will be available for all users registered in Windows 10 on your computer.
To add User Accounts Desktop context menu in Windows 10, do the following.
As you may remember, there is a set of commands in Windows 10 which you can use to open various pages of Settings directly. Refer to the following articles to learn more about them.
- Open various Settings pages directly in Windows 10 Anniversary Update
- How to open various Settings pages directly in Windows 10
Here is the set of commands we need to add to the context menu of Desktop.
Your info
ms-settings:yourinfo
Email & app accounts
ms-settings:emailandaccounts
Sign-in options
ms-settings:signinoptions
Access work or school
ms-settings:workplace
Family and other people
ms-settings:otherusers
Sync settings
ms-settings:sync
To execute these commands, you can type the desired command in the Run dialog (Win + R) or create a shortcut with the following target:
explorer.exe ms-settings:sync
In our case, there is an alternative way to execute the command. I prepared a Registry tweak to add these commands to the context menu:
Windows Registry Editor Version 5.00

[HKEY_CLASSES_ROOT\DesktopBackground\shell\useraccount]
"MUIVerb"="User Accounts"
"Icon"="%SystemRoot%\\System32\\usercpl.dll,0"
"Position"="Bottom"
"SubCommands"=""

[HKEY_CLASSES_ROOT\DesktopBackground\shell\useraccount\shell\01yourinfo]
"MUIVerb"="Your info"
"Icon"="%SystemRoot%\\System32\\bootux.dll,-1032"
"SettingsURI"="ms-settings:yourinfo"

[HKEY_CLASSES_ROOT\DesktopBackground\shell\useraccount\shell\01yourinfo\command]
"DelegateExecute"="{556FF0D6-A1EE-49E5-9FA4-90AE116AD744}"


[HKEY_CLASSES_ROOT\DesktopBackground\shell\useraccount\shell\02email]
"MUIVerb"="Email and app accounts"
"Icon"="%SystemRoot%\\System32\\bootux.dll,-1032"
"SettingsURI"="ms-settings:emailandaccounts"


[HKEY_CLASSES_ROOT\DesktopBackground\shell\useraccount\shell\02email\command]
"DelegateExecute"="{556FF0D6-A1EE-49E5-9FA4-90AE116AD744}"


[HKEY_CLASSES_ROOT\DesktopBackground\shell\useraccount\shell\03signing]
"MUIVerb"="Sign-in options"
"Icon"="%SystemRoot%\\System32\\bootux.dll,-1032"
"SettingsURI"="ms-settings:signinoptions"

[HKEY_CLASSES_ROOT\DesktopBackground\shell\useraccount\shell\03signing\command]
"DelegateExecute"="{556FF0D6-A1EE-49E5-9FA4-90AE116AD744}"


[HKEY_CLASSES_ROOT\DesktopBackground\shell\useraccount\shell\04workplace]
"MUIVerb"="Access work or school"
"Icon"="%SystemRoot%\\System32\\bootux.dll,-1032"
"SettingsURI"="ms-settings:workplace"


[HKEY_CLASSES_ROOT\DesktopBackground\shell\useraccount\shell\04workplace\command]
"DelegateExecute"="{556FF0D6-A1EE-49E5-9FA4-90AE116AD744}"


[HKEY_CLASSES_ROOT\DesktopBackground\shell\useraccount\shell\05family]
"Icon"="%SystemRoot%\\System32\\bootux.dll,-1032"
"MUIVerb"="Family and other people"
"SettingsURI"="ms-settings:otherusers"

[HKEY_CLASSES_ROOT\DesktopBackground\shell\useraccount\shell\05family\command]
"DelegateExecute"="{556FF0D6-A1EE-49E5-9FA4-90AE116AD744}"


[HKEY_CLASSES_ROOT\DesktopBackground\shell\useraccount\shell\06sync]
"MUIVerb"="Sync your settings"
"Icon"="%SystemRoot%\\System32\\bootux.dll,-1032"
"SettingsURI"="ms-settings:sync"

[HKEY_CLASSES_ROOT\DesktopBackground\shell\useraccount\shell\06sync\command]
"DelegateExecute"="{556FF0D6-A1EE-49E5-9FA4-90AE116AD744}"
Notice the SettingsURI string value. It tells the shell to execute the Settings app and go to the specified page directly! A special object {556FF0D6-A1EE-49E5-9FA4-90AE116AD744} called from the command subkey performs the operation. So, the pages of the Settings app will be opened natively.
The context menu commands "Personalization" and "Display" work exactly this way, and this is how I discovered the trick.
To save your time, I prepared ready to use Registry files which you can download here:
The undo file is included, so you can add or remove the User Accounts submenu quickly.
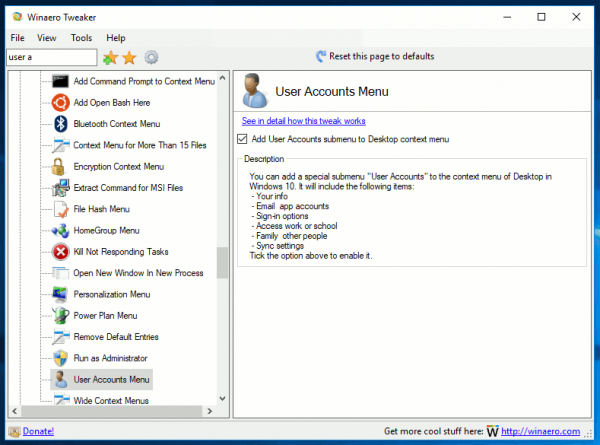
You can save your time and use Winaero Tweaker instead. It comes with the following feature:

You can download it here: Download Winaero Tweaker.
That's it.
Support us
Winaero greatly relies on your support. You can help the site keep bringing you interesting and useful content and software by using these options:
