Ever since Windows 95, the operating system has had a feature called Xmouse where the focus of windows can follow the mouse pointer, meaning, as you move the mouse pointer around, the window which is under the mouse pointer becomes the active window. This feature is disabled by default. Let us see how it can be turned on.
Advertisеment
Normally to make a window active you have to click on it. The Xmouse feature when turned on activates a window simply by hovering. Depending on what your settings are, it may raise the window, that is, bring the window to the front or it can simply make the window active but keep it in the background. In Windows versions before Windows Vista, Xmouse could be turned on using Microsoft's TweakUI powertoy.
How to turn on Xmouse active window tracking in modern versions of Windows
In Windows Vista and later versions such as Windows 7, and Windows 8/8.1, Microsoft added a built-in option to turn on Xmouse.
- Open Control Panel (see how if you don't know).
- Open Ease of Access Center.
- Click 'Make the mouse easier to use'
- Check the option 'Activate a window by hovering over it with the mouse' and click OK.

Now when you hover over various windows, they will be focused without clicking. They will also get auto raised, meaning the window on which the mouse hovers which be brought to the foreground.
How to make windows active but not raise them
Windows provides no UI option to not raise windows but still make the focus follow the mouse. However, there is a registry setting to keep Xmouse on but not automatically raise the window. After you configure that, background windows will become active if you hover over them but will stay behind the foreground window. To configure this,
- First make sure that 'Activate a window by hovering over it with the mouse' is turned on from Ease of Access Center -> Make the mouse easier to use.
- Next, open Registry Editor (see how).
- Go to this registry key:
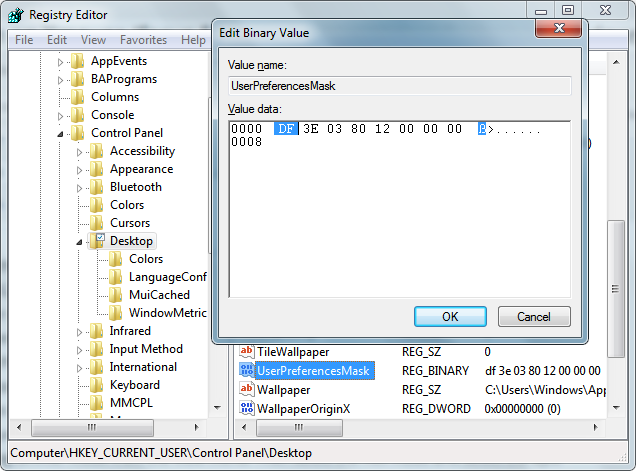
HKEY_CURRENT_USER\Control Panel\Desktop
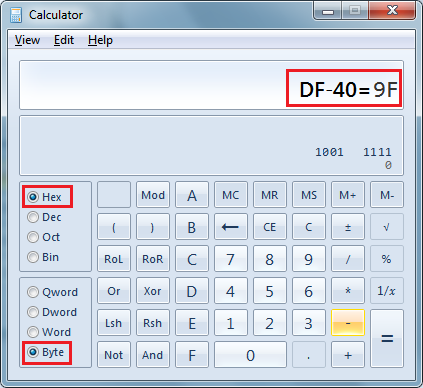
- In the right pane, locate the value "UserPreferencesMask". This is a REG_BINARY value, expressed in hex numbers and many settings related to visual effects are stored in this one value. For windows to get focus but not get raised automatically, we need to subtract 40 bits from the first hex value. (40 bits because Windows adds 41 bits to the first hex value in UserPreferencesMask when it enables Xmouse, and only 1 bit is supposed to be set if you want Xmouse without autoraise behavior). In my case, the value was df,3e,03,80,12,00,00,00 but your value may be different. You can do the calculation to figure this out easily in Windows Calculator. Just start Calculator and switch to the Programmer mode from the View menu. Then select the Hex mode and select the Byte display size. In my case, df − 40 = 9f, so I changed it to 9f,3e,03,80,12,00,00,00.
- To actually change it, double click the UserPreferencesMask value and carefully select the first two bits and then type the new value.
- Now log off and log in back again to see the change. Windows will become active when you hover over them but won't be brought to the top.
Change the time out for how fast or slow windows get focus after hovering
There is one more tweakable parameter related to Xmouse behavior and that is the delay after which windows get active after the mouse hovers on them. To adjust this timeout,
- Open Registry Editor (see how).
- Go to the same registry key as above:
HKEY_CURRENT_USER\Control Panel\Desktop
- In the right pane, locate the DWORD value called ActiveWndTrkTimeout.
- Double click the ActiveWndTrkTimeout value and change to the Decimal base. Enter the time in milliseconds (ms). 1000 ms means the window will become active after you hover over it for 1 second. If you set it to 0, the windows will get the focus instantly although we don't recommend that you set it to 0 even if you want the focus to be transferred faster - set it to 500 instead.
- Log out and log in again to see the change.
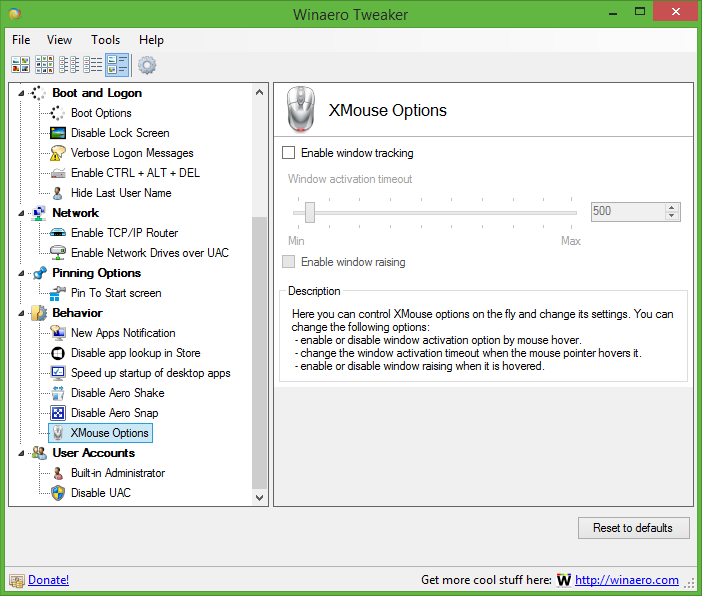
If you want to avoid registry tweaking and prefer a simple GUI tool to tweak this, get the app called Winaero Tweaker.
 Use its options to avoid Registry editing.
Support us
Winaero greatly relies on your support. You can help the site keep bringing you interesting and useful content and software by using these options:

Great tip, especially letting us know about the Winaero utility. One small annoyance with WinAero is why the author didn’t allow people to lower timeout all the way down to 0. 500 is the minimum time, and in fact that’s a fairly annoyingly long delay already. It’s just totally absurd to even let it be cranked up all the way to 9000.
Another question: How does WinAero get this working without requiring a logout/login ? And is there a way to mimic this when just tweaking the registry manually?
The Windows API SystemParametersInfo() can tweak these settings live with SPI_SETACTIVEWINDOWTRACKING, SPI_SETACTIVEWNDTRKZORDER, and SPI_SETACTIVEWNDTRKTIMEOUT, followed by a broadcast WM_SETTINGCHANGE message. You can follow my website link for my own open source tool which does this, MouseWinX.
Please lower the minimum timeout to 10ms. 500ms is way, way too long when doing repetitive operations.
OK, i will do
Alternatively setting it to a large timeout lets you scroll in the window without switching titlebar focus.
Is it possible to achieve something like ‘activate the window immediately, but raise it after 500ms? Registry or UI, doesn’t matter.
It is Windows’ built-in feature, so Nope
I really hate the way this feature works in Windows, why can’t it work like it does in Linux or Mac where you can scroll any window without pulling the window to the front each time a mouse cursor is hovering over any inactive window, it’s always got to pull the windows to the forefront instead of leaving it in the background. This feature is so annoying and counterintuitive because it steals focus from a main window in the foreground, and hides it under the other instead of letting me have main window in focus and the background window staying as it is and still let me scroll it how I want.
If you use Winaero Tweaker, it has an option “Enable window raising” which you can uncheck to get the behavior you want. See the screenshot above of Winaero Tweaker.
The option enable window raising is active every time I restart windows (Win10), then I need to load the program and change it until the next login, It’s just me or this is a bug?
Must be a bug.
Finally I could deactivate the XMouse option that for some reason was active by default on my Citrix remote PC and that was bothering me so much!
Thank you for your precious indications!
Is there a registry setting to bring a window to the foreground only upon scrolling?
Hi Gaurav Kale!
When I uncheck the “Enable window raising”, my mouse pointer in the delete or replace dialog will move to the center of screen. Any fixes?
I’m sure I have disabled “Automatically move pointer to the default button in a dialog box” and I know this is not my problem. Because the pointer is not moved to the default button, but to the middle of screen.
TY
Why does the “Enable Window Raising” option tick itself on? Is it a windows 10 thing or something?
you untick it and then a few days later it goes and ticks itself. Very annoying when you aren’t ready for it.
If this is on, then the on-screen keyboard is unusable. As soon as you go to the OSK it steals the focus and you can’t type into the other window.
Unless I’m missing something…which is certainly possible!