Advanced Host Controller Interface (AHCI) is a technical standard defined by Intel that specifies the operation of Serial ATA (SATA) disk controllers. When it is supported by your operating system and PC hardware, you will get the benefits of features such as native command queuing and hot swapping. For an older OS like Windows XP which does not support AHCI mode out of the box, without OEM-supplied drivers, it is possible to turn on the legacy (IDE) mode in the BIOS to get it to install properly. If your installed your Windows 7 or Windows 8 accidentally in the legacy IDE mode, and want to switch to the AHCI mode, Windows will not boot after you switch from IDE to AHCI in the BIOS. Here is how to fix it.
Advertisеment
First switch SATA to the legacy/IDE mode. Please refer to your motherboard manual to learn the exact location of the SATA options in your BIOS.
In Windows 7
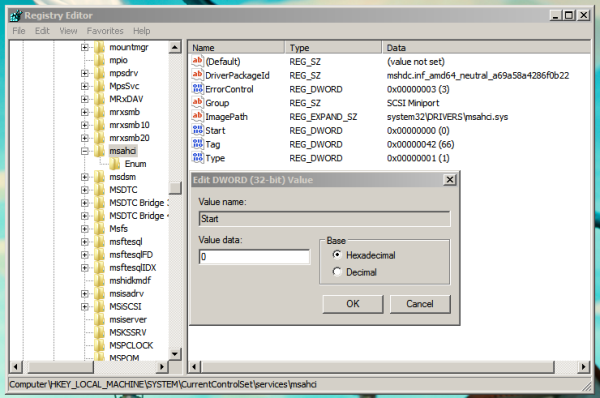
- Open the Registry editor.
- Navigate to the following key
HKEY_LOCAL_MACHINE\SYSTEM\CurrentControlSet\services\msahci
Tip: How to jump to the desired registry key with one click.
- Change the Start DWORD value from 3 to 0 as shown in the picture below.
- Reboot your PC and set the SATA mode to AHCI.
You are done. Now Windows 7 will boot successfully.
In Windows 8 and Windows 8.1
Option one
- Power down or restart the computer and enter the system BIOS.
- Change the ATA Drive setting back to ATA Mode, press enter to accept the change and restart the computer.
- Click Yes to the Warning about the detected mode change on the embedded ATA controller.
- The system will boot normally to the Start screen.
NOTE: Be sure you know the Local Admin account and password and are able to boot successfully before proceeding. - Open an elevated command prompt and run the following command to enable Safe Mode boot:
bcdedit /set {current} safeboot minimal - Restart the computer and boot to the system BIOS.
- Change the ATA Drive setting from ATA/IDE Mode to AHCI Mode, press enter to accept the change.
- Click Yes to the Warning about the detected mode change on the embedded ATA controller.
- The system will boot normally to the Start screen in Safe Mode.
- Open an elevated command prompt and run the following command to remove the Safe Mode boot option:
bcdedit /deletevalue {current} safeboot - Restart the computer and boot normally, the system will boot successfully to the Start screen.
Option two
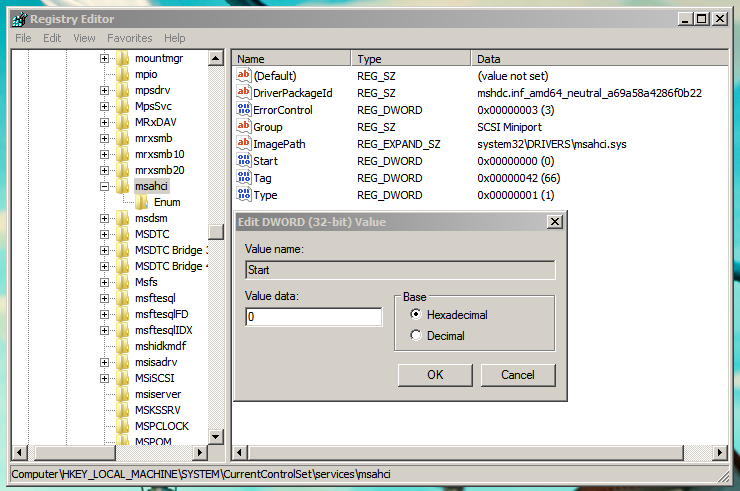
- Open the Registry editor.
- Navigate to the following key
HKEY_LOCAL_MACHINE\SYSTEM\CurrentControlSet\services\storahci
- Change the Start DWORD value from 3 to 0.
- Reboot your PC and set the SATA mode to AHCI.
That's it
Support us
Winaero greatly relies on your support. You can help the site keep bringing you interesting and useful content and software by using these options:

works like a charm! thanks!
you are welcome :)
Works for my Win7 too
Is there a similar trick to switch 8.1 from RAID to AHCI?
–Ed–
Hi Ed
Let me look :)
RAID and AHCI driver is virtually interchangeable. You should be able to change your BIOS from RAID to AHCI without changing anything in windows.
on Windows 8/8.1, how do i lookup the file association online instead of the Windows Store online?
Some Group Policy trick should have.
I will look for the appropriate tweak.
Due to the updated “Open With” dialog, MS has removed the group policy setting to configure the Internet Association service. So, only this can help (3rd party solution): https://winaero.com/blog/get-the-classic-open-with-dialog-on-windows-8-1-and-windows-8-using-openwith-enhanced/
Thanks!
Thanks, Sergey! I appreciate you taking the time to work through the Windows 8 side of things.
Best wishes,
–Ed–
Like a charm, mate, thanks !!!!
Does it have any side effect when i doing this tweak? Like any driver issue?
AFAIK, no, it does not have any side effect.
Hey thanks so much for this tutorial ;)
it works! xD
Please note that AHCI device driver has to be already installed before applying fix
otherwise this will not work.
Huh I already had that Start value set to 0 without me changing it and I’m on IDE. How is that possible?
Does it work with Windows 10?
It should work.
doesn’t work for windows 7, the default value for “Start” is already 0
Thanks, solution for windows 7 works!
It’s working !!! Thank you… Matursuwunsanget !!!
Thanks it worked!
DUDE IVE BEEN TRYING TO CHANGE THIS LEGACY TO AHCI FOR WEEKS. I KEEP GETTING THE SAME ERROR MSN. WHEN I CHANGE THE PC TO AHCI THE WINDOW ICON SHOWS UP UT THEN RESTART IT SELF. ANY ASSISTANCE PLEASE
After two days of internet digging and countless failed experiments of all suggested methods, found a simple solutions by myself. Make sure you know how to enter Bios Setup before entering windows (ie: by disabling secure boot, etc).
1) Boot normally (in IDE mode), go to Device Manager, uninstall all IDE/ATAPI controllers, starting from bottom to top, don’t restart when offered.
2) Reboot and go to BIOS setup: Change to AHCI mode.
3) Windows will boot and install or request new drivers automatically.
For upgrading motherboard:
2) Change to new motherboard.
I do have similar problem, but another way! Disk contain installed Windows 7, but “replacement” laptop has no AHCI mode in BIOS (Dell XPS M1710)! What should be done?
Great procedure but I don’t have a masachi or lastorV keys in my registry. I found other places that list ATAPI that I do have. One post also suggests pciide setting which I do have.
I even tried to go in and delete the controllers and that worked except for the last two, it would not allow me to delete them.
HELP I am still getting the 7b and my board does not have a IDE or SATA option.