Windows Defender is the built-in security solution in Windows 10. It provides basic protection against threats. Earlier versions of Windows like Windows 8.1, Windows 8, Windows 7 and Vista also had it but it was less efficient previously as it only scanned spyware and adware. In Windows 8 and Windows 10, Defender is based on the Microsoft Security Essentials app which offers better protection by adding full blown protection against all kinds of malware. Today, we will see how to schedule a scan in Windows Defender Antivirus in Windows 10.
Advertisеment
Over the Windows 10 lifecycle, Microsoft has improved Defender in many ways and enhanced it with numerous features such as Advanced Threat Protection, Network Drive Scanning, Limited Periodic Scanning, Offline Scanning, the Security Center dashboard and Exploit Protection (previously offered by EMET).
Don't be confused between Windows Defender and its related user interfaces such as Windows Defender Security Center. Windows Defender remains the built-in anti-virus software which provides real-time protection against threats based on malware definition files/signatures.
Whereas Windows Defender Security Center app is only a dashboard which allows you to track the protection state of several other Windows security technologies. It can be used to configure various security options like SmartScreen. Defender Security Center is what opens now when you click its icon in the system tray.
To schedule a new scan in Windows Defender in Windows 10, do the following.
- In the Start menu, go to Administrative Tools - Task Scheduler.
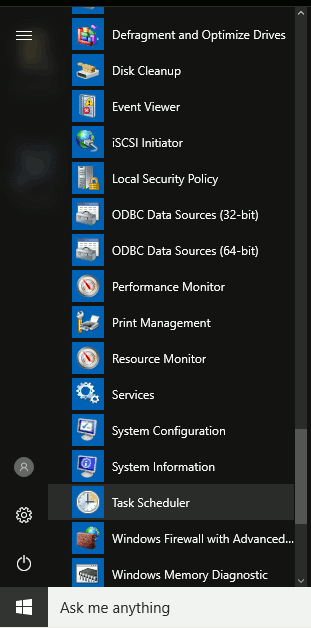
- In Task Scheduler go to Library - Microsoft - Windows - Windows Defender.
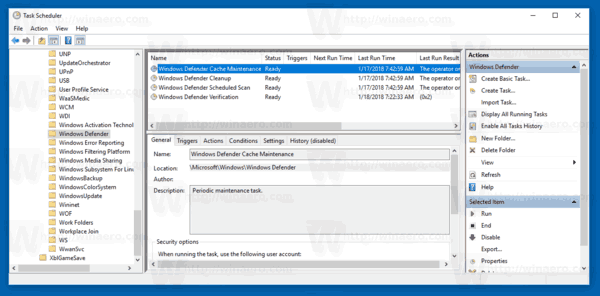
- Double click the task named "Windows Defender Scheduled Scan".
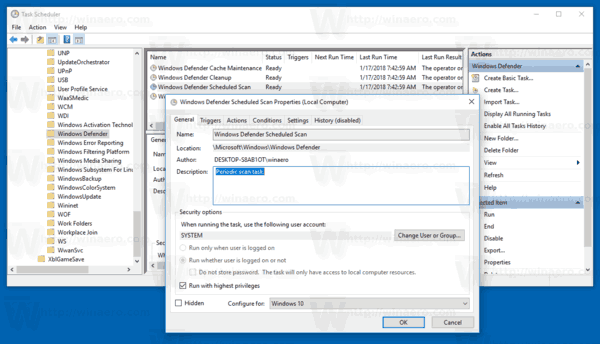
- On the Triggers tab, and click/tap on the New button.
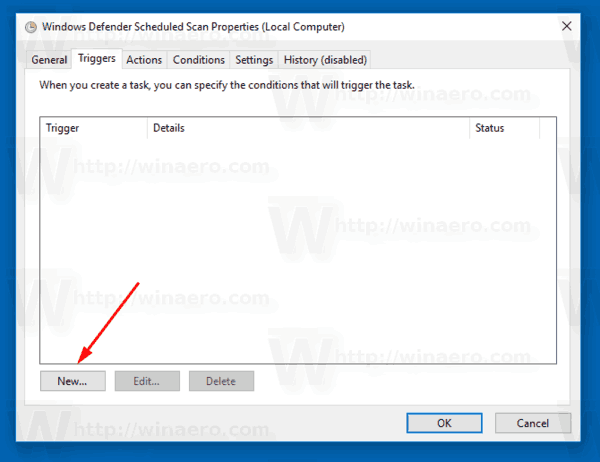
- Specify the type as "On a schedule" and set the desired time intervals.
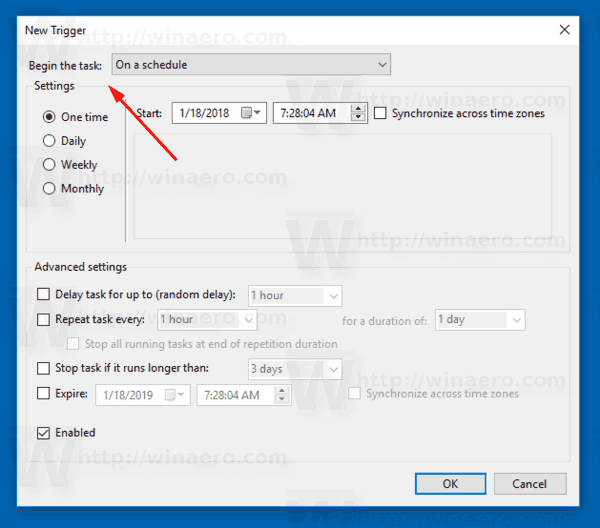
- Click OK in all open windows and you are done.
Alternatively, you can create a custom scheduled task with a custom schedule.
Use one of following commands:
"C:\Program Files\Windows Defender\MpCmdRun.exe" /Scan ScanType 2
This will start Windows Defender in console mode.
To see the GUI during the scan, use the command:
"C:\Program Files\Windows Defender\MSASCui.exe" -FullScan
Refer to the following article for details:
Create a shortcut for Windows Defender Full Scan in Windows 10
That's it.
Support us
Winaero greatly relies on your support. You can help the site keep bringing you interesting and useful content and software by using these options:

How do you STOP defender auto scan ??? I have disabled it in task scheduler but it still scans 2 times a week and stops my mining software saying it is a virus.
See
Find All Automatic Maintenance Tasks in Windows 10
Disable Automatic Computer Maintenance in Windows 10