Starting with Windows 10 Fall Creators Update, it is possible to limit Background Windows Update bandwidth and prevent Windows 10 from using all of your Internet connection to download huge updates. Let's see how to configure this useful feature.
Advertisеment
As you may already know, there is a way to defer upgrades in Windows 10. The user can defer feature updates to prevent a new build from being installed, or postpone quality updates. There is also an option to switch the update branch from "Current Branch" to "Current Branch for Business" which receives updates much later. However, deferring updates does not change the fact that the updates are quite large and have to be installed sooner or later.
Windows 10 Fall Creators Update, known as version 1709, also adds the ability to limit the bandwidth available for Windows Update. So, when updating, Windows 10 will not kill your Internet speed, and you will be able to browse web sites, stream videos and do everything that requires bandwidth. This option will be much appreciated by users with a slow Internet connection.
Windows Update has always used Background Intelligent Transfer Service (BITS) to download updates. BITS uses idle bandwidth to get them, so in theory, if you are actively using your internet for something else, the algorithm for downloading of updates should sense this and back off or lower its bandwidth consumption. However, due to the size and frequency of Windows 10 updates, this does not seem to actually work as well on the latest OS, compared to previous releases of Windows. Many users have been complaining that Windows 10 updates disrupt their online activities too much. The newly added option to control the bandwidth should appease some of these complaints.
The below information is outdated. If you are running Windows 10 build 17035 and above, you can set the background and foreground Windows Update limit separately. You should refer to the updated tutorial here:
Limit Windows Update Bandwidth in Windows 10
You can find your Windows 10 build number by following these steps.
To Limit Background Windows Update Bandwidth in Windows 10, do the following.
- Open the Settings app.

- Go to Update & security -> Windows Update.
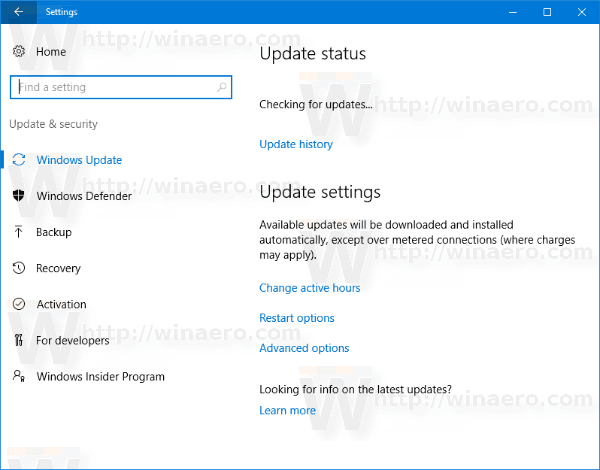
- On the right, click Advanced options.

- On the next page, click the link Delivery Optimization at the bottom. See the screenshot below:
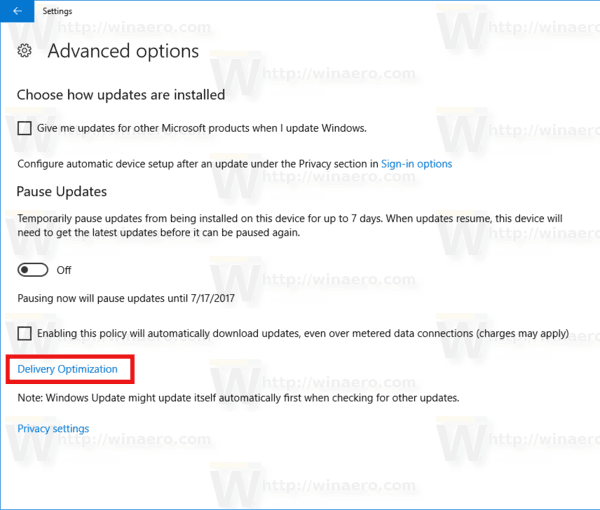
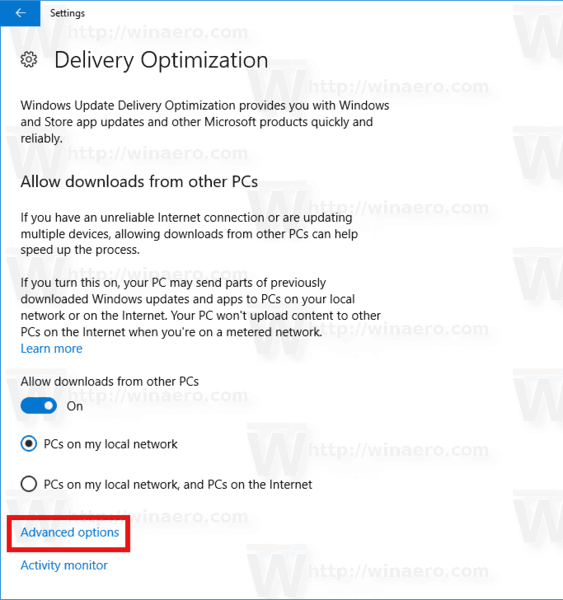
- At the bottom of the Delivery Optimization page, click the link Advanced options.
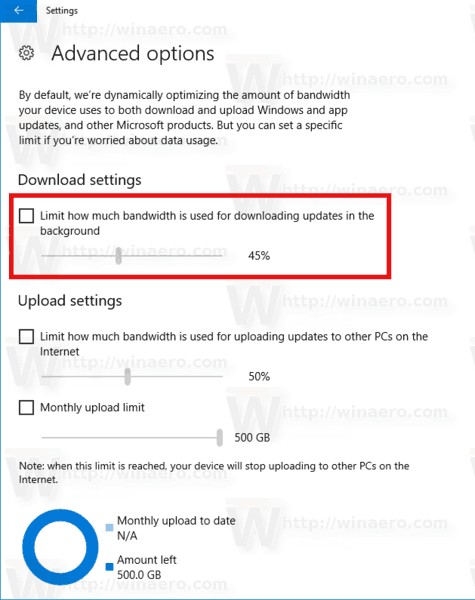
- On the page Advanced options, configure the options provided under Download settings. The first slider on the screenshot below is responsible for the download bandwidth limit.
That's it.
Tip: On the Delivery Optimization page, there is a link "Activity monitor".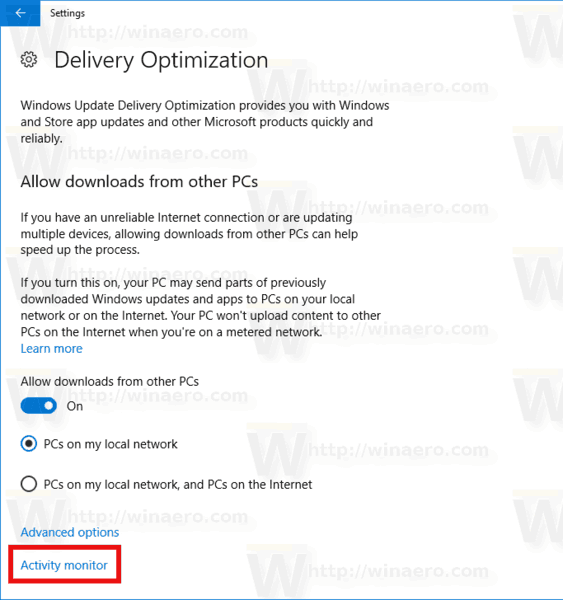 It opens the following page:
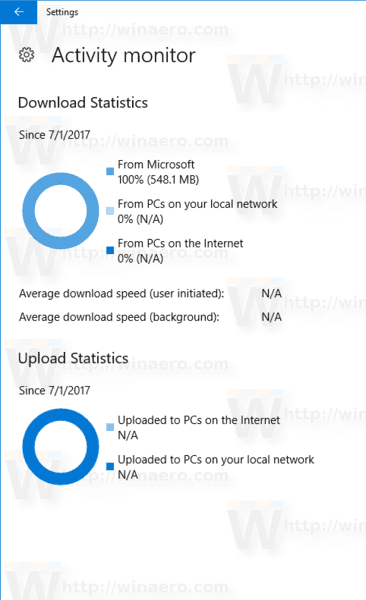
There, you can see a nice view of your traffic stats related to Windows Update.
Here is how to configure this feature with a Registry tweak.
Limit Windows Update Bandwidth with a Registry Tweak
You need to sign in as Administrator before proceeding.
- Open the Registry Editor app.
- Go to the following Registry key.
HKEY_LOCAL_MACHINE\SOFTWARE\Microsoft\Windows\CurrentVersion\DeliveryOptimization\Settings
See how to go to a Registry key with one click.
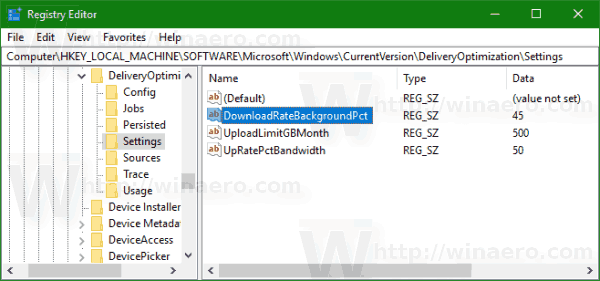
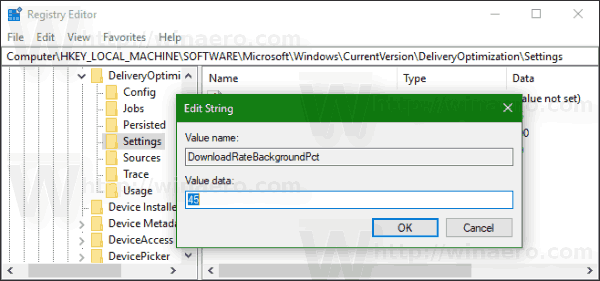
- On the right, modify or create a new string value DownloadRateBackgroundPct.
- Set its value data to a number between 5 and 100 for the percentage of bandwidth you want to limit Windows Update to.
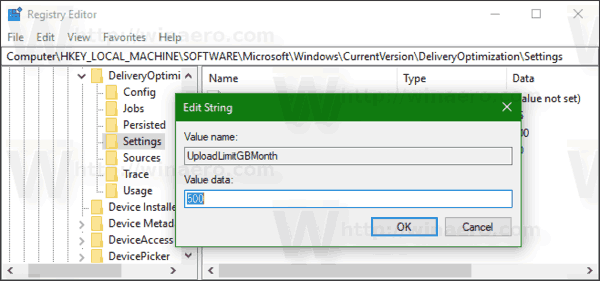
- To set the limit for the bandwidth used for updates uploaded to other PCs, modify or create a string value UpRatePctBandwidth. Again, set its value to a number between 5 and 100.
- To change the monthly upload limit, modify the string value UploadLimitGBMonth. Enter a number between 5 and 500 to set the amount of GBs as the monthly upload limit.
- Restart Windows 10.
Many thanks to Nick of TheCollectorsBook for tipping us.
Support us
Winaero greatly relies on your support. You can help the site keep bringing you interesting and useful content and software by using these options:

That’s a good one. 4GB download eachtime seems nothing to MS but definitely is to few atleast. :)
Thanks Sergey!
Yep, very good feature.
There is no Options in Delivery Options
PCs on my network
There is NO:
Advanced Options
Activity Monitor
Because they are available starting with Windows 10 Fall Creators Update, version 1709, as mentioned in the article.
To access this feature, you need to install Windows 10 build 16237 or above.
Well that i know am in the SLOW insider 16232
Will they be available on Home version of Windows 10 Fall Creators Update, version 1709?
Time will tell.
Thanks for the article!
I noticed the limit is set using %.
This seems to assume that Windows knows a computer’s bandwidth towards the Internet. Does it? Because the “bandwith” numbers I see in Windows usually refers to network card capacity. And I can’t imagine many people had a problem with their network card being overloaded. But I know that A LOT of people are having trouble with their Internet connection being overloaded.
A normal usecase is probably a Gigabit network card and something like a 5 Mbit/s bandwidth on Internet traffic, rate limited by an external third party from Windows perspective (our network provider).
So potentially important question:
Is there a way to tell windows what to base this %-value on (e.g; 100% = 8Mbit/s)?
Or even better, can we set this Update Bandwidth value using Mbit/sek instead? A key called “DownloadRateBackground” or “DownloadRateBackgroundMbps” perhaps?
I would say the option is percentages due to the fact that it would be using BITS to shape traffic, and hence it is percentage of available traffic. But that doesn’t mean exactly what it means in English either. BITS traffic is shaped over time, so 50% is full speed available for 50% of a time period, and then no traffic for the remainder time period.
Is there a way to turn this off completly either with windows 10 the creators Update. 1709 or in the registry or the group Policy I have the pro version. I don’t want to share any of my bandwidth with anyone