Windows 10 is well known for forced updates and the extremely inopportune times at which it downloads them, installs them and restarts your PC. Only Enterprise editions of the Windows 10 operating system have the ability to control how updates are delivered and installed. Home editions and the Pro edition of Windows 10 as well are locked down to get updates whenever Microsoft decides to push them out. A huge number of users are not happy with this behavior. Here is a method that will allow you to install updates when you manually check for them. This will disable automatic updates.
Advertisеment
A new method has been discovered which reliably stops Windows 10 from downloading and installing updates automatically. Let's see how it can be done.

To install Windows 10 updates manually, do the following.
- Open a new elevated command prompt.
- Type or copy-paste the following command:
takeown /f "%windir%\System32\UsoClient.exe" /a
- Now, run the following command:
icacls "%windir%\System32\UsoClient.exe" /inheritance:r /remove "Administrators" "Authenticated Users" "Users" "System"
The procedure mentioned above disables automatic updates in all recent builds of Windows 10.
You will be able to check for updates and install them manually using the Settings app. See the following article:
Create a Check for updates shortcut in Windows 10
In short, you can go to Settings - Update & recovery - Windows Update and click "Check for updates" on the right. Alternatively, you can type this ms-settings command in the Run dialog to start the update check directly.
ms-settings:windowsupdate-action
How does it work
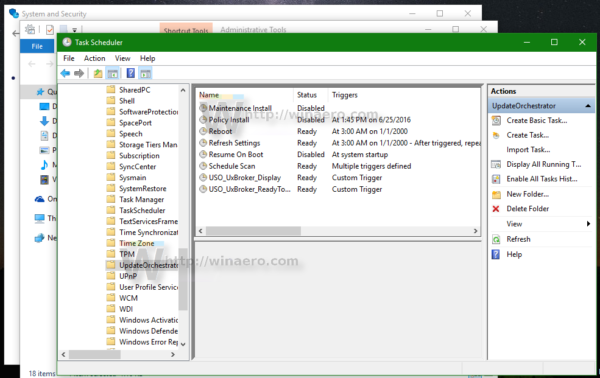
If you are reading Winaero daily, you must be familiar with the UpdateOrchestrator task group. The group was reviewed in the article "How to permanently stop Windows 10 reboots after installing updates".It can be found in Task Scheduler under Task Scheduler Library \ Microsoft \ Windows \ UpdateOrchestrator.

The Schedule Scan task calls a special binary file, C:\Windows\System32\UsoClient.exe, which performs the update operation in the background and restarts the operating system automatically when required.
By executing the takeown command, we simply changed the file system ownership of this file from Trusted Installer to the Administrators group.
The next command, icacls, removes the inherited file system permissions along with permissions for the following groups: "Administrators" "Authenticated Users" "Users" "System".
So, nobody can launch UsoClient.exe any more, and the OS won't be able to install updates automatically or download them. But if you open the Settings app, you should still be able to manually check for them.
How to undo the change
To undo changes you have made, do the following.
- Open a new elevated command prompt.
- Type or copy-paste the following command:
icacls "%windir%\System32\UsoClient.exe" /reset
- Restore the TrustedInstaller ownership. You can safely omit this step.
Note: This method can stop working at any moment. Any major or minor update to the OS can change the way Windows 10 is receiving updates, so keep this in mind.
It's a shame that we have to use such a complicated trick to stop Windows 10 from downloading huge forced updates. This option should be available out-of-the-box and no one should have to incur the bandwidth costs of frequent huge updates.
Source: Deskmodder.de.
Support us
Winaero greatly relies on your support. You can help the site keep bringing you interesting and useful content and software by using these options:

Sergey,
Under “Services” I changed “Windows Update” to “Disabled” and then I manually update as I need to. Even though Windows Update is disabled under Services, Windows Defender definition updates still make it through. Is there a reason I should do the (somewhat) more complicated procedure you detail in your post? Thank you!
Reportedly, Windows 10 is able to re-enable the Windows Update service.
There’s a typo in How To Undo The Change
icalcs “%windir%\System32\UsoClient.exe” /reset
should be
icacls …
Thanks
One way to prevent Windows from downloading every update — at least for now, at least until Microsoft reads this and decides to again give its users what they don’t want — is outside of the updates settings. Set your connection as metered.
Doing that may also affect some other apps that use bandwidth casually, for instance the Microsoft Office applications Outlook and OneNote. And you will want to download those updates at some point and install them.
Go to Settings, Network & Internet, and then either Status, Ethernet, or Wi-Fi.
From Status, choose Change connection properties, Set as metered connection On.
From Wi-Fi, go to Manage known networks, and select the ones you want to be metered and change their properties (Set as metered connection On).
From Ethernet, select the network and Set as metered connection On. However, some report this doesn’t work properly for Ethernet.
As a variation on this, you can limit the bandwidth of Windows update processes manually —
https://www.reddit.com/r/Windows10/comments/4t0l8r/windows_update_hogging_bandwidth/
I.e., use a tool like NetLimiter and limit the bandwidth of Host Process for Windows Services — which will also slow down transfers from the Windows Store, although I rarely use that.
Or change the router settings to limit bandwidth —
https://www.laptopmag.com/articles/change-your-routers-quality-of-service-qos-settings-how-to
Or more advanced, edit the group polices. The group policy editor though is not included in Windows Home. Local Computer Policy > Computer Configuration > Administrative Templates > Network > Background Intelligent Transfer Service (BITS), and throttle the bandwidth.
It looks like Microsoft removed the feature from Settings that allowed people to pause updates for 35 days. Thanks a lot, Microsoft.
I’m getting an “access is denied” error when running this update on win 10 version 1709 (build 16299.309). Is this normal?
I’m getting an “access is denied” error when running this update on win 10 version 1709 (build 16299.309). Is this normal?
I tried undoing the change made in an earlier version of Winaero by running the command prombt as administrator
icacls “%windir%\System32\UsoClient.exe” /reset
However, I get access denied.