How to Clear and Reset External Display Cache in Windows 10
If you have multiple displays or an external projector, you might find the built-in feature of Windows 10 to change the active display and the sharing mode of your current desktop useful. The feature called Project allows the user to have only the primary screen enabled, duplicate it on a second display, extend it across all displays, or use the second screen only.
Advertisеment
The Project feature in Windows 10 offers the following modes:
- PC screen only
Only the primary display is enabled. All other connected displays will be inactive. Once you connect a wireless projector, this option changes its name to Disconnect. - Duplicate
Duplicates the primary display on the second display. - Extend
Your desktop will be extended across the all connected monitors. - Second screen only
The primary display will be disabled. Use this option to switch to the external display only.
You can set individual display mode and resolution for each display connected to your PC, laptop or other Windows 10 device. The operating system remembers these settings by storing them in a cache and applies them every time you connect the earlier configured monitor. This is very time saving, as you don't need to reconfigure an external display once you connect it.

The external display cache is stored in the Registry. If it gets corrupted, the display output may stop working as expected when you connect to an external monitor. In this case, you can try to reset (clear) the display cache. This will force the OS to forget connected external monitors and all their settings. Here's how it can be done.
Note: To clear and reset the display cache in Windows 10, you must be signed in with an administrative account.
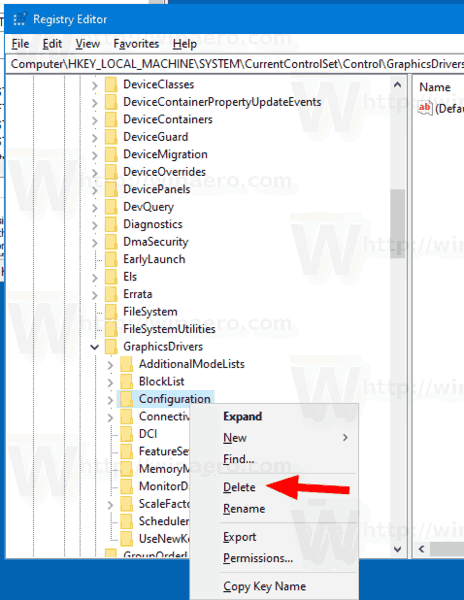
To Clear and Reset External Display Cache in Windows 10,
- Open the Registry Editor app.
- Go to the following Registry key:
HKEY_LOCAL_MACHINE\SYSTEM\CurrentControlSet\Control\GraphicsDrivers\
See how to go to a Registry key with one click. - Right-click on the subkey Configuration and select Delete from the context menu.

- Now, delete two other subkeys, Connectivity and ScaleFactors.
- Restart Windows 10 to make the changes done by the Registry tweak take effect.
You are done!
To save your time, you can download the following ready-to-use Registry file. This will allow you to clear and reset the display cache with a couple of clicks without editing the Registry manually.
That's it.
Articles of interest:
- Change Display Resolution in Windows 10
- Create Switch Display Shortcut in Windows 10
- Configure multiple displays in Windows 10
Support us
Winaero greatly relies on your support. You can help the site keep bringing you interesting and useful content and software by using these options:

Hello,
I followed your instructions exactly, because I was told the solution to my problem was to delete display cache. Now that I’ve done that though, my problem has gotten worse. One of monitors has no cache at all. Prior to deleting the cache, I was getting 4k at 60hz on one monitor and 4k at 30hz on the other. Now I’m getting 4k 30hz and 1080p on the other. Please help.
Hi
What if you change their settings back to normal manually?
I followed these steps with some apprehension but it worked great! Both my external displays function well now. Wish I had found this page before spending 2h trying to troubleshoot on my own. I’m not really sure what deleting these three items did, but hopefully no negative ramifications. Thank you.