In Windows 10, you can make the operating system to search for certain file types or prevent the search feature from accessing them. This can be done by changing the Search index options. In this article, we will see how it can be done.
Advertisеment
As you may already know, search results in Windows are instant because they are powered by the Windows Search indexer. It is not new to Windows 10, but Windows 10 uses the same indexer-powered search like its predecessors although it uses a different algorithm and a different database. It runs as a service that indexes file names, contents and properties of file system items and stores them in a special database. There is a designated list of indexed locations in Windows, plus Libraries which are always indexed. So, instead of performing a real-time search through files on the file system, the search performs a query to the internal database, which allows showing results immediately.
If this index becomes corrupted, Search doesn't work properly. In our previous article, we reviewed how to reset the search index in case of corruption. See the article:
How to Reset Search in Windows 10
Windows Search is capable of indexing not just the file name but also the metadata/properties of files (in case of pictures, videos, documents etc) and their full contents (when the documents are not plain-text but in some binary format such as DOC or PDF). The File Types tab of Advanced Indexing Options can be used to include or exclude certain file types from search and their contents and properties. Let's see how it can be done.
To add a file type to search in Windows 10, do the following.
- Open the Control Panel.
- Now, open Indexing Options by typing indexing options in the search box of the Control Panel, and then click the settings item Indexing Options.

- The Indexing Options applet will open.
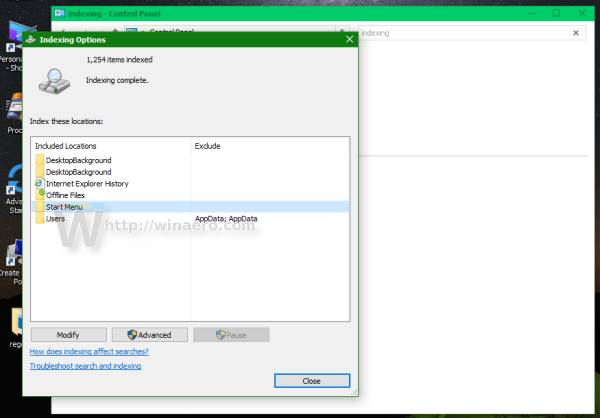
- Click the Advanced button.
 The following window will appear.
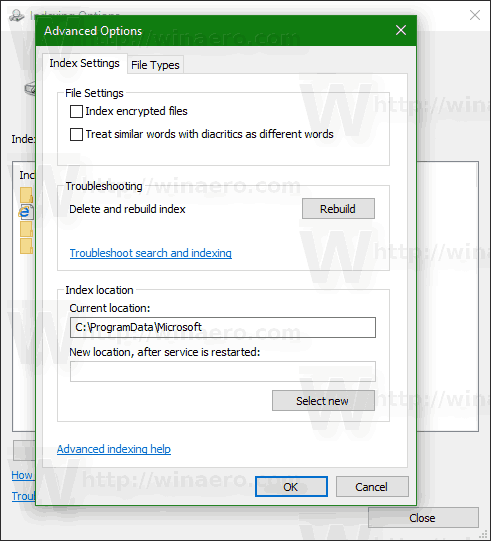
- Go to the File Types tab. There, type a new extension in the text box under Add new extension to list to add it to the list of indexed file types.
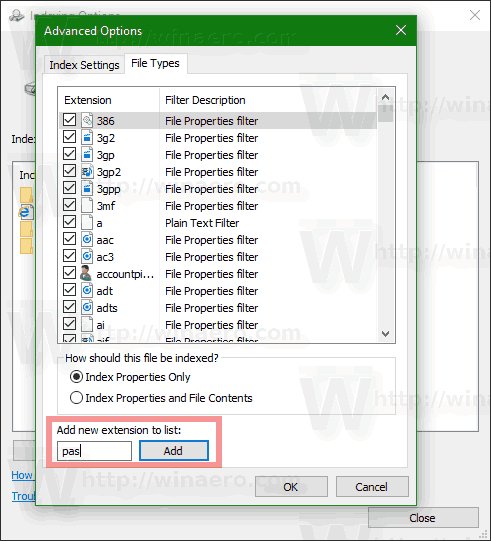
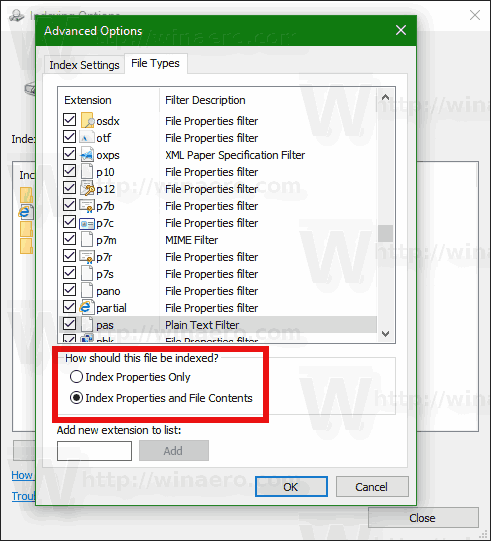
- Select the file extension you have added and set one of the following options:
- Index Properties Only - Windows will include only file system meta data like file name, date, author, etc in the index.
- Index Properties and File Contents - Along with file system meta data, the file contents and extra file properties will be included in the index. This makes the search index large and slower, but more efficient if you often search for file contents.
- Click the OK button to apply your changes and close the dialog.
You are done.
Tip: to learn more about the Index Properties and File Contents option, refer to the following article:
How to search your entire PC including file contents and launch anything using Classic Shell
Read the "Understand Windows IFilters and Property Handlers and how they extend your system's ability to search" part.
To remove a file type from search in Windows 10, do the following.
- Open the Control Panel.
- Now, open Indexing Options by typing indexing options in the search box of the Control Panel, and then click the settings item Indexing Options.

- The Indexing Options applet will open.

- Click the Advanced button.
 The following window will appear.
- Go to the File Types tab.
- Select the file extension you would like to remove from the search index and uncheck it.
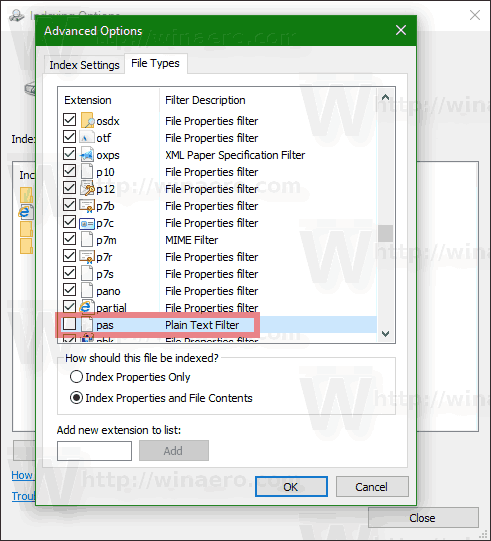
- Click the OK button to apply your changes and close the dialog.
Note: Sometimes Windows does not apply changes your made to Search Index instantly. If you are affected by this issue, rebuild the search index manually.
Tip: You can add a custom folder to the index in order to search for its contents faster. See the article How to Add Folder to Search Index in Windows 10.
That's it.
Support us
Winaero greatly relies on your support. You can help the site keep bringing you interesting and useful content and software by using these options:
