How to Add the Project Display Context Menu in Windows 10
If you have multiple displays or an external projector, you might find it useful to add a special context menu to quickly switch mode for multiple displays in Windows 10. It will use the built-in Project Display feature of Windows 10 which allows the user to have only the primary screen enabled, duplicate it on a second display, extend it across all displays, or use the second screen only.
Advertisеment
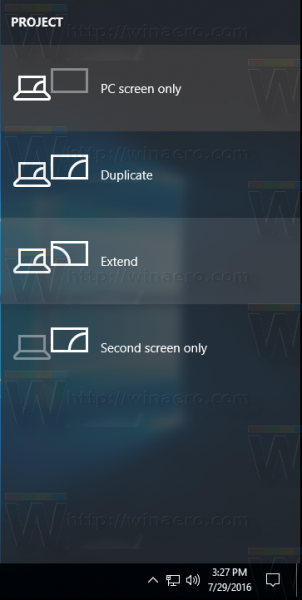
The Project feature in Windows 10 offers the following modes:
- PC screen only
Only the primary display is enabled. All other connected displays will be inactive. Once you connect a wireless projector, this option changes its name to Disconnect. - Duplicate
Duplicates the primary display on the second display. - Extend
Your desktop will be extended across the all connected monitors. - Second screen only
The primary display will be disabled. Use this option to switch to the external display only.
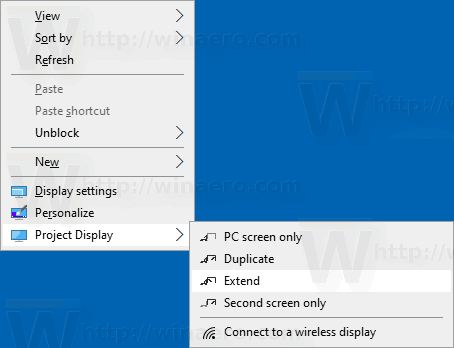
You can create a shortcut to activate any of these 4 settings. Similarly, you can create a context menu to integrate the Project Display feature directly with the desktop context menu. Here's how it can be done.
You must be signed in with an administrative account to be able to add the menu.
To Add the Project Display Context Menu in Windows 10,
- Download the following ZIP archive: Download ZIP archive.
- Extract its contents to any folder. You can place the files directly to the Desktop.
- Unblock the files.
- Double click on the Add Project Display To Desktop Context Menu.reg file to merge it.
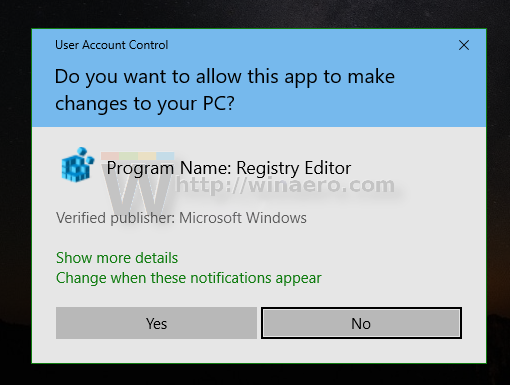
- If you are using a dark theme in Windows 10, I suggest you to apply the Add Project Display Desktop Context Menu - For Dark Theme In Windows 10.reg file instead.
- To remove the entry from the context menu, use the provided file Remove Project Display From Desktop Context Menu.reg.
You are done!
How it works
The Registry files above modify the Registry branch
HKEY_CLASSES_ROOT\DesktopBackground\Shell\ProjectDisplay
Tip: See how to go to a Registry key with one click.
For the Project Display entries, the context menu calls the following commands:
-
DisplaySwitch.exe /internal- The /internal argument is used to switch your PC to use the primary display only. -
DisplaySwitch.exe /external- Use this command to switch to the external display only. -
DisplaySwitch.exe /clone- Duplicates the primary display. -
DisplaySwitch.exe /extend- Expands your Desktop to the secondary display.
For the 'Connect to a wireless display command' the context menu entry executes the following ms-settings command:
ms-settings-connectabledevices:devicediscovery
See following article to learn how to add any Settings page to the context menu:
Add Settings Context Menu In Windows 10
That's it.
Articles of interest:
- Clear and Reset External Display Cache in Windows 10
- Change Display Resolution in Windows 10
- Create Switch Display Shortcut in Windows 10
- Configure multiple displays in Windows 10
Support us
Winaero greatly relies on your support. You can help the site keep bringing you interesting and useful content and software by using these options:

https://winaero.com/blog/switch-between-multiple-displays-monitors-directly-with-a-shortcut-or-from-the-command-line-in-windows-7-and-windows-8/
Indeed. The same trick but for the context menu.
Fixed the issue. The registry key values are wrong. Edited it.
I see. I have updated the files (changed path delimiters to \\).
Thank you very much Timea!
Nothing happens when I select an option.
LTSC 2019 x64
Windows + P works fine.
Same here, working if I enter the command on a command prompt but not working with the registry keys.
My account is admin account.
It doesn’t work, you press any selected item, and nothing happens.
replace “%windir%\\System32\\DisplaySwitch.exe” with “C:\Windows\System32\\DisplaySwitch.exe”