How to Add Allow Sleep with Remote Opens to Power Option in Windows 10
Windows 10 comes with a useful, but hidden power option, Allow sleep with open remote files. When enabled, it makes the network file system prevent the computer from automatically entering sleep when remote network files are open. Here's how to make it visible and accessible from Windows 10 Power Options.
Advertisеment
The option Allow Sleep with Remote Opens is available in Windows Vista and later versions of Windows.

Depending on your hardware, it can be switched to one of the following modes.
- On - Prevents automatic sleep when remote network files are open. However, if the open files are stored in Offline Files or the open files have not been updated since they were originally opened, automatic sleep is allowed.
- Off - Prevents automatic sleep when remote network files are open. However, if the open files are stored in Offline Files and are backed by the Offline File cache, automatic sleep is allowed.
By default, it is hidden in Power Options, so you can enable it as described below.
You can add or remove it from Power Options using either a Registry tweak or powercfg. In this article, we will review both methods.
To Add Allow Sleep with Remote Opens to Power Option in Windows 10,
- Open an elevated command prompt.
- Add Type or copy-paste the following command:
powercfg -attributes SUB_SLEEP d4c1d4c8-d5cc-43d3-b83e-fc51215cb04d -ATTRIB_HIDE.
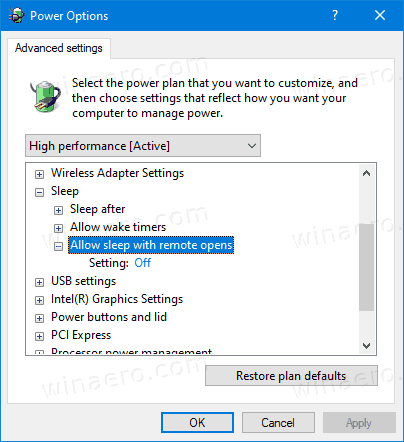
- Allow sleep with remote opens is now available in the Power options applet.
- To undo the change, use the following command:
powercfg -attributes SUB_SLEEP d4c1d4c8-d5cc-43d3-b83e-fc51215cb04d +ATTRIB_HIDE
You are done. On the following screenshot, the Allow sleep with remote opens option is added to Power Options.

If you have a laptop, you will be able to set this parameter individually when on battery and when plugged in.
Alternatively, you can apply a Registry tweak.
Add Allow sleep with remote opens in Registry
- Open Registry Editor.
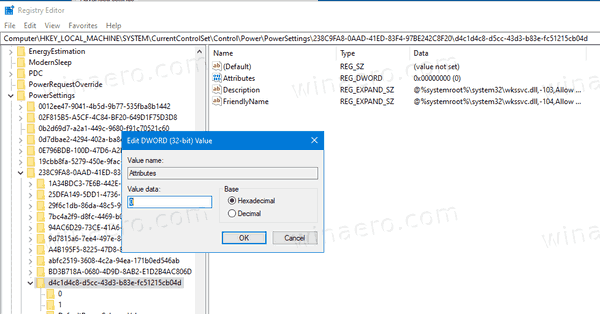
- Go to the following key:
HKEY_LOCAL_MACHINE\SYSTEM\CurrentControlSet\Control\Power\PowerSettings\238C9FA8-0AAD-41ED-83F4-97BE242C8F20\d4c1d4c8-d5cc-43d3-b83e-fc51215cb04d.Tip: You can access any desired Registry key with one click. - In the right pane, change the Attributes 32-bit DWORD value to 0 to add it. See the following screenshot:

- Once you make these changes, the setting will appear in Power Options.
- A value data of 1 will remove the option.
You are done!
Tip: you can open advanced settings of a power plan directly in Windows 10.
To save your time, you can download these ready-to-use Registry files:
That's it.
Support us
Winaero greatly relies on your support. You can help the site keep bringing you interesting and useful content and software by using these options:
