Today, we will learn how to manage Clipboard History on Windows 11: enable, disable it, pin and unpin its items, and paste them as plain text. The clipboard history feature in Windows 11 allows users to store multiple items that have been copied, including text, HTML content, and images. Each entry is limited to a maximum size of 4 MB. The system retains up to 25 recent entries, with older ones being removed automatically unless they are explicitly pinned by the user.
Advertisеment
By storing the copy history, Windows 11 allows you to have a late access to various text and image data you have been working during the day. You can paste that data at a later time. In addition, you can select entries for being pinned for long-term availability. The feature also supports synchronization across devices that run under the same Microsoft account. However, this feature must first be enabled by the user.
It is important to note that each entry in clipboard history has a size limit of 4 MB and only retains up to 25 most recent items. Unpinned items are cleared upon system restart unless explicitly retained through policy settings.
Let's start with the basic configuration and learn how to turn on or off the useful clipboard history.
Enable or Disable Clipboard History in Windows 11
There are multiple ways to activate it or turn it off. You can use the Settings app, Registry, and even keyboard hotkeys. We will carefully review each of the methods.
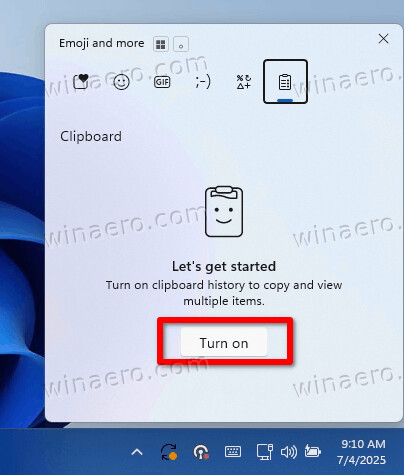
Method One: Enable or Disable Clipboard History Using Win + V Shortcut
- Press the keyboard combination Win + V to open the clipboard history window.
- If the clipboard history feature is currently disabled, a prompt will appear stating that it is off and offering an option to turn it on.
- Click the Turn On button to activate clipboard history for the current user.
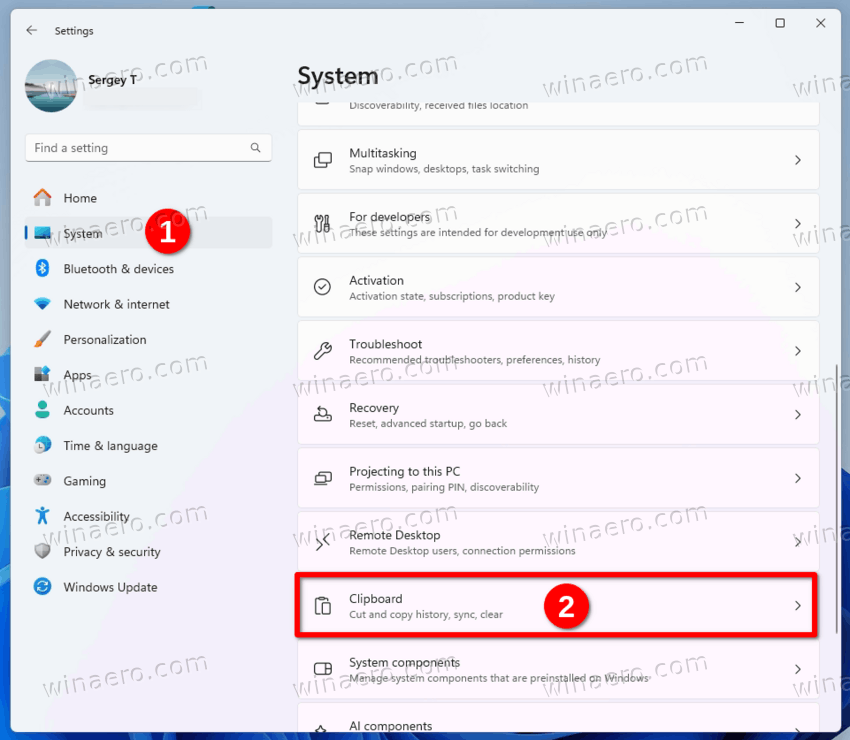
Method Two: Configure Clipboard History via Settings
- Launch the Settings application by pressing Win + I.
- In the left-side navigation pane, select System. In the right-side panel, click Clipboard.
- Locate the Clipboard history toggle switch and set it to On or Off, depending on your preference.
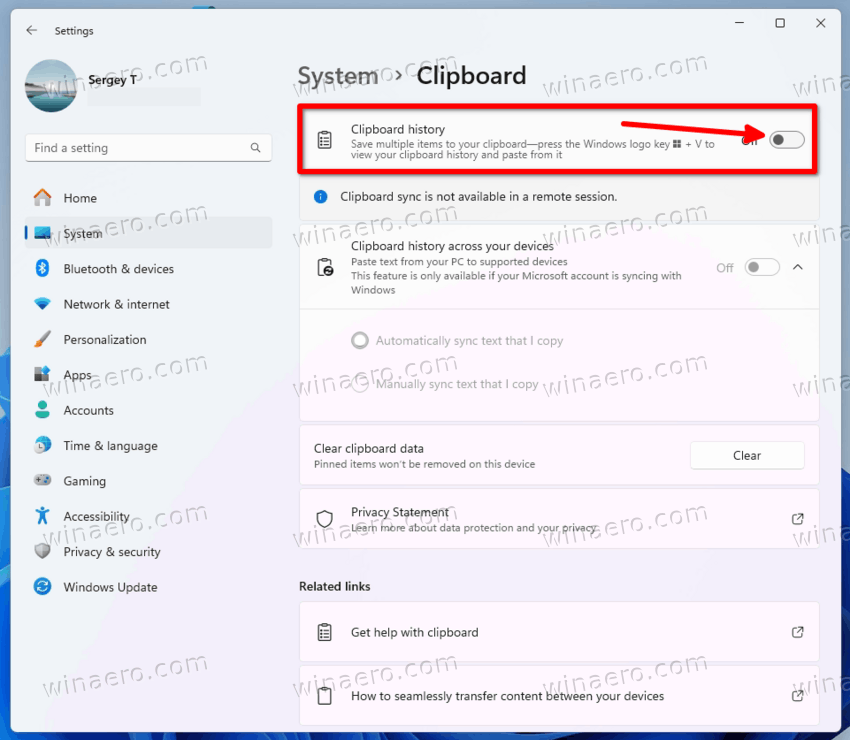
- Note that disabling clipboard history through this interface will remove all previously stored clipboard content and unpinned items from the system.
- You may now close the Settings app if no further configuration is required.
Method Three: Modify Clipboard History Option for Current User via Registry File
This method allows you to configure clipboard history by modifying registry values. It is suitable for advanced users who prefer automation or batch deployment options.
- Download the ZIP archive containing two REG files.
- Depending on what do you want, extract either
turn on clipboard history for current user.regorturn off clipboard history for current user.reg, or both.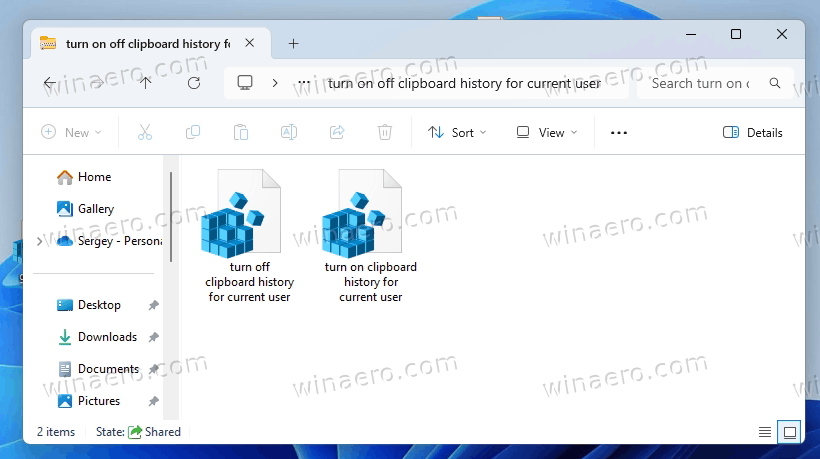
- Double-click the extracted file to merge it into the system registry.
- When prompted by the User Account Control dialog, confirm the action by clicking Yes or Run as applicable.
- Click OK or Yes to complete the registry modification process.
- After merging the file, restart the computer or sign out and back in to apply the changes.
- Once applied, you may delete the registry file to maintain a clean workspace.
That's it.
You may be wondering how these REG files work. Here are the details.
How do the REG files work
The REG files you have downloaded change the EnableClipboardHistory 32-bit DWORD value under the HKEY_CURRENT_USER\Software\Microsoft\Clipboard key. It supports the following data.
If EnableClipboardHistory is set to 0, this means the the Clipboard History feature is disabled. This is the default value.
When you change the EnableClipboardHistory value data to 1, this turns on Clipboard History. That's it!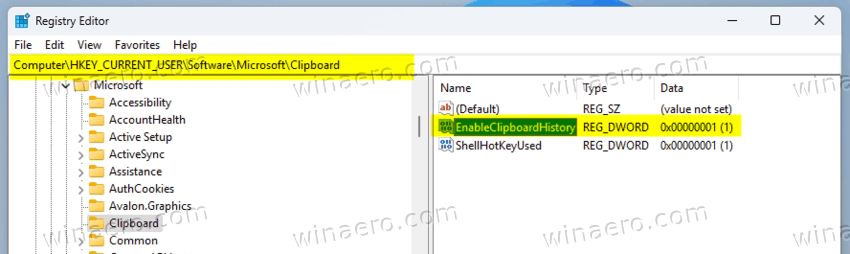
Also, administrators managing Windows 11 Pro, Enterprise, or Education editions, can control clipboard history using the Local Group Policy Editor.
Method Four: Configure Clipboard History for All Users via Local Group Policy Editor
This method applies to all standard user accounts and takes precedence over individual settings.
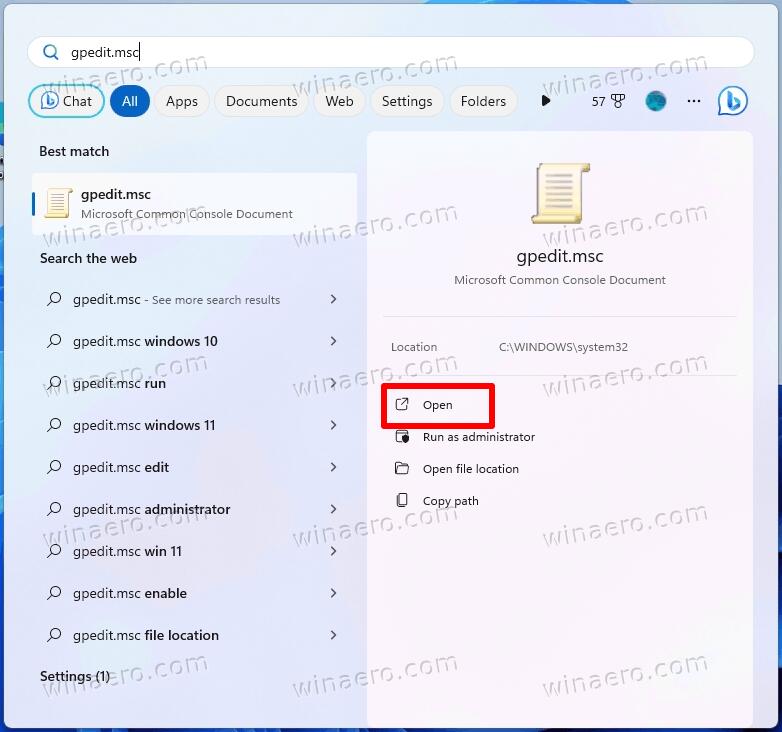
- Open the Local Group Policy Editor by typing gpedit.msc in Windows Search box in the taskbar or directly in the Start menu.
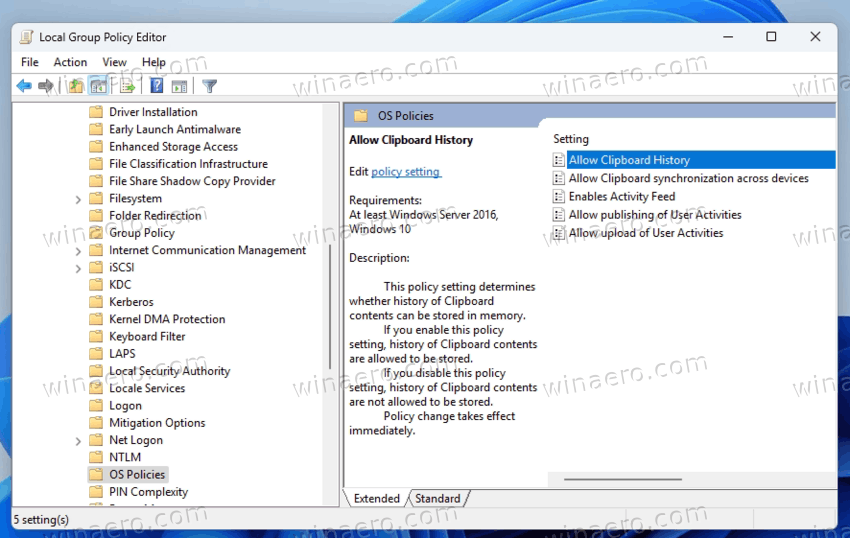
- Navigate to the following path in the left-side tree view: Computer Configuration > Administrative Templates > System > OS Policies
- In the right-hand pane, locate the Allow Clipboard History policy and double-click it to edit.
- To enable clipboard history for all users, select the Not Configured or Enabled option, depending on your requirements.

- To disable clipboard history system-wide, choose the Disabled option. This prevents users from enabling the feature manually via other methods.
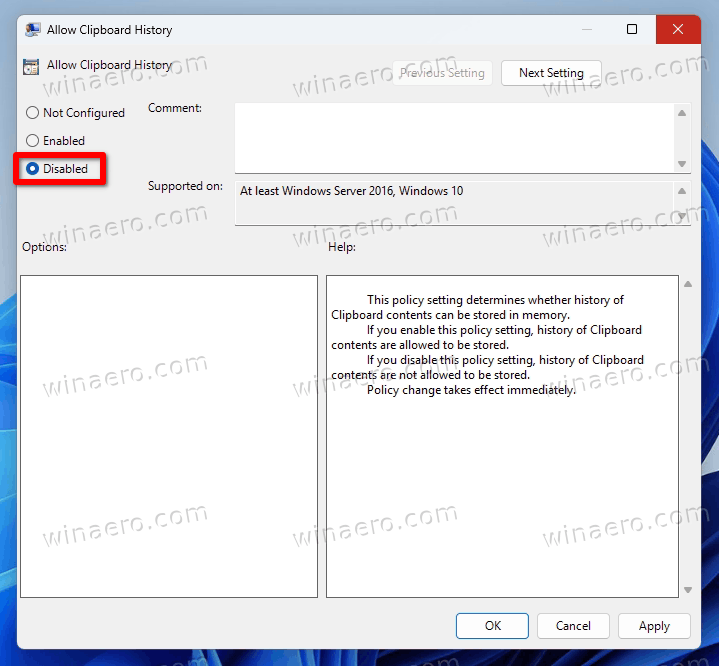
- Click OK to save your selection.
- Close the Local Group Policy Editor once the configuration is complete.
- To ensure the policy takes effect, either sign out and back in or restart the device.
That's it.
Method Five: Local Group Policy Tweak for Clipboard History
This method allows you to enable or disable clipboard history system-wide by making changes directly to the Windows registry. It is suitable for non-enterprise editions of Windows 11 that do not include gpedit.msc.
- Download these REG files in a ZIP archive.
- Depending on whether clipboard history should be enabled or disabled globally in the OS, extract the corresponding registry file (
enable clipboard history for all users.regordisable clipboard history for all users.reg), or both at once.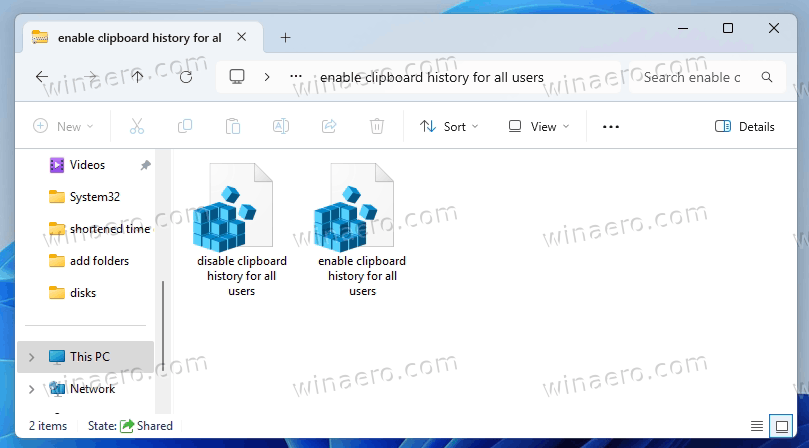
- Save the selected registry file to your Desktop for easy access.
- Double-click the file to merge its contents into the system registry.
- Confirm the operation when prompted by selecting Run, followed by Yes in the User Account Control dialog.
- After the merge completes successfully, either sign out and back in or restart the computer to apply the setting.
- Once verified, you may delete the registry file(s) if you no longer need them.
That's it.
How the Policy tweak works
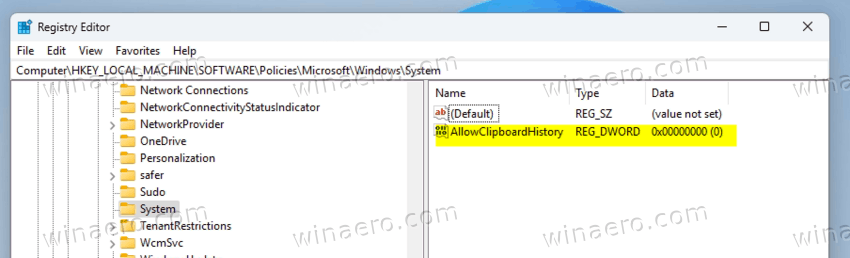
The REG files you have downloaded in the current chapter modify the AllowClipboardHistory value in the HKEY_LOCAL_MACHINE\SOFTWARE\Policies\Microsoft\Windows\System Registry branch. You can use the following values to configure the history status.
- AllowClipboardHistory = 1 - Enabled, users cannot disable it manually.
- AllowClipboardHistory = 0 - Disabled, users cannot enable it.
- AllowClipboardHistory is missing: The default system setting, the user can turn the Clipboard History on or off on demand.
The reviewed ways of configuring Clipboard History give you different levels of the feature control. You can go with per-user preferences or switch to enterprise-level configurations. It only depends on your tasks.
As said, you can sync your clipboard history across all the devices you own. This function requires you to use a Microsoft Account. If you are fine with it, you can set it up as follows.
Enable or Disable Sync Clipboard History Across Devices
Windows provides a clipboard history feature that allows you to access previously copied items across multiple devices when signed in with the same personal Microsoft account or work account. When you enable clipboard synchronization, data from the clipboard, such as texts, can be transferred securely between linked devices. However, this process involves Microsoft temporarily receiving and processing clipboard content. But users may choose between automatic syncing or manual selection of clipboard items for transfer if they have privacy concerns. Here are the settings and options you need to use.
Enable Clipboard Sync in the Settings app
- Open the Settings app by pressing Win + I.
- Navigate to the System category on the left pane, and select Clipboard on the right side to access clipboard-related configuration options.
- On the next page, toggle on the "Sync across devices" option to activate clipboard history synchronization. This will allow pasted content to be available on other signed-in devices.
- If you want, enable the setting for "Automatically sync text that I copy," which ensures all clipboard content is replicated without requiring manual confirmation.
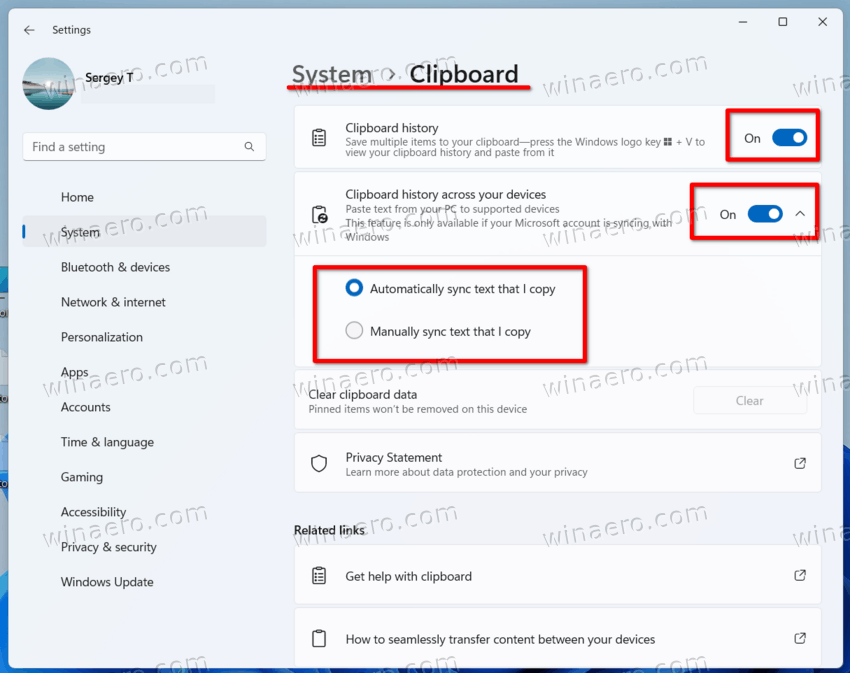
- Alternatively, leave this option off to manually select specific items for sync via the clipboard history window (Win + V).
- Finally, you can disable the "Sync across devices" option to stop Windows 11 from syncing any kind of your clipboard data.
That's it. These options allows you to manage the data that is transferred across devices. Manual mode offers greater discretion, while automatic mode provides convenience at the cost of increased cloud interaction.
Notes
- The clipboard sync function is tied to online user authentication. It supports both personal Microsoft accounts and enterprise work accounts managed through Entra ID.
- Clipboard history is limited to text and basic formatting. Complex objects such as images, executable code, and files are not synced across devices via this feature.
- Users should not forget that clipboard synchronization relies on secure cloud-based services. Microsoft claims that clipboard data is transmitted and stored in accordance with its standard privacy policies and encryption protocols.
In addition, you can set up the clipboard sync feature for the current user by applying registry modifications through downloadable .reg files. Similar to the GUI, these settings allow either automatic or manual synchronization of clipboard data across devices, or complete deactivation of the functionality. Additionally, for all users, you can adjust the sync option via a Group Policy tweak, or with a corresponding option in the gpedit.msc app (where available).
Turn On or Off Clipboard History Synchronization in Registry
- Download the following archive containing three REG files: Download ZIP Archive.
- To enable clipboard history and allow automatic sync, extract the file named
turn on clipboard sync across your devices and automatically sync.reg. - To enable clipboard history while allowing manual sync only, extract the file
turn on clipboard sync across your devices and manually sync.reg. - Finally, to disable clipboard history synchronization, extract the file named
turn off clipboard sync across your devices.reg. This one reverts the setting to its default state, preventing cross-device syncing of clipboard history.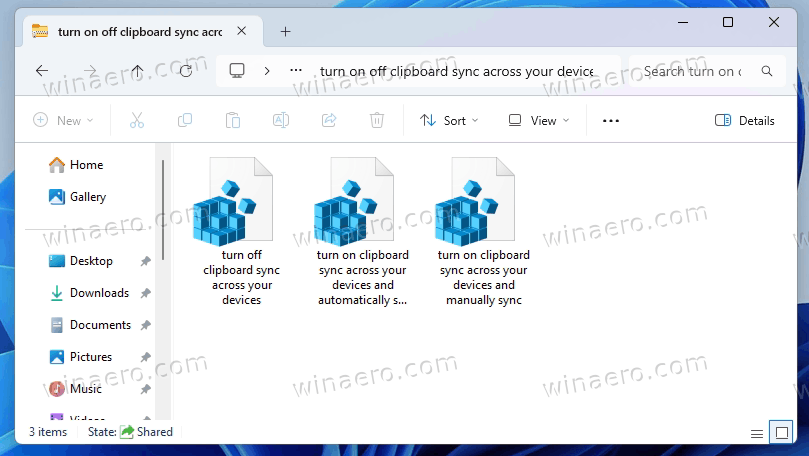
- Put the selected REG file to your Desktop for convenient access.
- Now, double-click the REG file to add the values from it to the Registry.
- When prompted by the system, confirm the operation by clicking Run, followed by Yes to both the confirmation dialog and User Account Control prompt.
- Finally, select OK to complete the merging of the file values into the system Registry.
- If you do not have further use for this REG file, it is safe to delete it after successful application of the registry changes.
That's it! For reference, here are the details on how the REG files work.
How it works
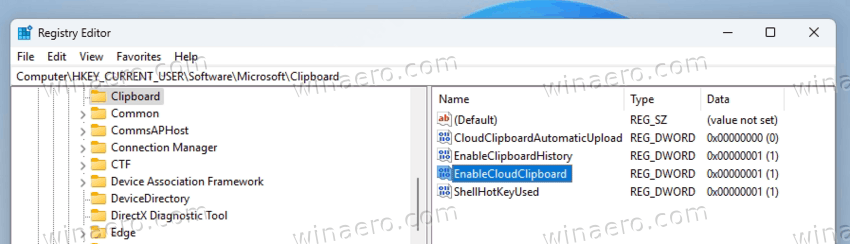
The provided REG files change the EnableCloudClipboard DWORD value under the HKEY_CURRENT_USER\Software\Microsoft\Clipboard key.
If EnableCloudClipboard is set to 0, this turns off Sync Clipboard History Across Devices for the current user. This is what Windows 11 uses by default.
When EnableCloudClipboard is set to 1, the Clipboard Sync feature is active. But its mode - automatic upload or manual upload - is defined by an additional value:
[HKEY_CURRENT_USER\Software\Microsoft\Clipboard]
"CloudClipboardAutomaticUpload"=dword:00000000- CloudClipboardAutomaticUpload = 0 - disables automatic upload of your clipboard data (enables manual mode).
- CloudClipboardAutomaticUpload = 1 - Windows 11 will automatically upload your data and sync between your devices.
Now, let's talk about the Group Policy option. The GUI option is available only in Windows 11 Pro, Enterprise, and Education editions. Users of other Windows editions can use an alternative registry-based method for systems where group policy tools are not available.
Enabling or Disabling Clipboard Sync for All Users via Local Group Policy Editor
To enable or disable Clipboard History Sync for all users, do the following.
- Launch the Local Group Policy Editor by pressing Win + R on the keyboard, and then executing
gpedit.mscfrom the Run dialog.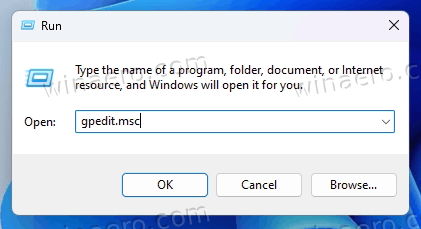
- In the left navigation pane, navigate to the following path: Computer Configuration > Administrative Templates > System > OS Policies.
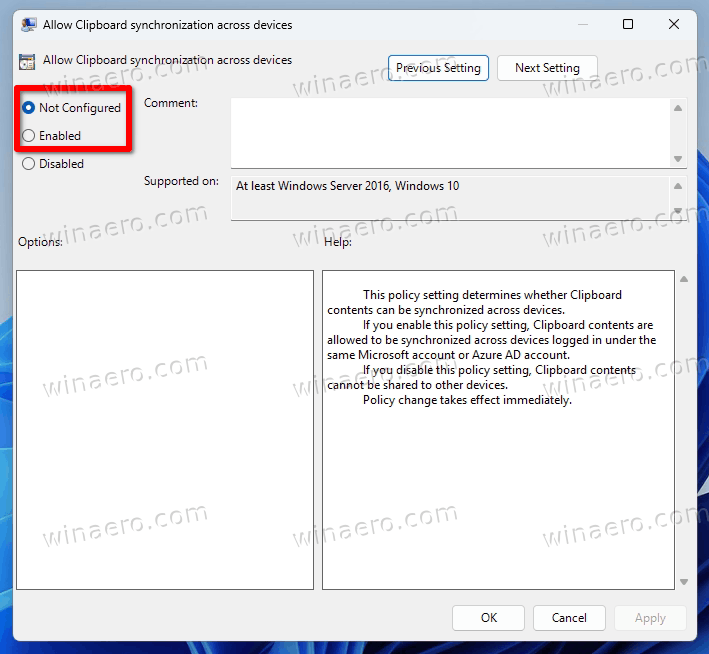
- In the right-side panel, locate the Allow Clipboard synchronization across devices policy, and double-click to open its properties.
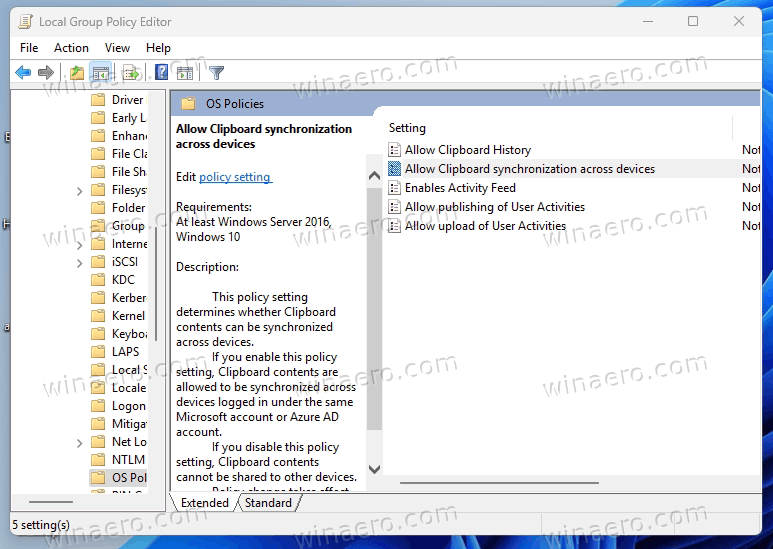
- To enable clipboard history sharing for all users:
- Select one of the following options, Not Configured or Enabled, as both will have the same effect.
- Select one of the following options, Not Configured or Enabled, as both will have the same effect.
- To prevent clipboard synchronization system-wide:
- Select the Disabled option to block access to cross-device clipboard syncing for all users.
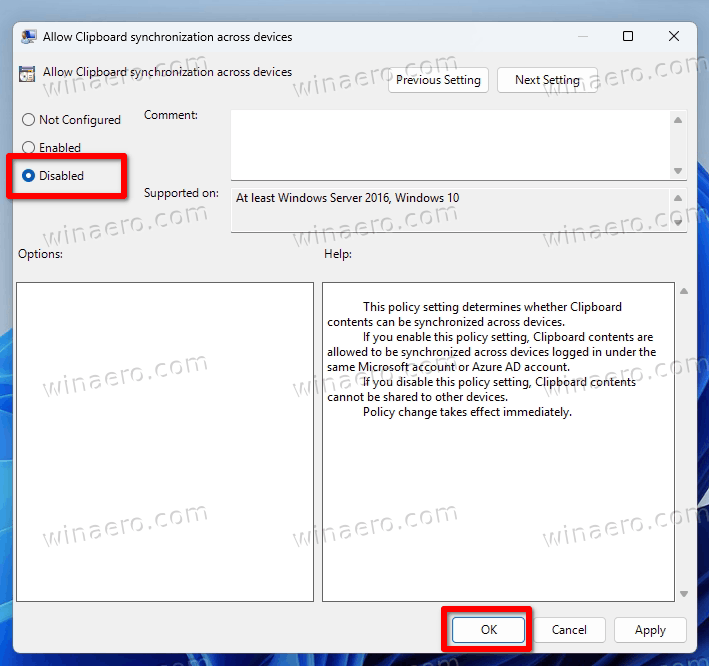
- Select the Disabled option to block access to cross-device clipboard syncing for all users.
- Click OK to save the selected configuration, and close the policy dialog.
- It is now safe to close the Local Group Policy Editor app.
That's it.
As said, the gpedit.msc is missing in some editions of Windows 11. Also, you may just prefer REG files for convenient and flexible OS tuning. For that, let's review how to set the policy system-wide in the Registry, and apply settings globally across all user profiles.
System-Wide Configuration via Registry File
- Start with downloading these ready-made REG files in a ZIP archive.
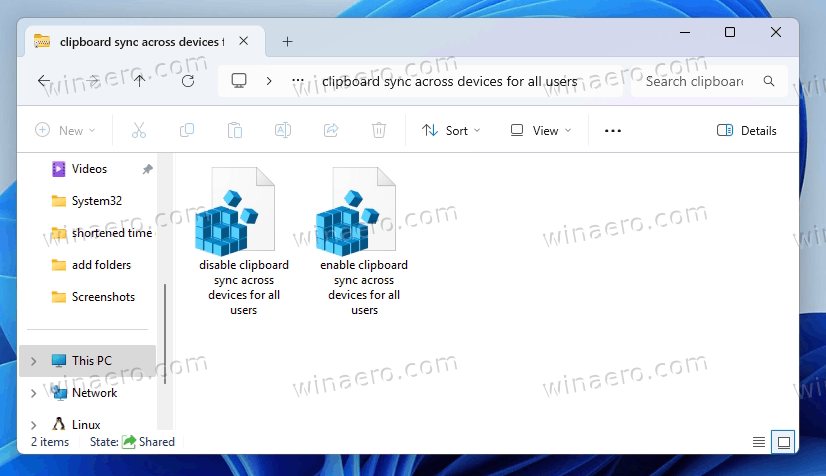
- To enable clipboard sync, extract the registry file Enable_Clipboard_sync_across_devices_for_all_users.reg. It will set the value
"AllowCrossDeviceClipboard"=-under theHKEY_LOCAL_MACHINE\SOFTWARE\Policies\Microsoft\Windows\Systemregistry key. - To disable clipboard sync, use the registry file Disable_Clipboard_sync_across_devices_for_all_users.reg. It sets
"AllowCrossDeviceClipboard"=dword:00000000under the same Registry branch.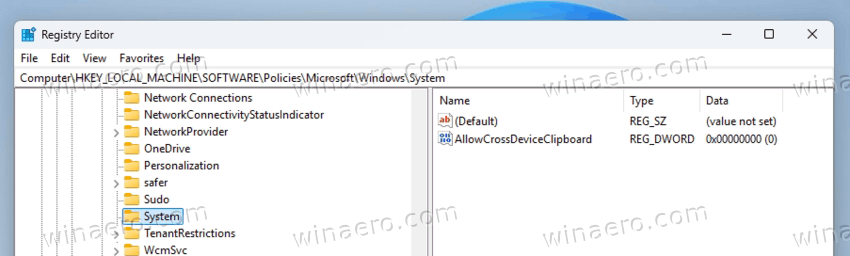
- Place the chosen .reg file to the desktop and apply it by double-clicking.
- Confirm the action when prompted by selecting Run, followed by Yes in the User Account Control dialog box, and then click OK to finalize the registry value import.
- After the update completes, you may remove the REG file from your device if you no longer need it.
These configuration options provide granular control over clipboard history synchronization, ensuring alignment with enterprise policies or personal preferences. Each change requires a system restart or sign-out/sign-in cycle to take full effect.
As mentioned in the beginning of this guide, pinned items remain persistent in the history flyout. This can be of help when you enable Clipboard History in Windows 11. Let's review how to use them.
Pin and Unpin Items in Clipboard History
Items stored in clipboard history remain available after system restarts only if they have been pinned. Otherwise, Windows will clear unpinned items upon reboot. To manage pinned items within clipboard history, follow the instructions below.
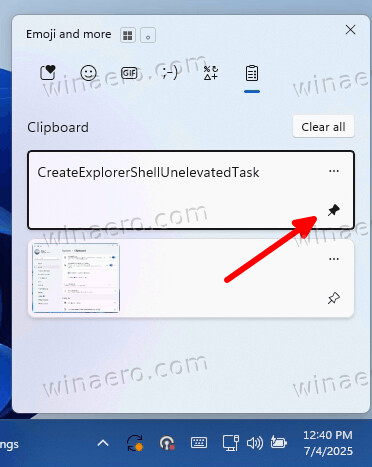
How to Pin an Item
- Press the keyboard shortcut Win + V to open the clipboard history window.
- Locate the item you wish to retain beyond system reboots in the clipboard list.
- Select the Pin button next to the entry.
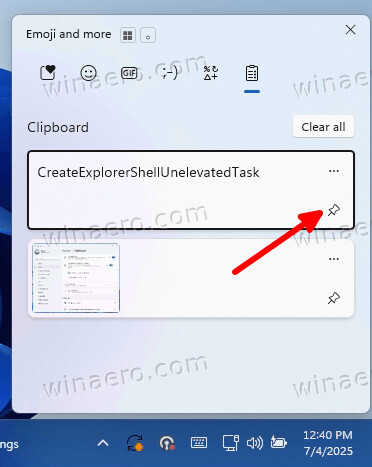
This will add the item to the persistent section of the clipboard history. It remains accessible even after you restart the device.
Unpinning an Item from Clipboard History
- Open the clipboard history by pressing Win + V.
- Find the item currently marked as pinned which you want to remove from the persistent clipboard storage.
- Click the Unpin icon associated with the selected item.
This will remove its protected status, and the item may be deleted from clipboard history during the next system restart or when new items exceed the storage limit.
Note that these changes will sync with all other devices running under the same Microsoft Account.
Finally, yet another cool feature is the ability to paste the clipboard data unformatted. Here's how.
How to Paste as Plain Text from Clipboard History in Windows 11
In Windows 11, under certain conditions, you may want to remove formatting before inserting the copied text into a new document or application.
A commonly used alternative for pasting unformatted text is the keyboard shortcut Ctrl + Shift + V. This functionality enables plain-text insertion in apps like Microsoft Word or Chrome and Edge browsers. It is important to note that not all software supports this command, and availability may vary depending on the app you are using.
An additional method exists through the clipboard history interface. It is allowing users to paste selected items as plain text directly from the clipboard panel. The following steps explain in detail how to use this function.
Paste as Plain Text from Clipboard History
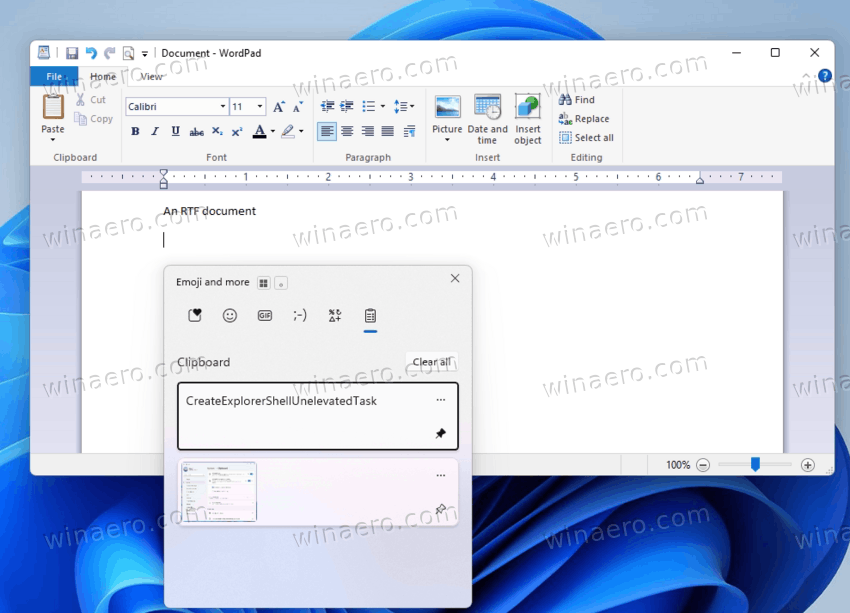
- Position the mouse cursor to place in the document where you intend to insert the plain text content.
- Open the clipboard history window by pressing the Win + V keyboard combination. The clipboard history panel will appear near the current cursor position.
- Locate the relevant text-based item in the clipboard history and click the three vertical dots button available for the entry.
- Select the Paste as Text option from the menu that appears. This action removes any embedded formatting from the selected item and inserts only the raw text into the destination document.
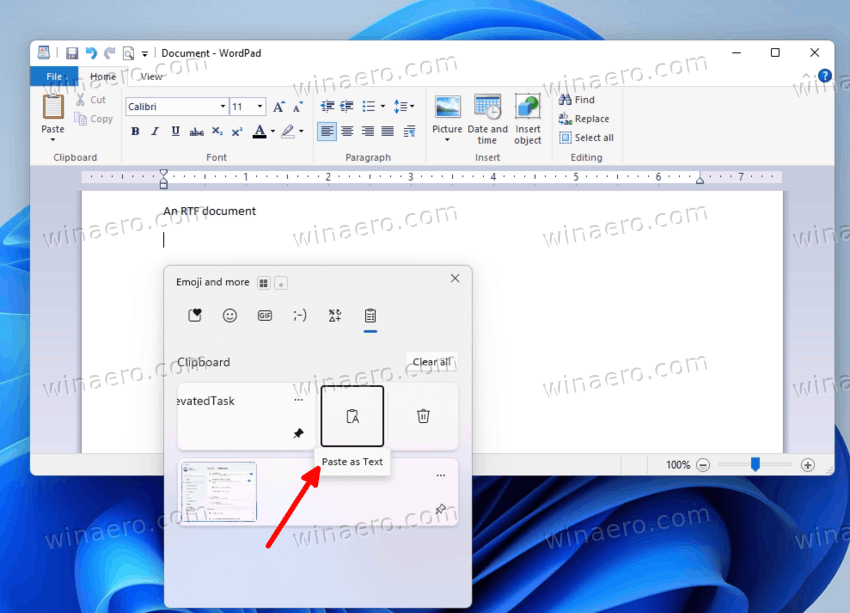
- Once completed, the clipboard history window will close automatically. The text will appear at the specified location within the active application.
That's it. It is particularly useful when you are working with richly formatted sources like web pages, or email clients where inherited styles may be not suitable for the document.
Closing words
After following the steps in this tutorial, you can efficiently use the Clipboard History feature in Windows 11. Now you know how to enable and disable it for the current user or all users, turn the data sync on and off across all your devices, and even paste your text pieces without formatting.
Support us
Winaero greatly relies on your support. You can help the site keep bringing you interesting and useful content and software by using these options:
