There's a reported issue in Windows 11 24H2 where Remote Desktop Protocol (RDP) sessions fail to work properly after logging in. It's not yet known what exactly causes the bug. Some users blame recent security patches, such as KB5050094 and KB5051987. These updates seem to have introduced changes that affect how RDP interacts with the network.
Advertisеment
RDP allows users to remotely control another computer, which is commonly used by businesses for managing physical or virtual machines. Despite the RDP service running correctly and firewall settings being properly configured, some 24H2 systems are unable to maintain or establish these remote connections.
During testing, it was observed that even though the RDP service appears active in the Services manager and network tests are successful, the connection still fails. Multiple users have encountered this issue, with some mitigating the bug by changing the default RDP port number from 3389 to another value. However, this solution doesn't resolve the problem for everyone.
Another common issue involves RDP sessions freezing during the login process, especially when reconnecting to a previously disconnected session. Users report seeing a "please wait" message or experiencing a frozen interface at the top of the screen.
In some cases, users can initially connect successfully. But everything will freeze shortly afterward. Reconnecting becomes problematic, with the system getting stuck on a "spinning wheel" or displaying an "other user" message. The only workaround in such cases is to log in again with a different account or have an administrator intervene to reset the session.
Fix RDP in Windows 11 version 24H2
To address this issue you need to change the following Group Policy settings. If you are affected, navigate to gpedit.msc > Local Computer Policy > Computer Configuration > Administrative Templates > Windows Components > Remote Desktop Services > Remote Desktop Session Host > Connections. Here, you'll find an option labeled "Select network detection on the server."
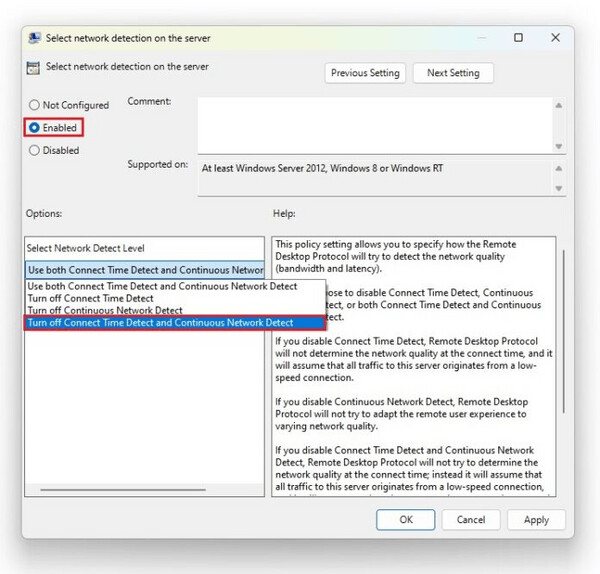
You need to enable this policy and set it to turn off both Connect Time Detect and Continuous Network Detect. Applying these changes doesn't require a system restart; instead, running the command gpupdate /force will apply the updated policies. Some users have found that disabling Continuous Network Detect is sufficient to fix the issue.
Method 2: Using a batch file and Registry tweak
Alternatively, you can create the following batch file:
@echo off
:: Set the registry valuesreg add "HKEY_LOCAL_MACHINESOFTWAREPoliciesMicrosoftWindows NTTerminal Services" /v fServerNetworkDetect /t REG_DWORD /d 1 /freg add "HKEY_LOCAL_MACHINESOFTWAREPoliciesMicrosoftWindows NTTerminal Services" /v fTurnOffTimeDetect /t REG_DWORD /d 1 /freg add "HKEY_LOCAL_MACHINESOFTWAREPoliciesMicrosoftWindows NTTerminal Services" /v fTurnOffNetworkDetect /t REG_DWORD /d 1 /f
:: Update group policygpupdate /forceecho Done.
pause
How to Use the Batch File
- Open a text editor (e.g., Notepad).
- Copy and paste the above code into the editor.
- Save the file with a .bat extension, such as SetRDPRegistry.bat.
- Run the batch file as an administrator to ensure it has the necessary permissions to modify the registry.
You are done. This batch file achieves the same functionality as the original Group Policy tool, but uses the REG.EXE tool instead.
Support us
Winaero greatly relies on your support. You can help the site keep bringing you interesting and useful content and software by using these options:

Thankyou Sergey, this helped !
Great to hear. You are most welcome.
Nice tips, thanks. Would that be done on the host or on the client?
on the client as I understand
I think it should be on the host (server). After setting this option on the host, the remote desktop top bar no longer shows the connection quality icon, which suggests the problematic feature is successfully turned off.
I think typically options under “Remote Desktop Services > Remote Desktop Session Host” are for the host, and options under “Remote Desktop Services > Remote Desktop Connection Client” are for the client.
Thank you!
Thanks for the tip. We had the issue with RDP on Server 2019 and clients running W11 24H2. Making this reg change on the host fixed the issue. No need to make the change client side.
Thank you for the feedback
After KB5052093 (Win11 24H2) I’ve had constant RDP interruptions to black screen. Removing that one solved that issue for me.
Well, releasing KB5053598 didn’t solve that. Moreover, playing with “Select network detection on the server” didn’t help in my case, I also had to explicitly set “Select RDP transport protocols” to “Use only TCP” instead of previous “Use either UDP or TCP”.
Also it seems, that overall RDP-over-UDP thing is broken for 24h2/Server 2025 for a long time (Google for “Server 2025 RDP only using TCP”).
I have the same problem with accessing a remote desktop via VPN. I did a clean install of WINDOWS 11 Professional 24H2. Before that there was WINDOWS 10 Professional and no problems. Locally the remote desktop works but externally via VPN it does not and before it worked. None of the measures I found in the guides here and elsewhere helped me.
I have the same problem with remote desktop access via VPN. I did a clean install of WINDOWS 11 Professional 24H2.
Before that, there was WINDOWS 10 Professional and no problems. Locally remote desktop works, but from outside via VPN it does not and it worked before.
None of the measures I found in the guides here and elsewhere helped me.