How to upgrade Linux Mint to Linux Mint 19.2 'Tina'
If you are a Linux Mint user, you are probably aware of the ability to upgrade the installed version to the next release. In case of Linux Mint 19.2, you can easily upgrade previous versions including version 19 and 19.1 of the OS.
It can be a good idea to create a snapshot of the installed OS before proceeding. You can use the preinstalled Timeshift app. It is an excellent tool which focuses on creating and restoring system snapshots. It’s a great companion to mintBackup which focuses on personal data. Using them, you can can easily restore your operating system to its previous state.
Before upgrading, you might be interested in reading the following articles:
Advertisеment
If you are a Cinnamon spin user, upgrade all the installed 'spices', i.e. applets, desklets, extensions, and themes, to their latest available options using the appropriate option in the System Settings app.
Also, the team behind the distro recommends you to disable the screensaver.
To Upgrade Linux Mint to Linux Mint 19.2 Tina,
- Click on the apps menu and launch System > Update Manager.
- In the Update Manager, click on the Refresh button.
- If there are any new version of mintupdate and mint-upgrade-info packages, apply them.
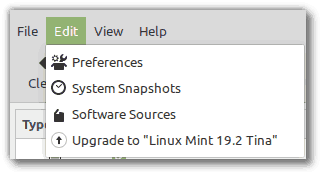
- Launch the System Upgrade by clicking on “Edit->Upgrade to Linux Mint 19.2 Tina”.
- Follow the instructions on the screen.If asked whether to keep or replace configuration files, choose to replace them.

You are done. You have the latest Linux Mint version installed on your PC.
Post-upgrade
After you upgrade your Linux Mint, there a few steps you should take. Starting in Linux Mint 19.1, there is a new P7zip-full package available. it provides the ability to create password-encrypted archives. Also, you can install xul-ext-lightning which adds Calendar support in Thunderbird. To install these packages, open a new root terminal and type:
apt install p7zip-full xul-ext-lightning
If you are running the Cinnamon edition, you can also remove the XScreensaver hacks. These are no longer supported by the Cinnamon screensaver. To remove them, open a terminal and type:
apt remove --purge xscreensaver-data xscreensaver-data-extra xscreensaver-gl xscreensaver-gl-extra cinnamon-screensaver-webkit-plugin cinnamon-screensaver-x-plugin
That's it.
Support us
Winaero greatly relies on your support. You can help the site keep bringing you interesting and useful content and software by using these options:
