You can now uninstall OneDrive in Windows 11, as in early March 2024, Microsoft released a new technical support document confirming that. Company's official website outlines the process of disabling and deleting the OneDrive cloud service account for Windows 10/11 users. The documentation now includes detailed instructions on how users can disable, hide, or completely remove the OneDrive service from their computers if they no longer wish to use it.
Advertisеment
OneDrive is a cloud storage service introduced by Microsoft in 2007. In 2014, it was renamed from SkyDrive to OneDrive due to trademark issues. By default, the Documents and Pictures folders are synchronized with OneDrive in Windows 11 when user access settings are configured.
To uninstall OneDrive from Windows 11 or 10, do the following.
Uninstall OneDrive in Windows 11 (official method)
- Open the Settings app by pressing Win + I, or with any other method you like.
- Navigate to Apps > Installed apps.
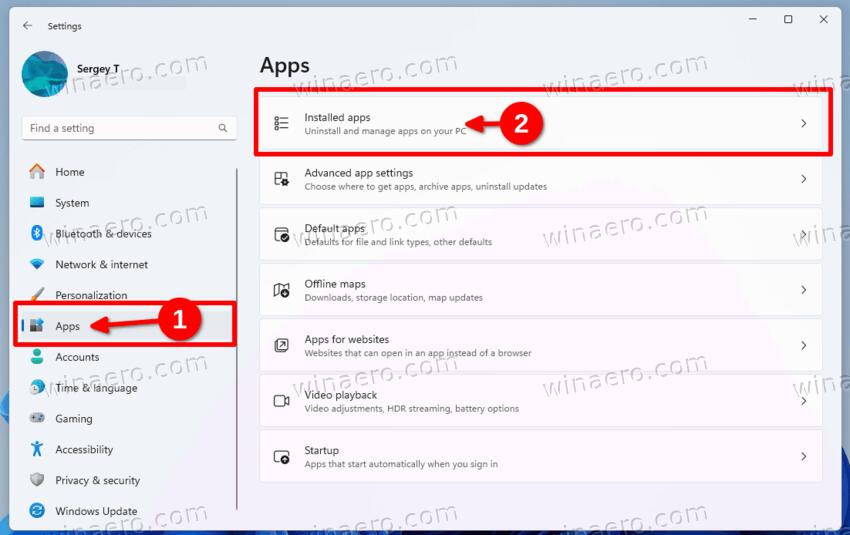
- In the program list on the right, scroll down to Microsoft OneDrive and click the three dots next to it.
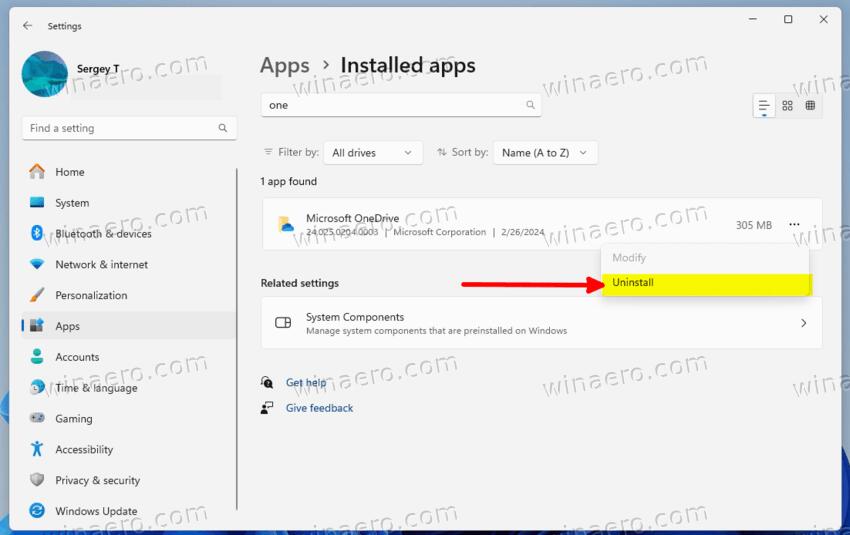
- Now select Uninstall.
- In the next dialog, click Uninstall one more time to confirm the removal. If you're prompted for an administrator password or confirmation, type the password or provide confirmation.

- The OneDrive will now be removed.
You are done!
Previously, Microsoft's documentation did not provide as much information on disabling OneDrive, but now users have the freedom to manage the service on their PC. This includes the ability to delete the OneDrive folder, disable synchronization, cancel a subscription, and sign out of the service.
Additionally, the dedicated support page officially confirms that OneDrive can be deleted in Windows 11, whereas previously this option was only mentioned for Windows 10.
In addition, you can use winget to uninstall OneDrive in Windows 11.
Remove OneDrive with Winget
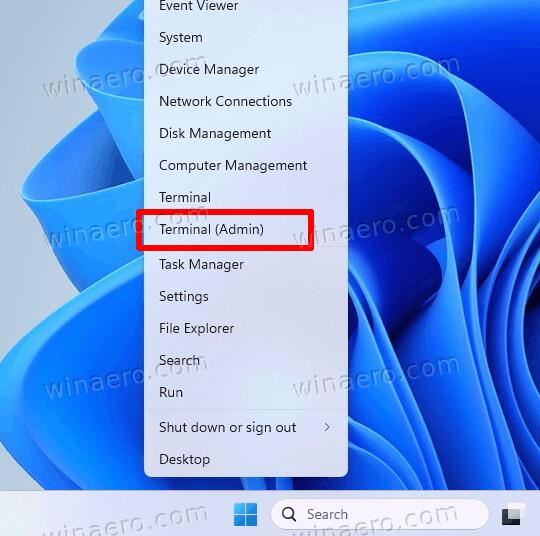
- Press the Win+X keys on the keyboard (or right-click the Start button).
- Select Terminal(Admin) to open the Terminal app elevated.
- Type the following command, and press Enter to execute it:
winget uninstall onedrive.
- Wait for the winget to finish the removal and you are good to go.
You are done.
💡If you aren't familiar with winget, its name means "Windows Package Manager". The app is a powerful command-line utility that aims to simplify the installation, removal, validation, and retrieval of detailed information for various applications. Winget can help you with searching, downloading, installing, upgrading, and configuring software on each of your PCs with ease. By working in console, winget allows automating app installation.
The reviewed methods will uninstall OneDrive for the current user. This is because the OneDrive per-user client is installed into each user's profile the first time they sign in to Windows. Its files will be placed to the %localappdata%\Microsoft\OneDrive folder. To completely remove OneDrive from your computer, you'll need to sign in as each user and uninstall it.
However, here's a inconvenience. Every time you create a new user account, you'll have to uninstall OneDrive for that user again and again. When you new user signs in, Windows 11 will run the command C:\Windows\System32\OneDriveSetup.exe /thfirstsetup automatically without user's consent. Luckily, there's a way to prevent the app from self-installing. It requires a Registry modification.
Prevent OneDrive from Installing for New Users
To stop OneDrive from installing for new users in Windows 11, do the following.
- Open the Registry editor (type
regedit.exein the start menu). - Select HKEY_LOCAL_MACHINE in the left panel.
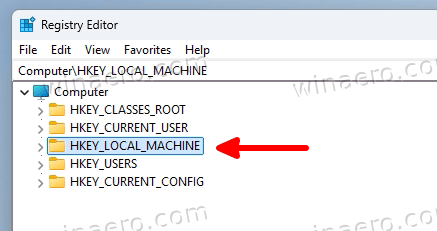
- In the Registry editor's menu, select File > Load Hive.
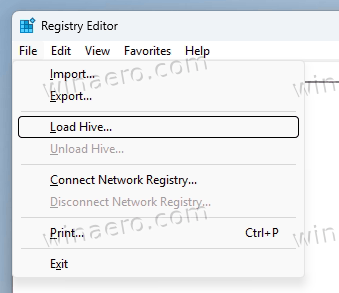
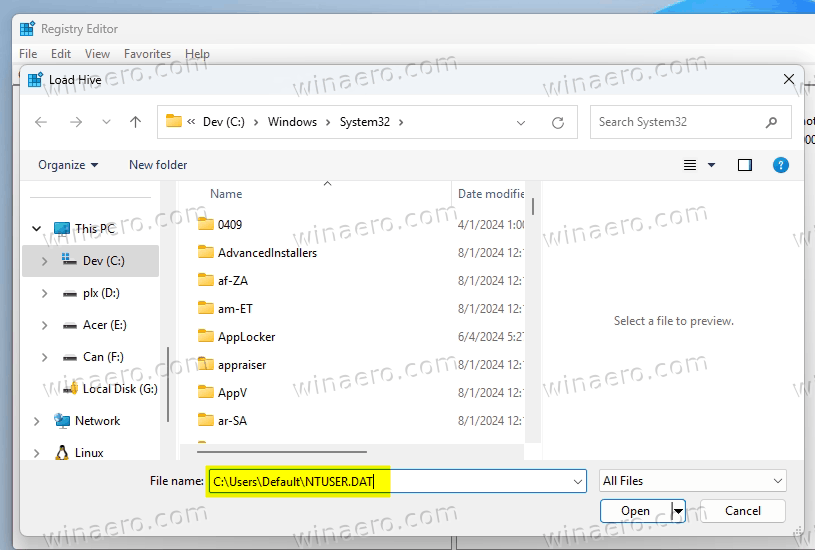
- In the open file dialog, paste the C:\Users\Default\NTUSER.DAT file path.
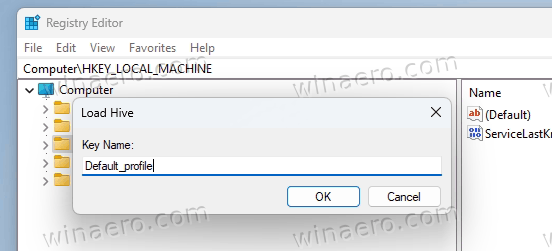
- Now, specify any name for the "folder" in the Registry tree on the left to mount the Default profile file. For example, name it Default_profile.
- Now, navigate to HKEY_LOCAL_MACHINE\Default_profile\SOFTWARE\Microsoft\Windows\CurrentVersion\Run.
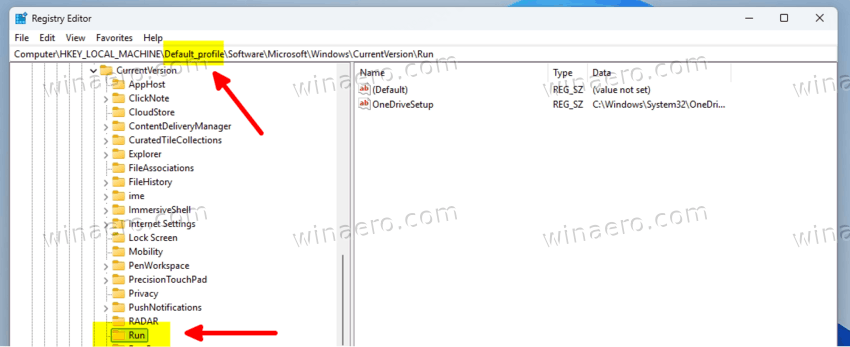
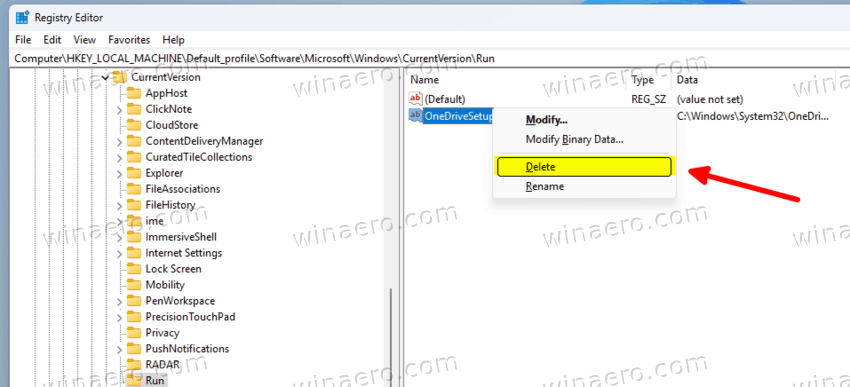
- Right-click and delete the OneDriveSetup startup entry in the right pane.
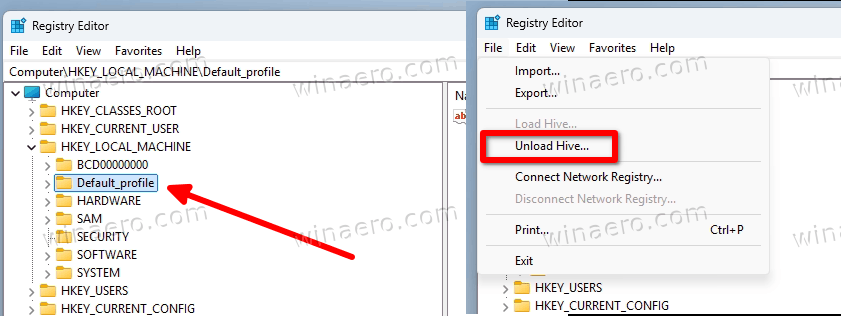
- To apply the changes you made, unload the branch by putting selection on the Default_profile folder on the left, and selecting the File -> Unload Hive menu item.
That's it! Now the OneDrive client will not be installed when new users sign in.
Saving your time
To save your time, you can automate the above steps with three console commands. Say, you can put them to a batch file, and run. Or execute them manually one by one in Terminal opened as Administrator. Here the commands:
reg load "hklm\Default_profile" "C:\Users\Default\NTUSER.DAT"reg delete "hklm\Default_profile\SOFTWARE\Microsoft\Windows\CurrentVersion\Run" /v "OneDriveSetup" /freg unload "hklm\Default_profile"
Finally, if you, your system administrator or computer vendor have preloaded OneDrive by running its installer as Administrator, the situation is quite different. Instead of being installed to the user profile, OneDrive will be installed to the c:\Program Files (x86)\Microsoft OneDrive folder. To get rid of it in such a case, you'll have to run a special command
Completely Uninstall OneDrive for All Users
To remove OneDrive installed to Program Files for all users, do the following.
- Press the Win + R keys on the keyboard.
- Type or copy-paste the following command into the Run dialog:
C:\Windows\System32\OneDriveSetup.exe /uninstall /allusers, and hit Enter.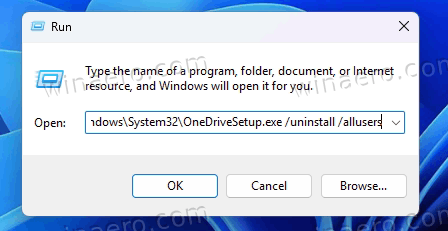
- Wait for the OneDrive to be uninstalled.
That's it.
Last but not least, you may want to disable OneDrive from appearing anywhere in the Windows user interface. Windows 11 provides a special group policy for that. In addition, you can disable it startup entry, and even hide the icon from the navigation pane in File Explorer.
If you change your mind, you can restore the OneDrive app with ease. Microsoft offers an installer for that.
Reinstall OneDrive
To restore and reinstall the earlier removed OneDrive app in Windows 11, do the following.
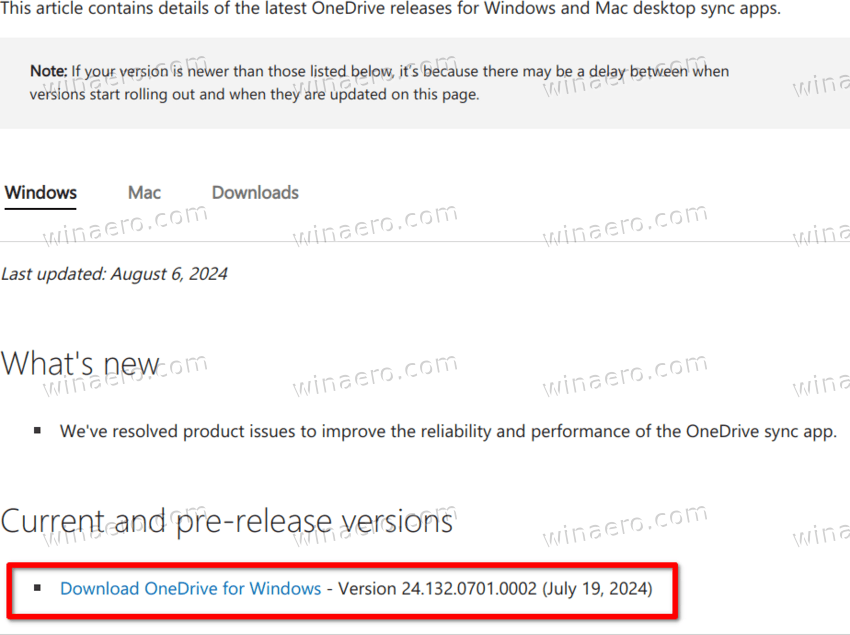
- Go to the OneDrive release notes site.
- There, click the Download OneDrive for Windows link.
- Save the OneDriveSetup.exe file to any folder on your computer, and run it.

- You will now see the installer user interface with a progress bar, so wait for it to finish.
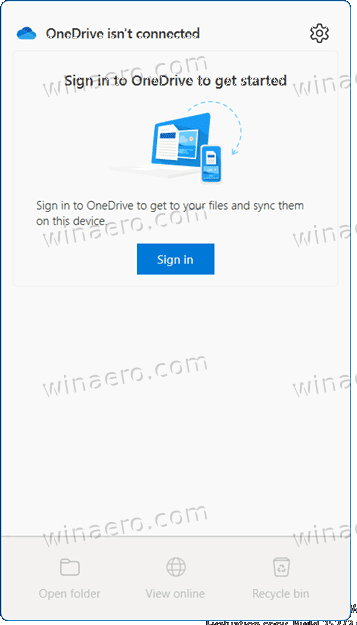
- When OneDrive installation has finished, you can enter your Microsoft Account credentials to set up the file sync.
That's it.
Now, let's review how to disable OneDrive integration with the operating system without removing the app. It will remain installed, but will not interfere with your PC activity. Here's how.
Disable OneDrive in Windows 11
- Press Win + R and type
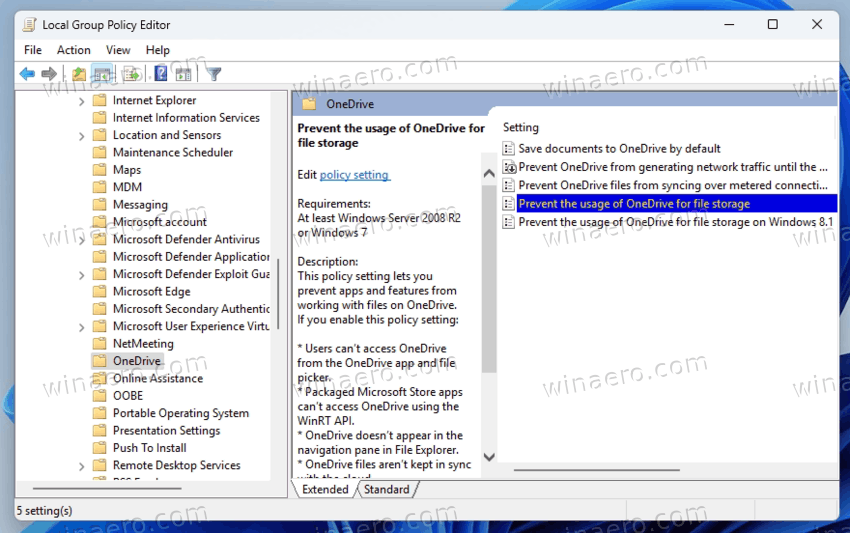
gpedit.msc; press Enter. - In the Local Group Policy Editor that opens, browse to Computer Configuration\Administrative Templates\ Windows Components\OneDrive.
- Double-click the Prevent the usage of OneDrive for file storage policy in the right pane.
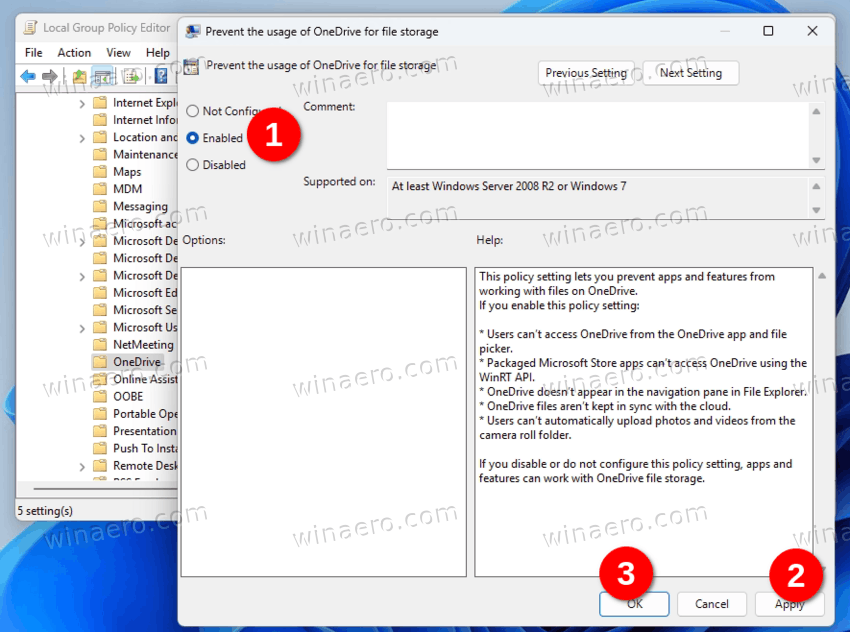
- Select Enabled in the next dialog, click Apply and OK. You can now close the gpedit app.
That was easy. But gpedit.msc is missing in certain editions of Windows 11, such as Home. In this situation you can apply a direct registry tweak that configures the policy.
Disable OneDrive with a Registry Tweak
To disable OneDrive integration with Windows 11, do the following.
- Run
regedit.exeby pressing Win + R and typingregedit.exein the Run box. - There, navigate to the HKEY_LOCAL_MACHINE\SOFTWARE\Policies\Microsoft\Windows key in the left panel.
- Right-click the Windows folder on the left, and select New > Key from the context menu. Name the new key OneDrive.
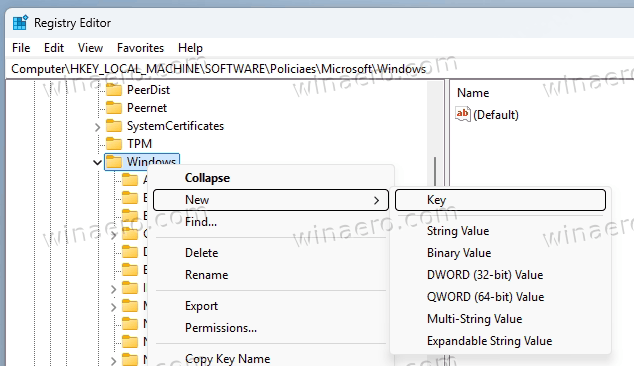
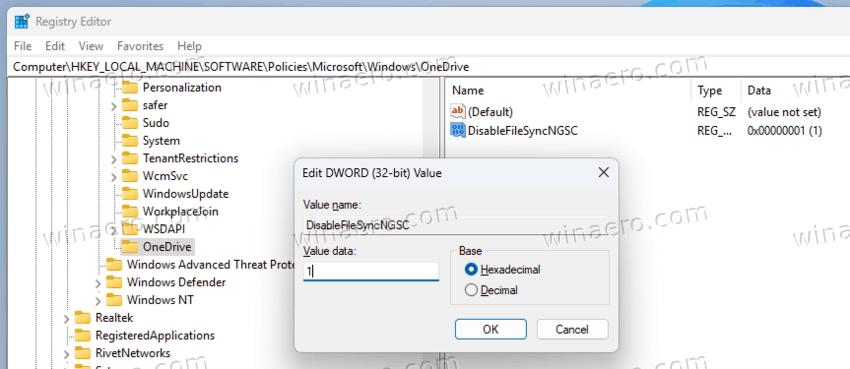
- Now right-click the OneDrive key you just created, and select New > DWord (32-bit) Value. Name the new value DisableFileSyncNGSC.
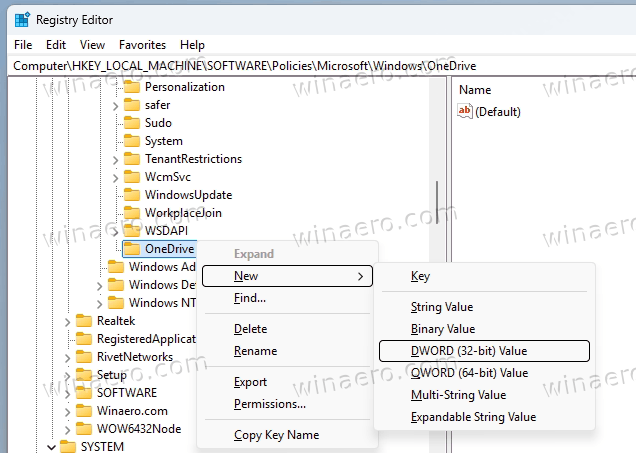
- Double-click DisableFileSyncNGSC to open it and set its data to 1.
- Restart the computer to apply the change.
That's it! From now on, OneDrive will disappear from anywhere in File Explorer.
In addition, you can want to remove it from startup processes to free up system resources and make the startup a little bit faster. This can be easily done with the Task Manager inbox app.
Remove OneDrive from Startup
- Launch the Task Manager app with the Ctrl + Shift + Esc shortcut.
- Switch to the Startup apps page.
- Find OneDrive in the list of apps, and right-click it.
- Select Disable from the menu.
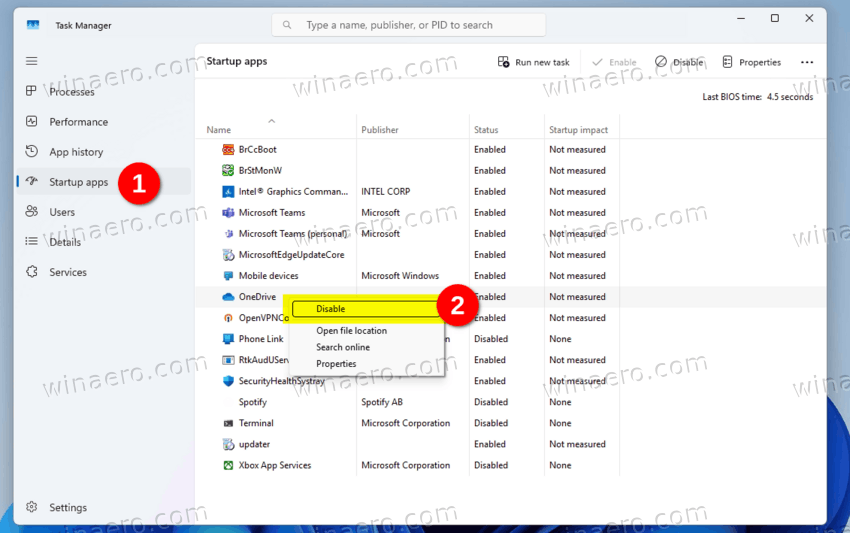
This will immediately disable OneDrive from running along Windows.
By default, OneDrive is set to start automatically when the user signs in to his account in Windows 11. In case if the user is using OneDrive, it will directly fetch the latest files from the cloud, or notify about them when the conditions do not allow to download them. If the user is not signed to OneDrive, it will any put its icon to the system tray in the taskbar, and will eventually show a prompt to sign in to it.
By disabling the Startup entry, you'll stop OneDrive from that.
Besides the system tray, OneDrive exists in the left area of File Explorer, the area called Navigation Pane. You can remove its icon from there with another Registry tweak.
If you need to hide the OneDrive icon from the Windows navigation pane, do the following.
Firstly, create a REG_DWORD registry parameter System.IsPinnedToNameSpaceTree with a value of 0 in the branch HKEY_CLASSES_ROOT\CLSID\{018D5C66-4533-4307-9B53-224DE2ED1FE6}.
Secondly, sign out from your Windows account, and sign-in back. Voila, the OneDrive icon will disappear.
That's it!
Support us
Winaero greatly relies on your support. You can help the site keep bringing you interesting and useful content and software by using these options:
