Starting with Windows 10 Fall Creators Update, you can have different Linux distros installed inside of Windows Subsystem for Linux (WSL). Once you enable the feature, you can go to the Store and install any available Linux distro you want from there. If you wish to change the default user for the distro that you have installed, here's how to set it for WSL in Windows 10.
Advertisеment
In Windows 10 Fall Creators Update, Windows Subsystem for Linux is finally out of beta. Not only can you install and run multiple Linux distros, but also for your convenience, they are available right in the Microsoft Store (formerly known as the Windows Store). As of this writing, you can install openSUSE Leap, SUSE Linux Enterprise, and Ubuntu.
The default UNIX user is the user account that appears signed in when you open the appropriate Linux console. By default, it opens with the user name that you've specified during the initial setup of the feature.
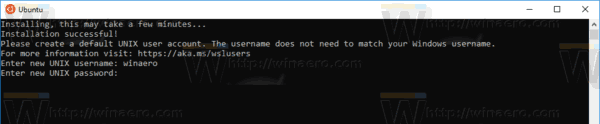
If you've added a new user to the distro you are using, you might want to make it the default UNIX user for WSL. I am going to make the user bob default instead of the winaero account.
Here is how it can be done.
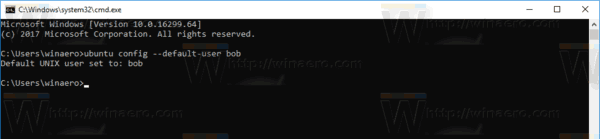
To set the default user for WSL in Windows 10, do the following.
- Open a new command prompt instance.
- To set the default UNIX user for Ubuntu in WSL, run the command:
ubuntu config --default-user new_user_name
Substitute the new_user_name portion with the actual user name. In my case, it is bob.
- If you are using openSUSE, run the following command:
opensuse-42 config --default-user new_user_name
- If you are using SUSE Linux Enterprise Server, run the following command:
sles-12 config --default-user new_user_name
From now, the specified user account will be used as your default UNIX user for WSL. The Linux console will open with this user.
Tip: The binary file name of each distro can be found with Task Manager. Open the Windows Task Manager and expand the running Linux console row on the Processes tab. See the following screenshot.
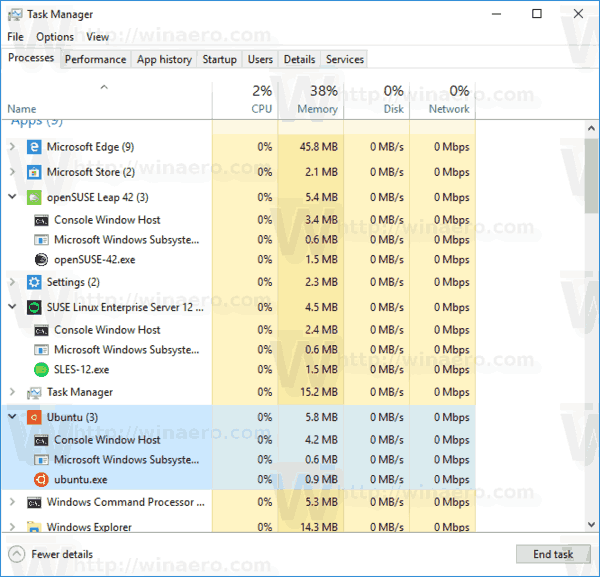
At the moment of this writing, Microsoft is using the following names:
- Ubuntu - ubuntu.exe
- openSUSE Leap 42 - opensuse-42.exe
- SUSE Linux Enterprise Server - sles-12.exe
Note: In older releases of Windows 10, which support only Bash On Ubuntu, you should use the following command:
lxrun.exe /setdefaultuser username
That's it.
Support us
Winaero greatly relies on your support. You can help the site keep bringing you interesting and useful content and software by using these options:

The command “openSUSE-42 config –default-user root” does not work.
—
> openSUSE-42 config –default-user root
Default UNIX user set to: root
Yet the user is still the original user when I start openSuse.
Also, I told WSL to use the same password for root as the user.
I cannot sudo. I cannot su. Basically, my installation is useless.
Any ideas?
I have windows 10, I added Centos7 Via WSL. when opening Centos7 it always puts me in as root, so I created a test user ‘test1’ , my attempts to make it log in as another user beyond root wont work here are the commands I have tried. I am a Wiz with Windows products but am new to all Linux, Like this is my 3rd week, Please Point me in the right direction
[root@LAPTOP-QUCDTMJS ~]# centos config -default-user test1
-bash: centos: command not found
[root@LAPTOP-QUCDTMJS ~]# centos linux config -default-user test1
-bash: centos: command not found
[root@LAPTOP-QUCDTMJS ~]# “centos linux” config -default-user test1
-bash: centos linux: command not found
Here is the results from Cat os-release
[root@LAPTOP-QUCDTMJS ~]# cat /etc/os-release
NAME=”CentOS Linux”
VERSION=”7 (Core)”
ID=”centos”
ID_LIKE=”rhel fedora”
VERSION_ID=”7″
PRETTY_NAME=”CentOS Linux 7 (Core)”
ANSI_COLOR=”0;31″
CPE_NAME=”cpe:/o:centos:centos:7″
HOME_URL=”https://www.centos.org/”
BUG_REPORT_URL=”https://bugs.centos.org/”
CENTOS_MANTISBT_PROJECT=”CentOS-7″
CENTOS_MANTISBT_PROJECT_VERSION=”7″
REDHAT_SUPPORT_PRODUCT=”centos”
REDHAT_SUPPORT_PRODUCT_VERSION=”7″
First, if you have not done so, create a user from your CentOS7 shell
adduser myUserName
Exit from the CentOS7 shell. Then, run the downloaded CentOS7.exe in a cmd or powershell:
.\Downloads\CentOS7\CentOS7.exe config –default-user myUserName
Hope it helps
Yan
.\Downloads\CentOS7\CentOS7.exe config –-default-user myUserName