How to Reset Hosts File Back to Defaults in Windows
Every Windows version comes with a special Hosts file which helps resolving DNS records. In addition to your network configuration, the file can be used to define a domain=IP address pairing which will have priority above the value provided by the DNS server. If the Hosts file is changed from default, resetting it can help resolve some connectivity issues.

You or a system administrator may have a number of reasons to modify the hosts file. For example, web devs can make their computer resolve a domain to a localhost address. If you have a home LAN, mapping a network device name to its IP address with the Hosts file will allow you to open the device by its name from File Explorer. This is useful when your network devices run a bareboned Linux distro which doesn't provide names Windows can recognize over the network.
Advertisеment
The Hosts file is just a regular text file which can be modified using any text editor. The only catch is that the editor app should be started elevated (as Administrator). The hosts file is located in the system directory, so non-elevated apps will fail to save it.
The Hosts file consists of lines of text. Each line must include an IP address in the first text column followed by one or several host names. Text columns are separated from each other by white space. For a historical reason, <Tab> is often preferred, but spaces will also do the trick. Lines started with a hash character (#) are comments. Windows ignores blank in the hosts file.
If you suspect your Hosts file is giving you connection issues, you can reset it, as follows.
To Reset Hosts File Back to Defaults in Windows,
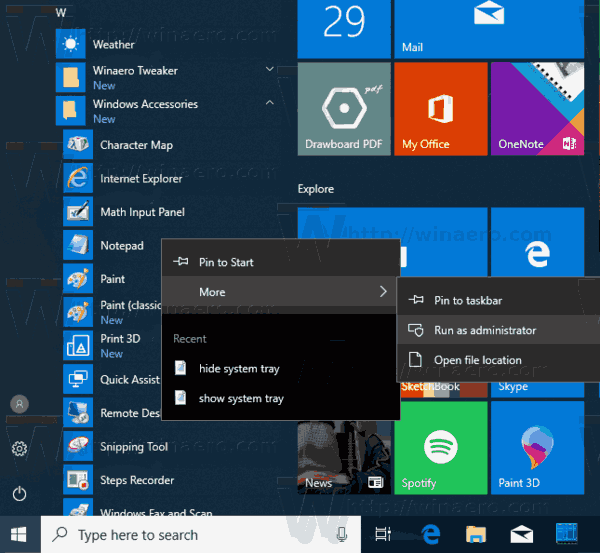
- Open the Start menu, and go to Windows Accessories.
- Right-click the Notepad app and select More - Run as Administrator.

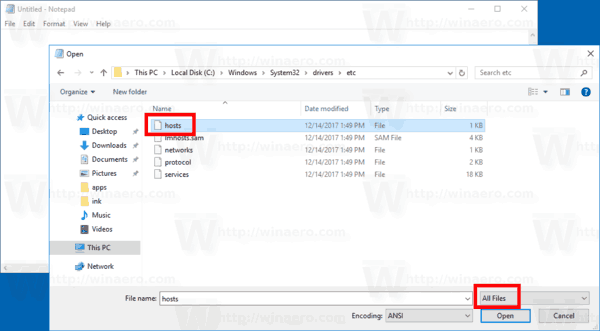
- In Notepad, click the File menu - Open, or press the Ctrl + O keys.
- Navigate to the folder C:\Windows\System32\drivers\etc.
- Select "All Files" from the drop-down menu.
- Double-click the hosts file.

- Select all the file contents (Ctrl + A) and clear it (press Del).
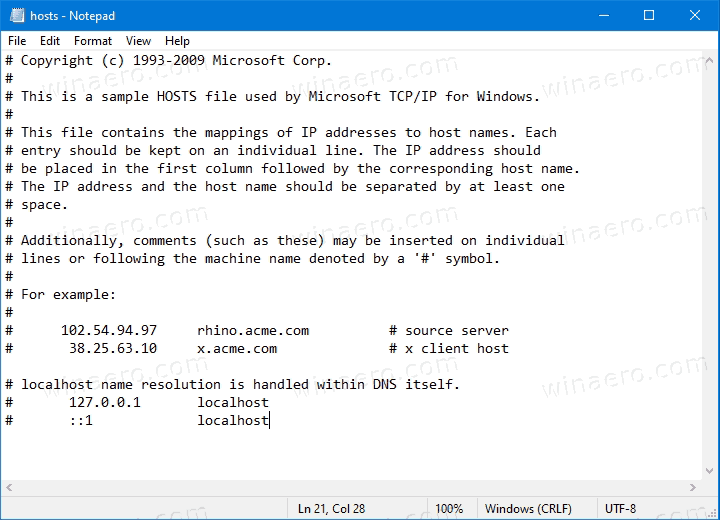
- Paste the following to the file:
# Copyright (c) 1993-2009 Microsoft Corp. # # This is a sample HOSTS file used by Microsoft TCP/IP for Windows. # # This file contains the mappings of IP addresses to host names. Each # entry should be kept on an individual line. The IP address should # be placed in the first column followed by the corresponding host name. # The IP address and the host name should be separated by at least one # space. # # Additionally, comments (such as these) may be inserted on individual # lines or following the machine name denoted by a '#' symbol. # # For example: # # 102.54.94.97 rhino.acme.com # source server # 38.25.63.10 x.acme.com # x client host # localhost name resolution is handle within DNS itself. # 127.0.0.1 localhost # ::1 localhost - Save the file(Ctrl + S).
You are done!
Related articles
Support us
Winaero greatly relies on your support. You can help the site keep bringing you interesting and useful content and software by using these options:
