In Windows 10, there are a number of options which you can use to change sounds for different system events, configure output and input devices, and more. Starting with Windows 10, Microsoft has added the ability to rename audio devices to the Settings app.
Advertisеment
Windows 10 introduced a new style of items and their panes/flyouts which open from the notification area. All of the applets which open from the system tray are different now. This includes the Date/Time pane, the Action Center, the Network pane and even the volume control. Once you click the sound icon in the system tray, the new volume indicator will appear on the screen.

Note: In a number of situations, the Volume icon can be hidden in the taskbar. Even when you have all the drivers installed, the icon might remain inaccessible. If you are affected by this issue, see the following post:
Fix: Volume Icon is Missing in Windows 10 Taskbar
In addition to the new volume mixer, a new option is available starting in Windows 10 Build 17093 and above. A new page in the Settings app allows adjusting the sound volume level for every active app. Also, it allows specifying different audio devices for running apps individually. The updated Settings app allows you to choose which output audio device to use by default in the OS. Modern PCs, laptops and tablets can use classic speakers, Bluetooth headphones and many other audio devices which you can connect simultaneously.
For your convenience, you can give your audio devices meaningful names. Here's how it can be done.
To Rename an Audio Device in Windows 10,
- Open the Settings app.
- Go to System -> Sound.
- On the right, scroll to the device (Output or Input) you want to rename.
- Click on the link Device Properties.
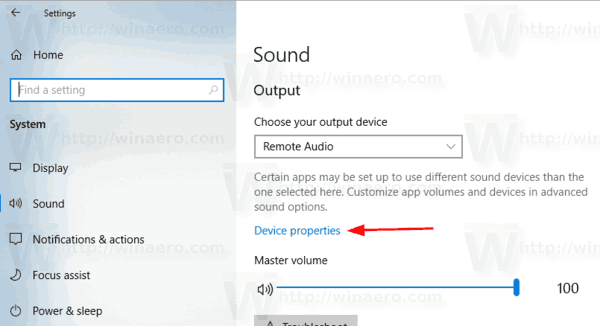
- On the next page, type a new name for your device and click on the Rename button.
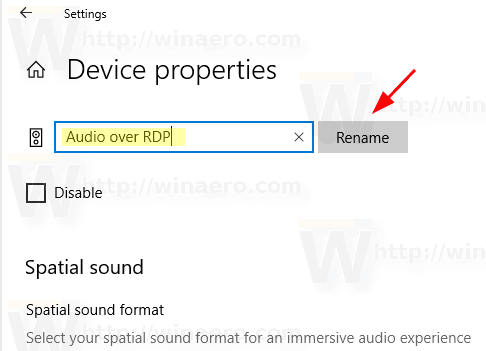
You are done. Repeat the steps above for all devices you want to rename.
Alternatively, you can use the classic Control Panel app to rename your audio devices.
Rename an Audio Device with Control Panel
- Open the classic Control Panel app.
- Go to Control Panel\Hardware and Sound.
- Click on the Sound icon.
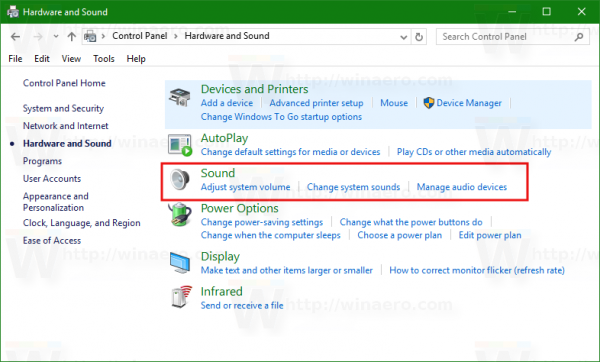
- To rename a playback device, switch to the Playback tab and select the device in the list.
- Click on the Properties button.
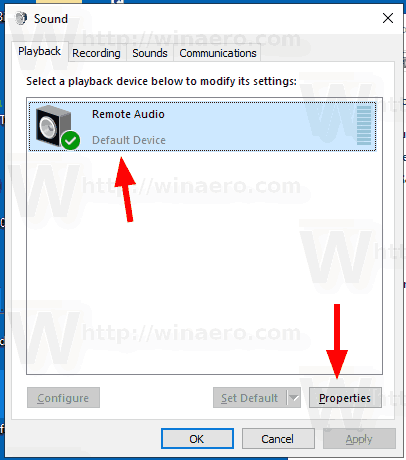
- In the next dialog, type a new name for your device and click Apply, then OK.
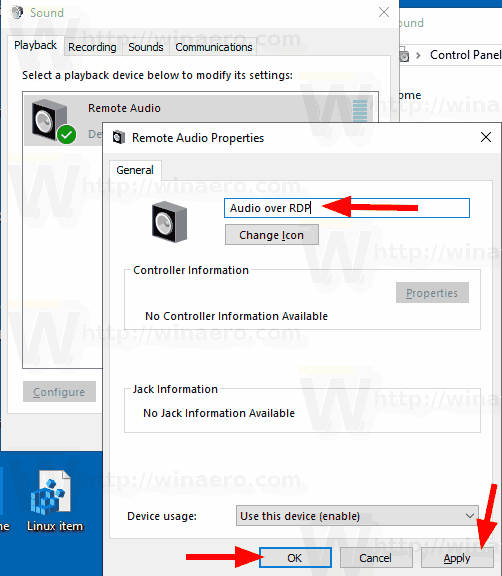
- To rename a recording device, switch to the Recording tab.
- Select the device you want to rename, and click Properties.
- Specify a new name for the device, then click Apply, and OK.
You are done.
Tip: Use the following RunDLL32 commands to save your time:
-
rundll32.exe shell32.dll,Control_RunDLL mmsys.cpl,,0- directly open the Sound applet at the Playback tab -
rundll32.exe shell32.dll,Control_RunDLL mmsys.cpl,,1- directly open the Sound applet at the Recording tab
Related articles:
- Set Audio Output Device For Apps Individually in Windows 10
- How to Change Default Audio Device in Windows 10
- How to Enable Mono Audio in Windows 10
- How to Change Narrator Audio Channel in Windows 10
Support us
Winaero greatly relies on your support. You can help the site keep bringing you interesting and useful content and software by using these options:
