It is still possible to open the classic System Properties dialog in Windows 11 and Windows 10 that is part of the Control Panel. As you may remember, since Windows 10 'October 20H2 Update' the System Properties applet that shows generic information about your PCs, has been replaced with the Settings app, making it harder to access it from anywhere in the GUI.
Advertisеment
In every release, Windows 10 is getting more and more classic options converted to a modern page in the Settings app. At some point, Microsoft might remove the classic Control Panel completely.
As of this writing, the classic Control Panel still comes with a number of options and tools which are not available in Settings. It has a familiar user interface which many users prefer over the Settings app. You can use Administrative tools, manage user accounts on the computer in a flexible way, maintain data backups, change the functionality of hardware and many other things. You can pin Control Panel applets to the taskbar to access frequently used settings faster.
The System applet is now hidden in Windows 11 and Windows 10 (starting in version 20H2). Regardless of the method you try to use to open it, it doesn't appear, bringing up the newest About page in Settings. If you click on the Properties context menu entry of This PC in File Explorer in Windows 11, or click on the System properties Ribbon command in This PC on Windows 10, or press Win + Pause/Break on the keyboard, you'll end up with the Settings page. The classic applet no longer opens with these ways.
However, if you need to open the classic applet, it is actually still possible. There are several other methods you can use.
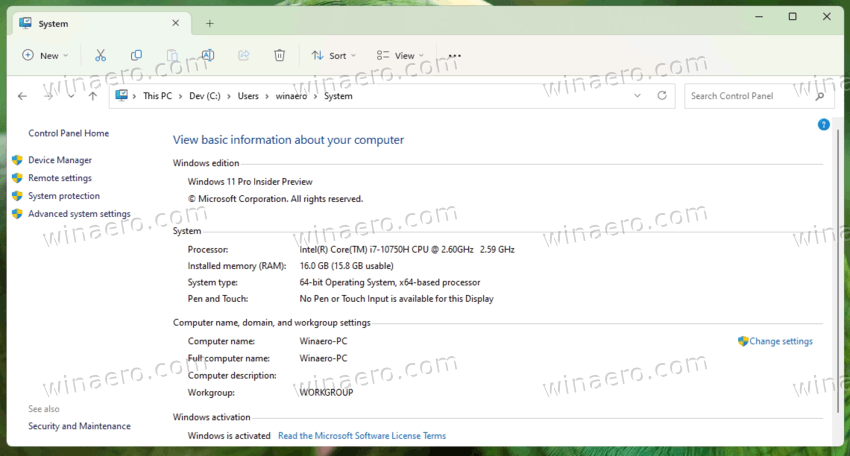
As you may remember from my other article, many Control Panel applets are available by CLSID (GUID) shell locations. So, for the "System properties" applet, the GUID is {BB06C0E4-D293-4f75-8A90-CB05B6477EEE}. While the shell command with this GUID won't work in Windows 11 and recent Windows 10 versions, you can use it in a different way! Here's how.
Open Classic System Properties in Windows 11 and 10
- Right-click anywhere on the desktop, and select New > Folder from the menu.
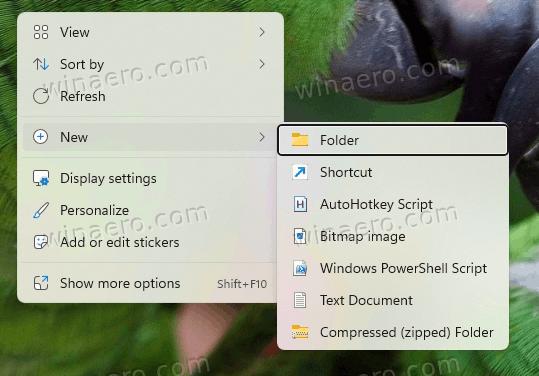
- Type System.{BB06C0E4-D293-4f75-8A90-CB05B6477EEE} in the new folder's name box, and hit Enter. Once you press Enter, the extension GUID part will become invisible.

- Now, double-click the "System" icon you just created. It will open the classic System Properties applet for you.
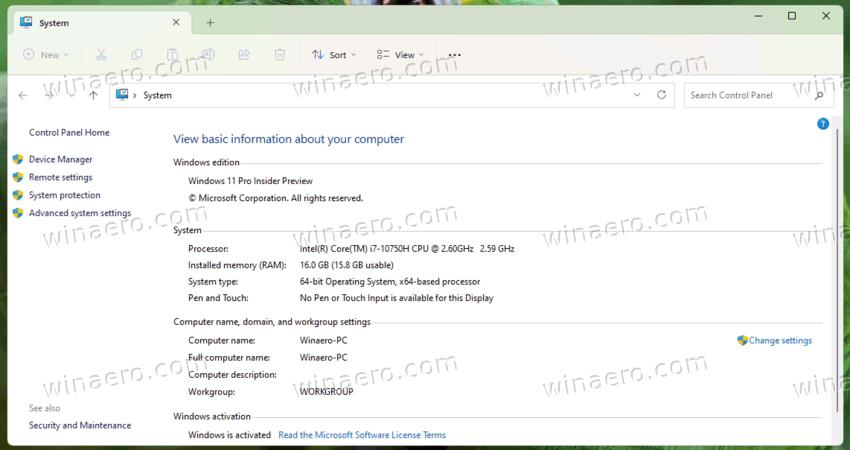
You are done!
Alternatively, you can open the Advanced System Properties dialog directly. It will display almost the same data as the applet reviewed above, and also allows you to change the computer name, network group, performance options etc, using the classic user interface.
How to directly open Advanced System Properties
- Right-click the Windows logo button with the in the taskbar, and select Run from the menu; or press Win + R.
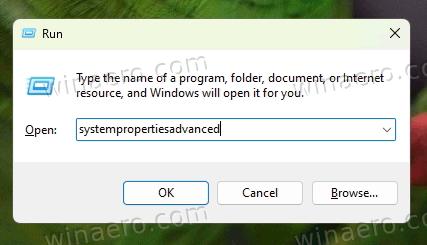
- In the Run box, type sysdm.cpl and press Enter.
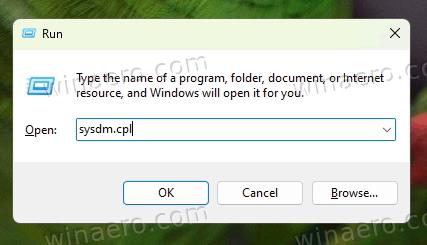
- Alternatively, you can type systempropertiesadvanced instead of sysdm.cpl.
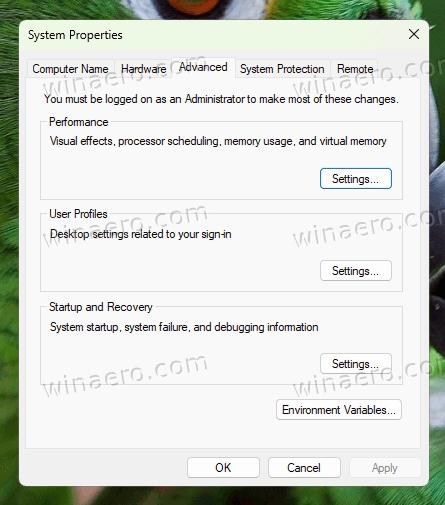
- Windows will open the Advanced System Properties classic dialog window.
Done!
Both sysdm.cpl and systempropertiesadvanced commands are the classic applets that remain available even in Windows 11 version 22H2, which is the latest stable OS release as of this writing. You will find the full list of classic applet commands in this guide.
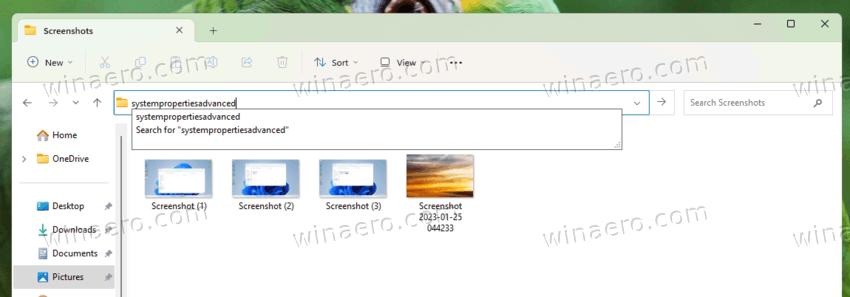
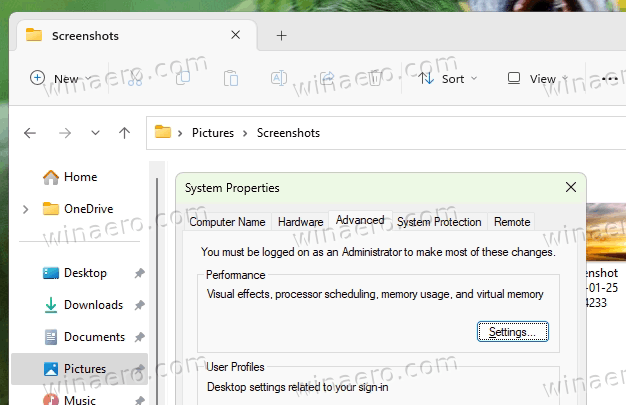
💡Tip: It is not actually necessary to type these two commands in the Run box. You can type them in the address bar of File Explorer. This will also do the trick.
To save your time, you can create a shortcut for any of these two commands, or even add them to the This PC's icon context menu in File Explorer.
Create a shortcut for the "System" applet
- Right-click the Desktop, and select New > Shortcut.
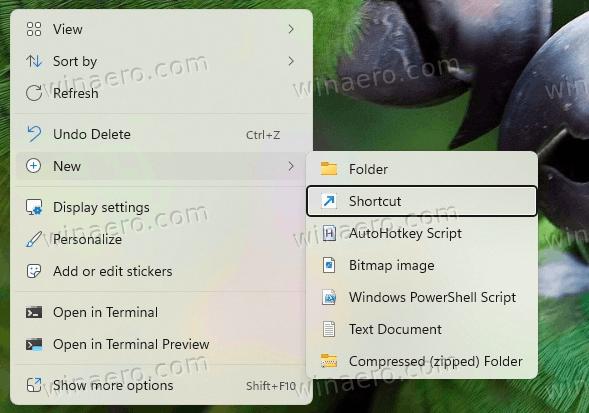
- In the "Type the location of the item:" box, type the
systempropertiesadvanced.exeline, and click Next.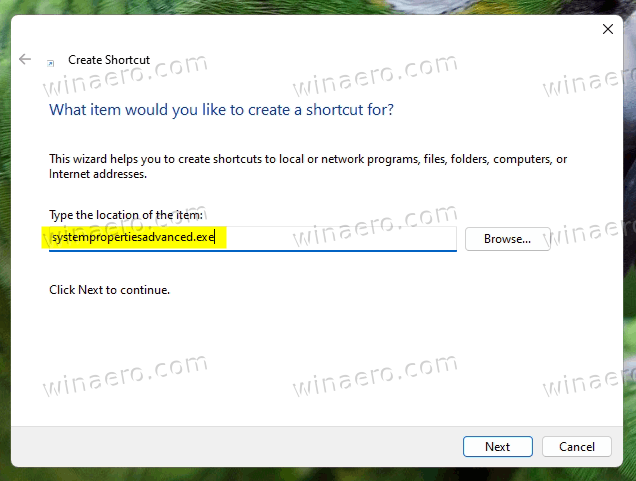
- On the next page, enter a meaningful name for the new shortcut, e.g. simply Advanced System Properties.
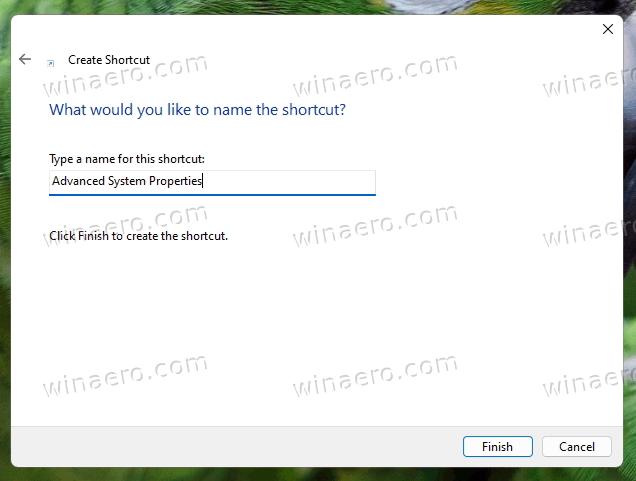
- Click on Finish, and double-click your new shortcut. Enjoy faster access to the good old options.
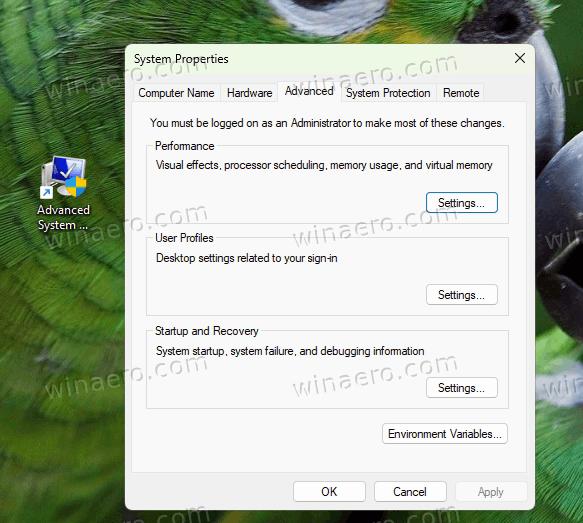
You are done. To access the shortcut much faster, you can pin it to the Start menu or taskbar. For that, press-n-hold the Shift key and right-click it to see the full menu, and select "Pin to Start" or "Pin to taskbar" from the context menu.
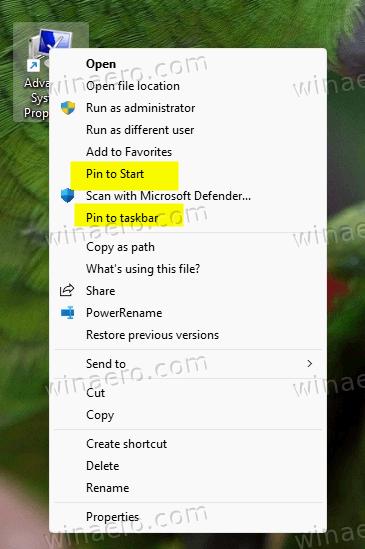
Alternatively, you can assign a global keyboard shortcut to open the applet with a single keystroke from any app. Follow the steps mentioned in this guide, it is applicable to all OS versions including Windows 11.
For your convenience, you can add the Advanced System Properties dialog to the context menu of the This PC icon in File Explorer. When you right-click it, you will be able to navigate to the classic UI with one click. Do the following.
- Press the Win + R keys and type
regeditin the Run box.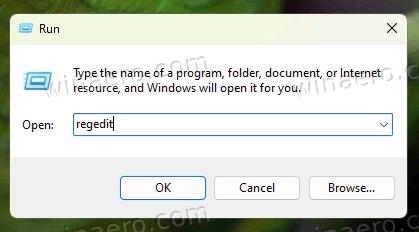
- Navigate to the following key: HKEY_CURRENT_USER\Software\Classes\CLSID.
- Right-click the CLSID value, and select New > Key from the menu. Type "{20D04FE0-3AEA-1069-A2D8-08002B30309D}" in the name for the new key.
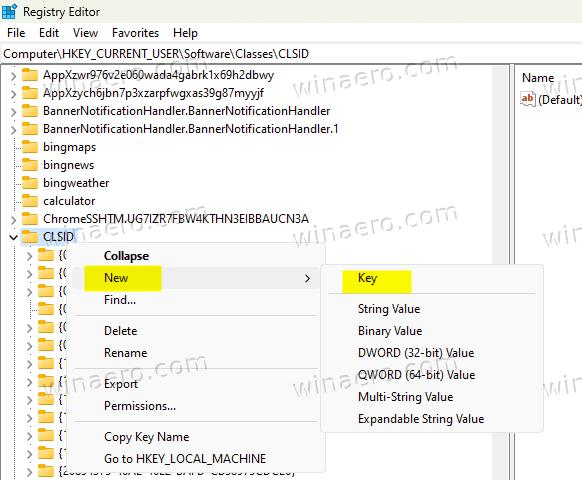
- Now, right click {20D04FE0-3AEA-1069-A2D8-08002B30309D} on the left, and select New > Key again. Name the new key Shell.
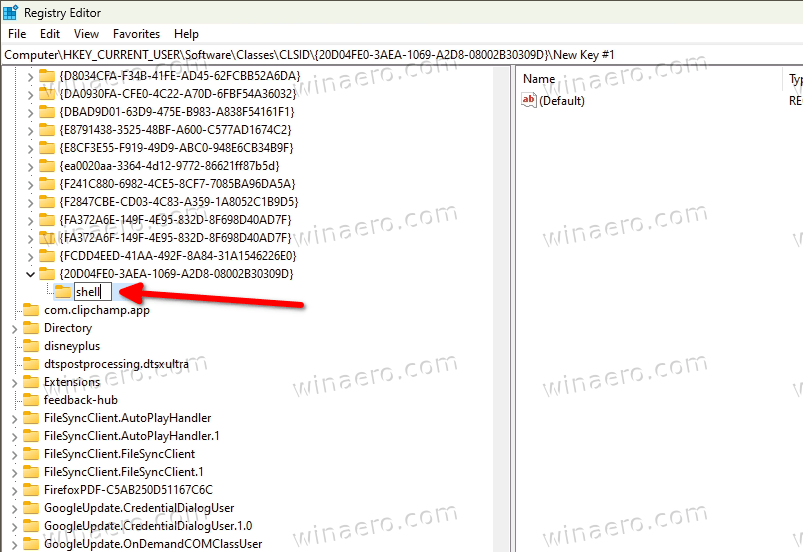
- Similarly, right-click the shell key, and select New > Key. Name the new key as "advproperties".
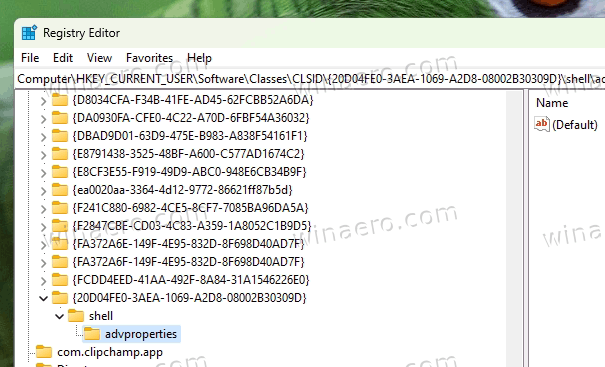
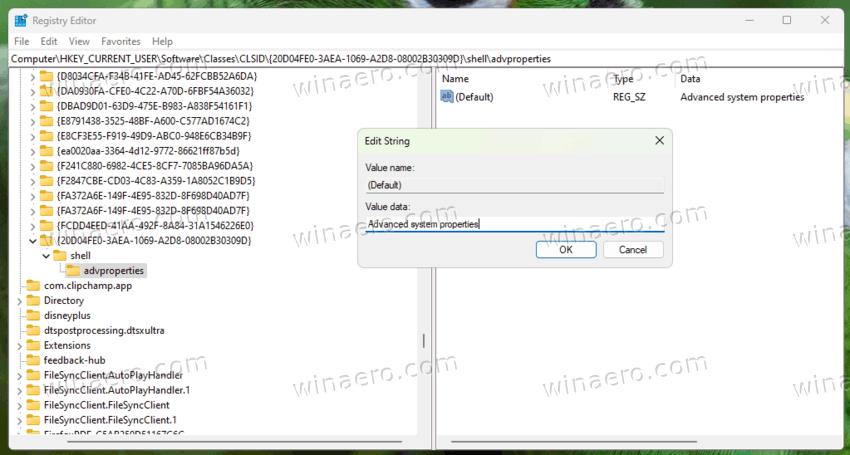
- In the right pane for the advproperties key, double-click the (default) unnamed value, and enter the text that will be shown for the menu item, i.e. "Advanced system properties".
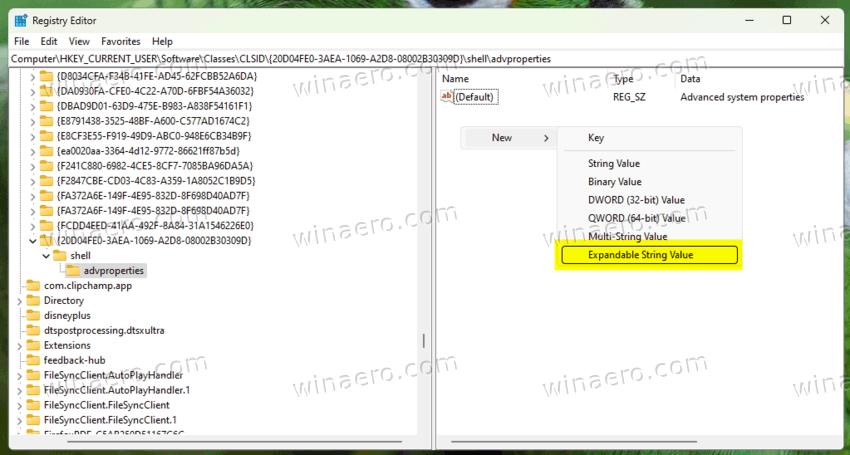
- Now, right-click anywhere in the right pane and select New > Expandable String Value from the menu. Name the new value as Icon.
- Then, double-click the Icon value and set it to
%SystemRoot%\system32\systempropertiesadvanced.exe,0.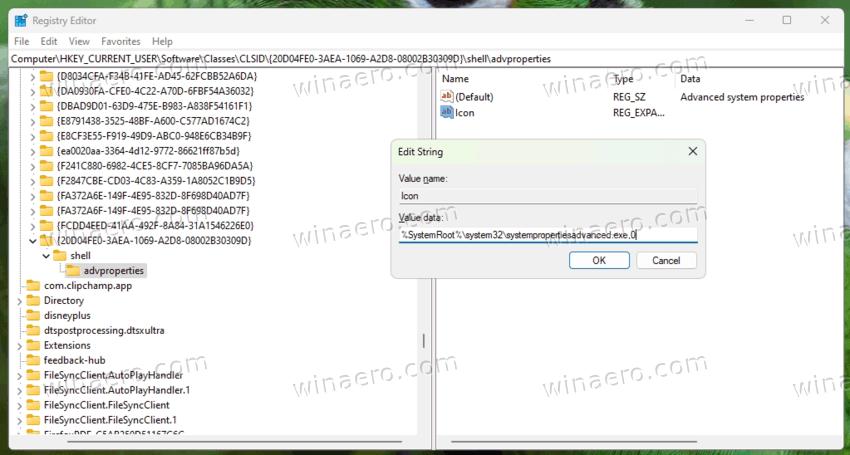
- Now on the left, right-click the advproperties you created, and select New > Key from its context menu.
- Name the new key as "command" and select it on the left.
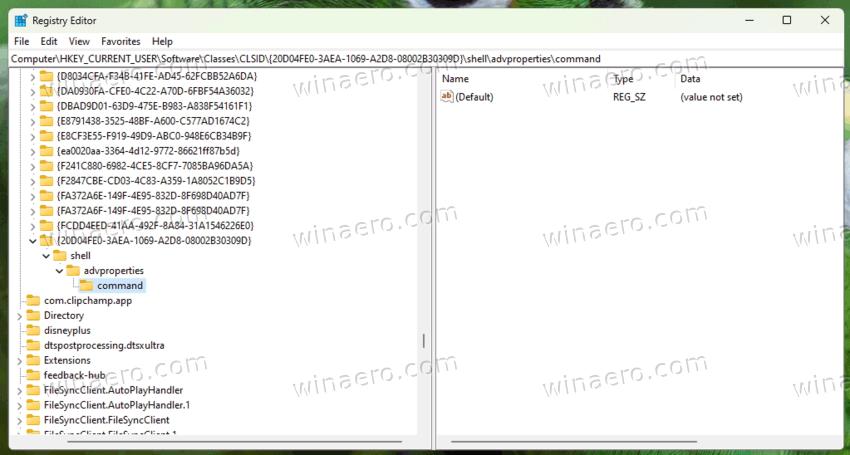
- On the right, double-click the (default) unnamed value, and set it to
c:\windows\system32\systempropertiesadvanced.exe.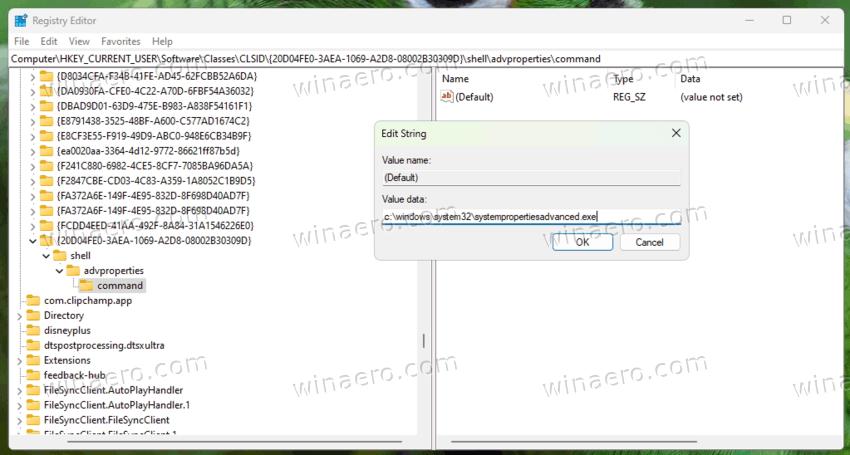
- Finally, right-click This PC in File Explorer (In Windows 11, hold Shift + right-click it). You now see the new "Advanced System Properties" entry.
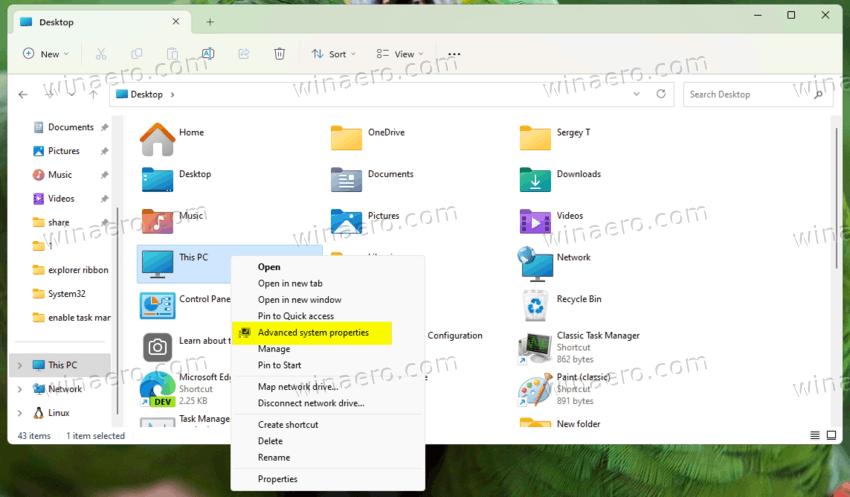
Enjoy! To save your time, I have created a couple of REG files for you.
Download Registry files
Download the two ready-to-use Registry files in a ZIP archive from this link. Extract the archive content to any folder of your choice.
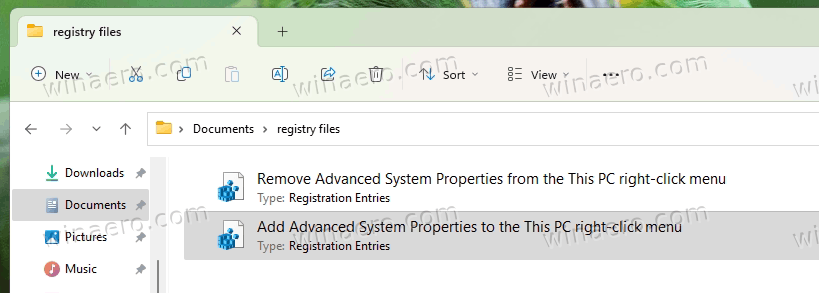
Now, double-click on the Add Advanced System Properties to the This PC right-click menu.reg file. You may be prompted by the User Account Control dialog. There, click Yes to permit the Registry modification.
Next, you will see the prompt by the Registry editor app. Click "Yes" to add the changes to the Registry, and you are good to go!
The other file, Remove Advanced System Properties from the This PC right-click menu.reg, is the undo tweak. Use it to remove the new menu item from the This PC's right-click menu.
Similar to the "Advanced system properties" item, you can add the legacy information page to the right-click menu of This PC. It will open the classic system properties in Windows 11 and 10 reviewed in the beginning of this guide.
To add classic System properties to the This PC's context menu, do the following.
- Open File Explorer (Win + E).
- Navigate to the C:\Users\<your username> folder.
- Here, create a new folder named System.{BB06C0E4-D293-4f75-8A90-CB05B6477EEE}.
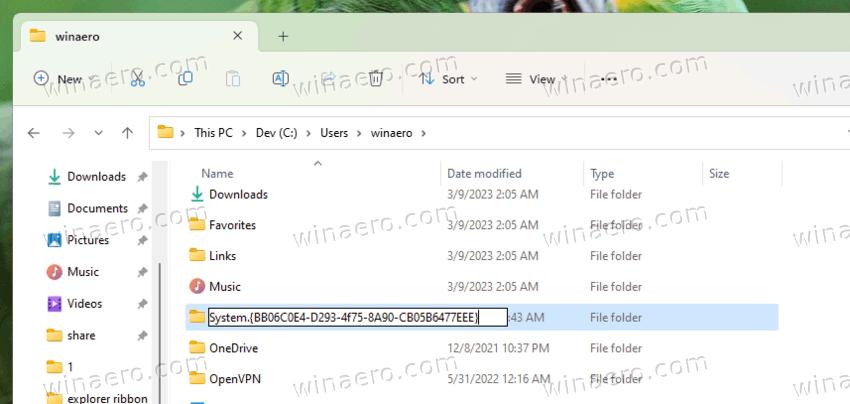
- Now, open the Registry editor (Win + R > type regedit, hit Enter).
- Open the HKEY_CURRENT_USER\Software\Classes\CLSID key, and right-click the CLSID folder in the left pane.
- Select New > key from the menu and name it as {20D04FE0-3AEA-1069-A2D8-08002B30309D}. You may already have this key if you followed the instructions above.
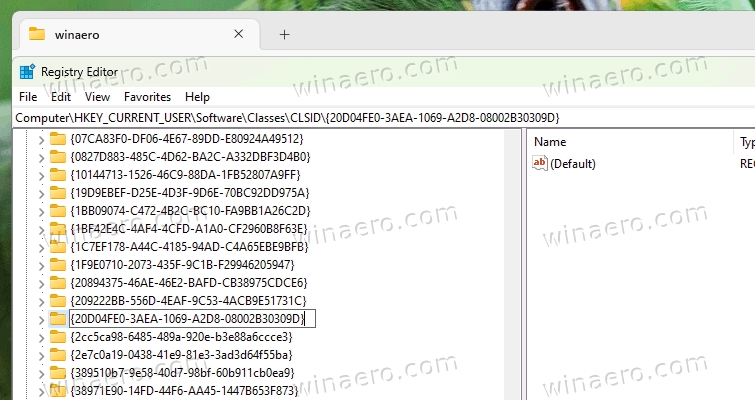
- Under the {20D04FE0-3AEA-1069-A2D8-08002B30309D} on the left, create a new subkey named Shell.
- Right-click the Shell key and again select New > Key. Name it ClassicProperties.
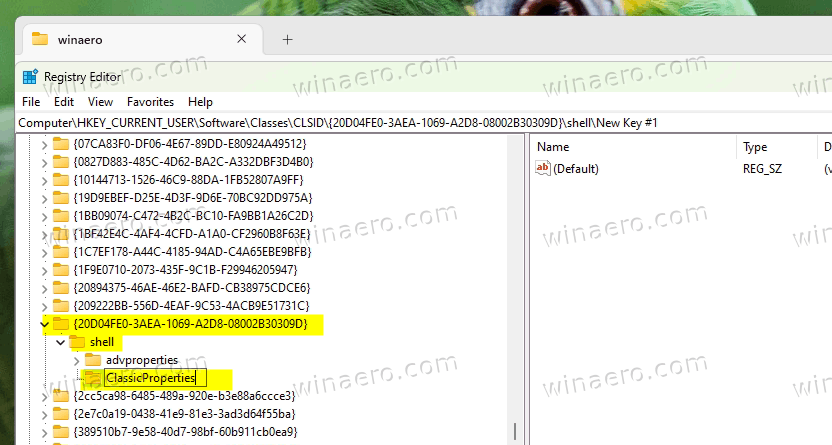
- In the right pane, double-click the (default) unnamed parameter, and set its value to the Classic Properties text.
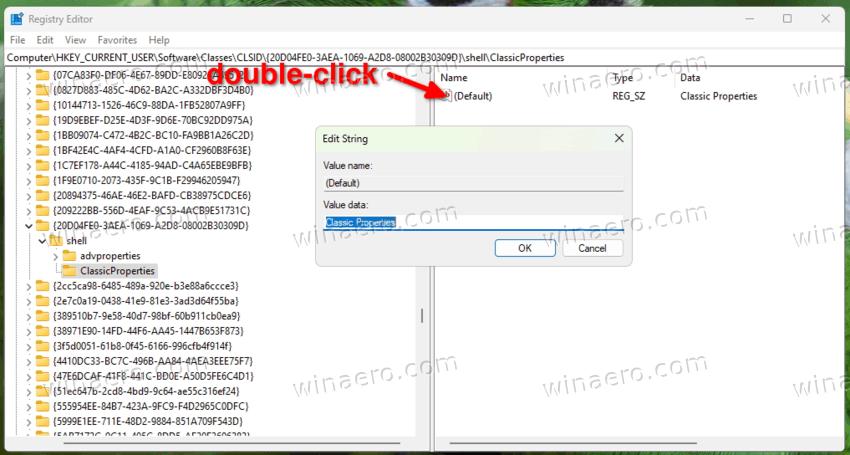
- Now, return to the left pane, right click the ClassicProperties folder, and select New > Key. Name it as command.
- Finally, double-click the (default) value on the right, and set it to this text:
explorer.exe c:\users\<your user>\System.{BB06C0E4-D293-4f75-8A90-CB05B6477EEE}.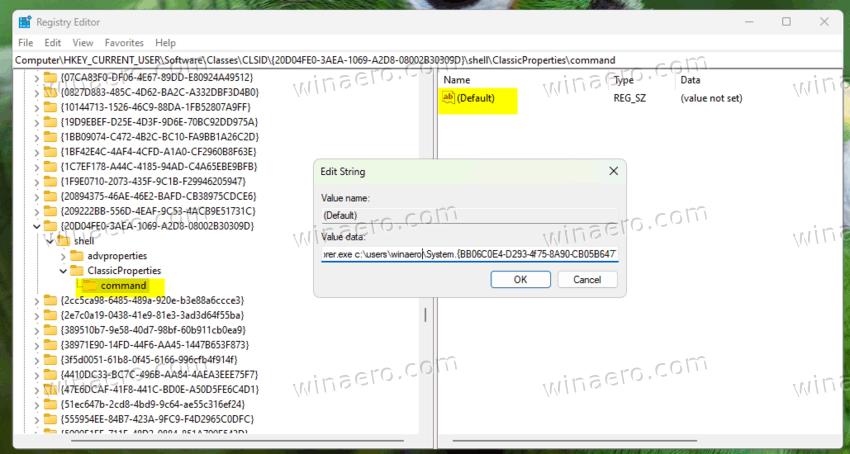
- Finally, right-click the This PC icon in File Explorer (in Windows 11, do Shift + right-click). You now have "Classic Properties" in its menu.
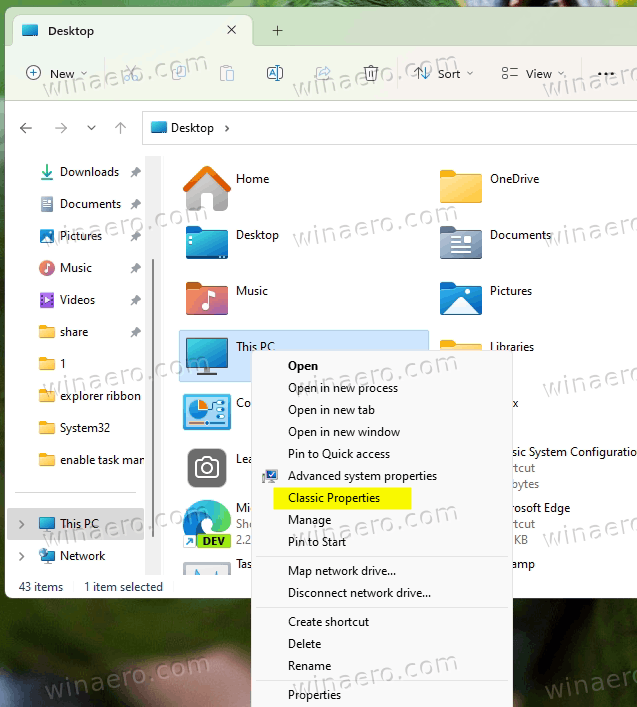
Again to save your time, I have created ready-to-use files.
Extract the ZIP archive you downloaded to any folder location of your choice, and open one of the following files:
-
Add Classic System Properties to the right-click menu.cmd- adds the "Classic Properties" entry to the This PC's context menu. -
Remove Classic System Properties from the right-click menu.cmd- removes the mentioned item.
Finally, you can add System Properties to the Navigation pane in File Explorer, that is on the left. Then it will be available in File Explorer with one click! This can be quickly done with Winaero Tweaker.
- Download, install and run Winaero Tweaker.
- Go to File Explorer > Navigation pane - custom items.
- Click on Add Shell Location.
- Find the System item in the list.
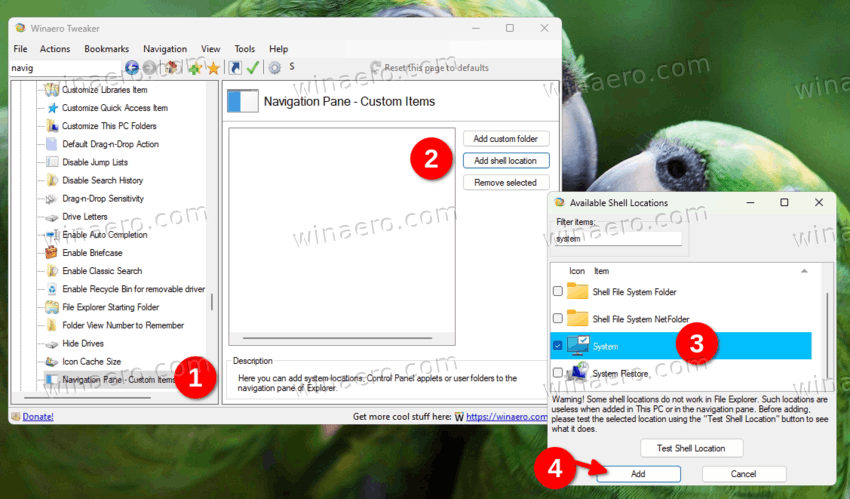
- Click on the Add button.
- Re-open File Explorer, and you will see the System item on the left.
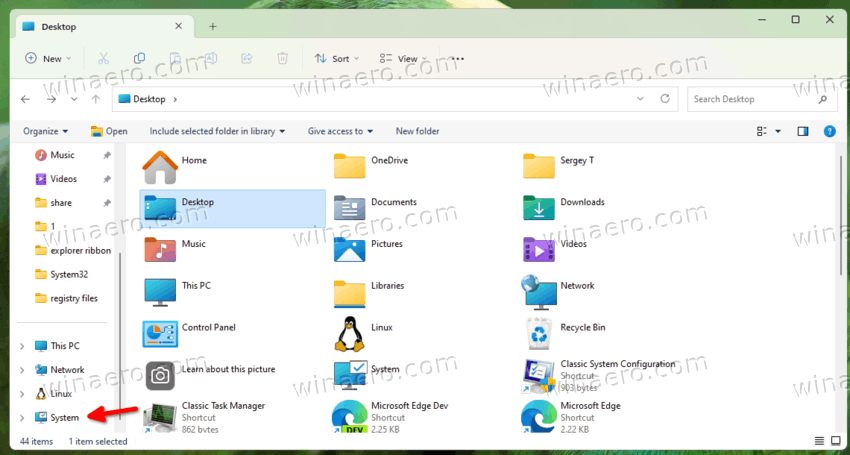
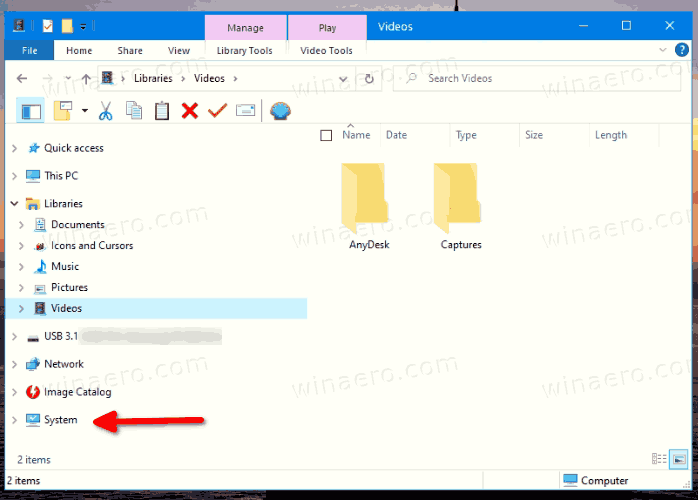
Now, let's review one more method. It remains exclusive to Windows 10 version 2004, but also worth to be mentioned in this guide.
Shell command method (Windows 10 version 20H2 only)
Note: This method works in Windows 10 version 20H2. However, from what I observed here, in Windows 10 build 20241+ and Windows 11 the command no longer works. You can quickly find what Windows version you have installed by pressing Win + R and typing winver in the Run dialog.
- Press Win + R to open the Run box.
- Type
shell:::{bb06c0e4-d293-4f75-8a90-cb05b6477eee}and hit the Enter key.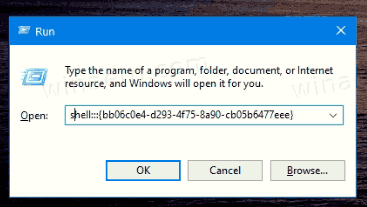
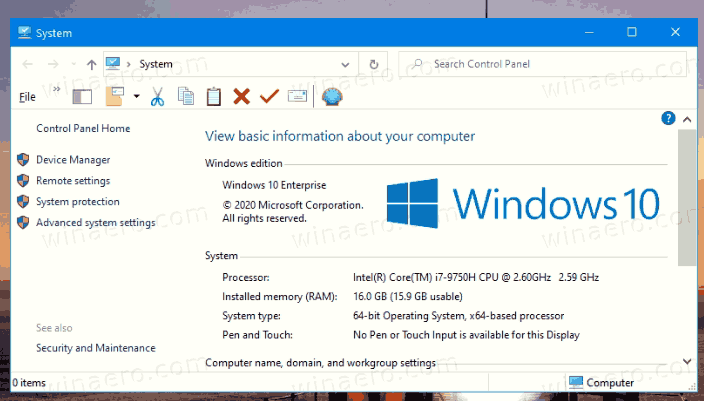
- Voila, the classic System Properties will open.
You are done!
You can access the classic System Properties applet faster if you create a shortcut to the shell command. Here's how.
Create a shortcut for the shell command
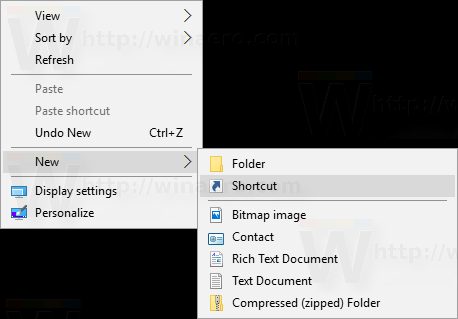
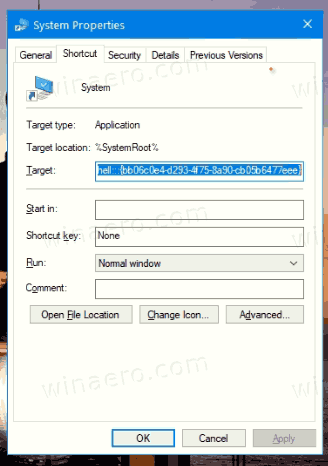
- Right-click the empty space on your Desktop. Select New > Shortcut from the context menu (see the screenshot).
- In the shortcut target box, type or copy-paste the following:
explorer.exe shell:::{bb06c0e4-d293-4f75-8a90-cb05b6477eee}.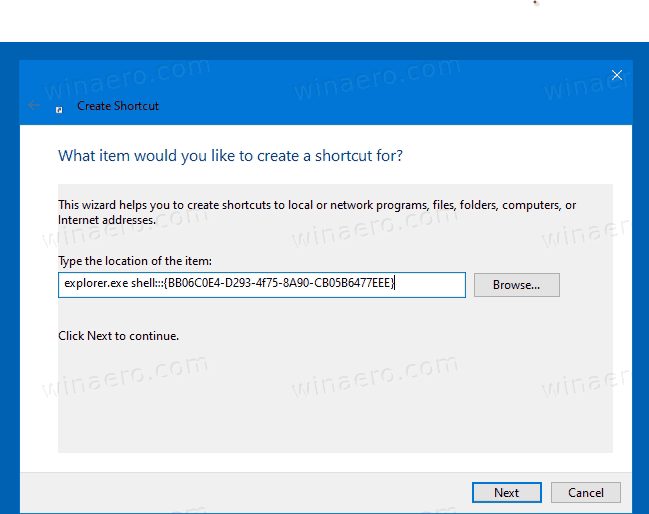
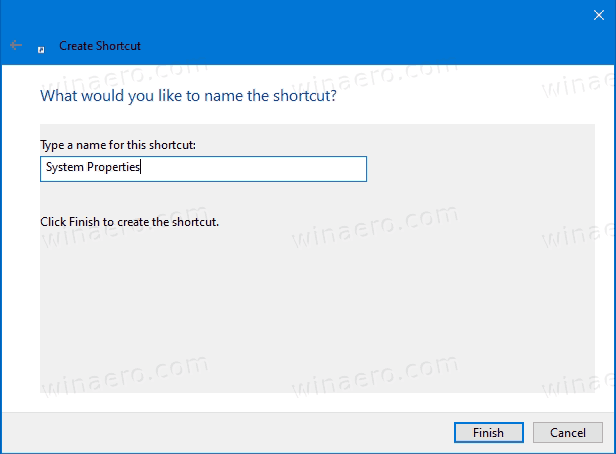
- Type System Properties for the name of the shortcut. Actually, you can use any name you want. Click on the Finish button when done.
- Now, right click the shortcut you created and select Properties. Tip: See How to open file or folder properties quickly in Windows File Explorer.
- On the Shortcut tab, you can specify a new icon if you wish. You can use the icon from the
c:\windows\system32\shell32.dllfile.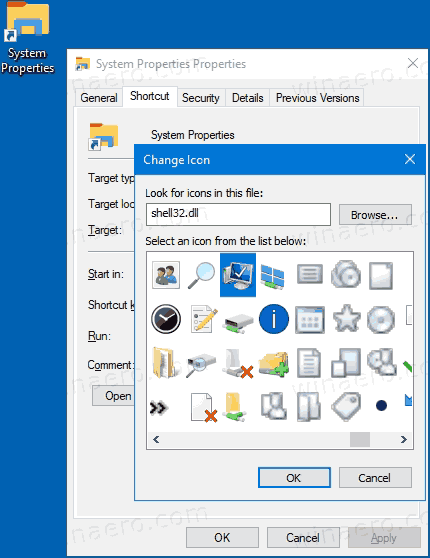 Click OK to apply the icon, then click OK to close the shortcut properties dialog window.
You are done!
Pro tip: You can save a lot of your precious time by using Winaero Tweaker. Use it for System Properties with Winaero Tweaker > Shortcuts > Shell Folder (CLSID) Shortcuts. Click on Select Shell Folders... button and find the System item in the list.
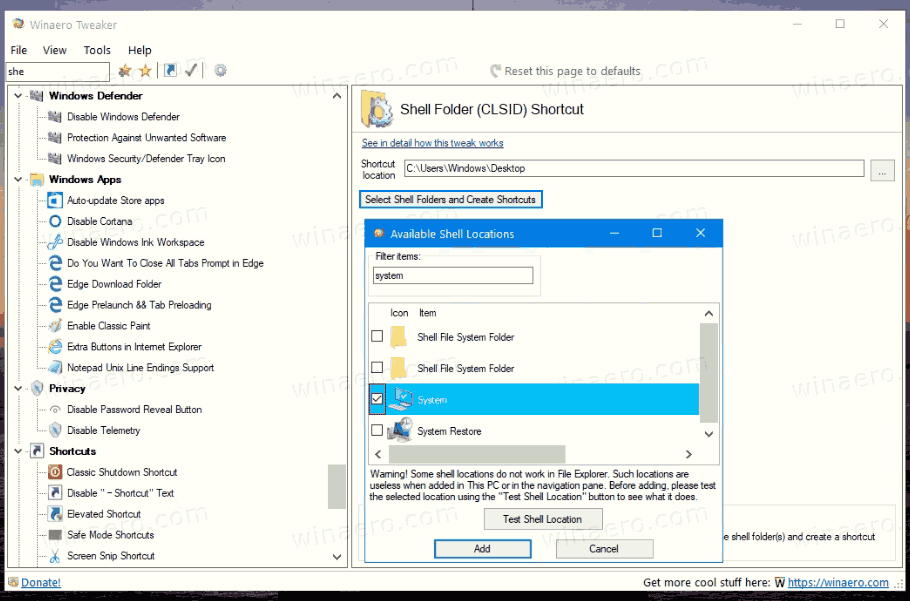
Now, you can move this shortcut to any convenient location, pin it to taskbar or to Start, add to All apps, etc.
That's it!
Support us
Winaero greatly relies on your support. You can help the site keep bringing you interesting and useful content and software by using these options:

Does the All Tasks shortcut, AKA Godmode folder, still work?
Sure it is.
You could just go open Control Panel then add \All Control Panel Items\System in the address bar. :)
lol, just press WIN + Pause
.. and you will end up with the Settings > About page. lol
type
sysdm.cplin the Search bar. Much faster than all thisThat works (for now.)
This page still works now on Win 11 now though, it wasn’t removed. Just create a folder named .{BB06C0E4-D293-4f75-8A90-CB05B6477EEE}, this will do the same thing. Can you add this method to this post Sergey?
Creating a folder with that name seemed to do nothing. Can you tell me step by step what you did?
It works! Don’t forget to put the period in front .{BB06C0E4-D293-4f75-8A90-CB05B6477EEE}
On Windows 10 you can simply right click “System” and the select the options “Open” or “Open in new window”. You’re Welcome.
You’re Welcome!–2021/11/27
lol idiot
windows 10 21h1 19043.1415 works Run and shortcuts
So, for the “System properties” applet, the GUID is {BB06C0E4-D293-4f75-8A90-CB05B6477EEE}. While the shell command with this GUID won’t work in Windows 11
It can work ( Win 11 07/0223 ):
Just remove “%userprofile%\” from appropriate line of CMD file.
Or modify in registry.
By the way, it reads Windows 11 by shows the Windows 10 logo….