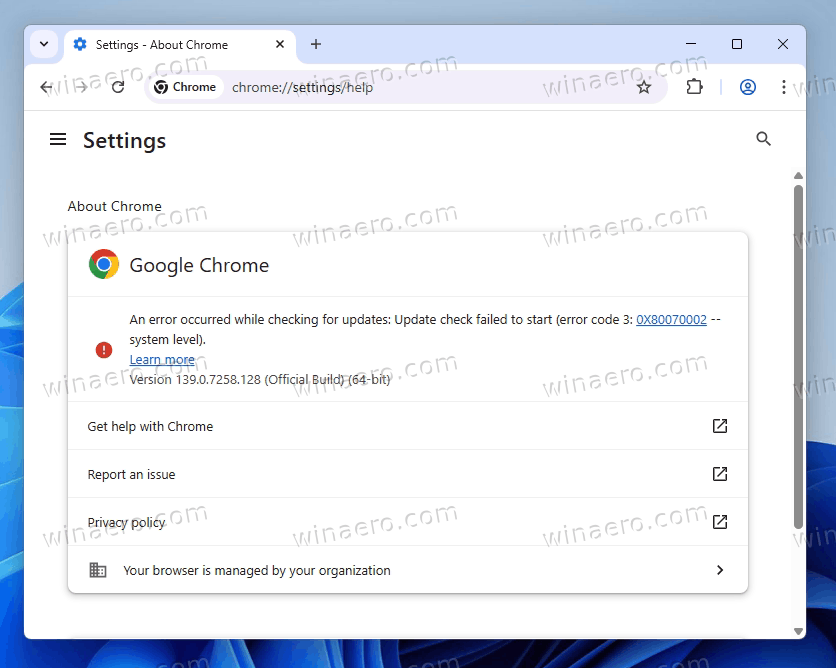
Google Chrome, a widely used web browser, automatically checks for updates to maintain performance and security. On Windows and macOS, Chrome uses an internal update mechanism that runs periodically when the system is online. The update process activates approximately every five hours or when accessing specific browser pages, such as chrome://settings/help. Upon detecting a new version, Chrome downloads and installs it silently. If the browser remains open for extended periods, a notification labeled "New Chrome available" appears; selecting "Relaunch to Update" applies the update immediately.
Advertisеment
It is important to note that the Chromium open-source browser does not include automatic updates. Additionally, Google Chrome does not implement auto-updates on Linux systems (I'll review this in detail in this post).
This guide will show you how to disable Google Chrome updates in Windows 11 and Windows 10, 8.1 and Windows 7 in different ways. There is a way to completely disable Chrome updates. There is also a way to make sure that the browser does not search for (and therefore install) updates automatically, but can install them when you need them.
Important Notes: Disabling Chrome updates halts the delivery of security patches, bug fixes, and feature enhancements. Users who choose to disable automatic updates should manually monitor for new Chrome releases and apply updates as needed to maintain browser security.
You may want to disable updates for Chrome and stick with a specific browser version. There are multiple reasons for that.
Reasons to Disable Automatic Updates
While automatic updates ensure security and feature enhancements, some users may wish to disable them for the following reasons:
- You want to keep a Chrome version that supports Manifest V2 version, in order to keep add-on compatibility.
- Updates initiate without user notification, consuming bandwidth in the background.
- Chrome does not provide an option to suspend updates on metered connections.
- New versions may modify or remove existing features, affecting user workflows.
- No built-in setting allows users to disable auto-updates or revert to previous versions.
Methods to Disable Chrome Auto-Update
Disabling auto-updates requires manual intervention through system-level configurations. Below are methods to disable automatic Chrome updates on Windows, Linux and macOS.
Modify Registry Settings to Disable Auto-Update
- Press Win + R, type
regedit, and press Enter to open the Registry Editor.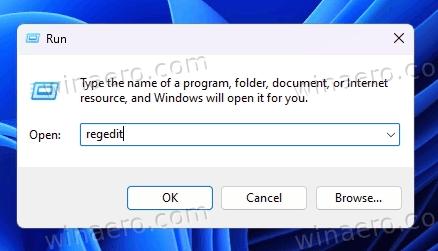
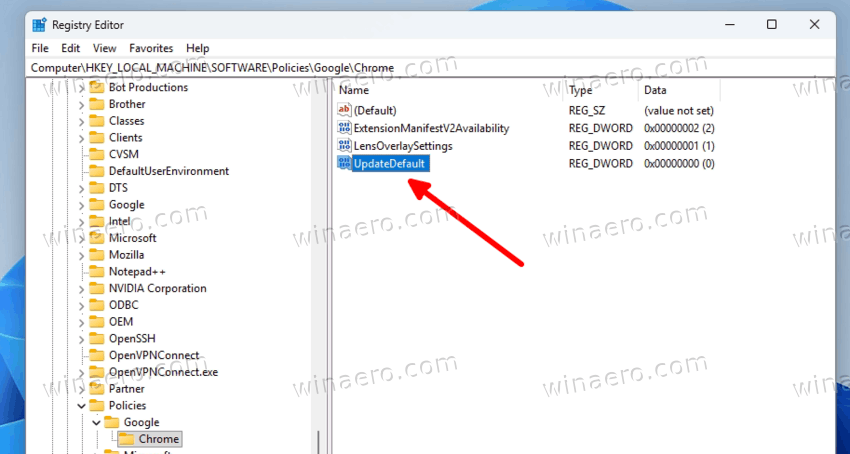
- Navigate to
HKEY_LOCAL_MACHINE\SOFTWARE\Policies. - Right-click on Policies, select New > Key, and name it Google.
- Right-click the new Google key, create another subkey, and name it Update.
- Inside the Update key, right-click on the right panel, select New > DWORD (32-bit) Value, and name it UpdateDefault.
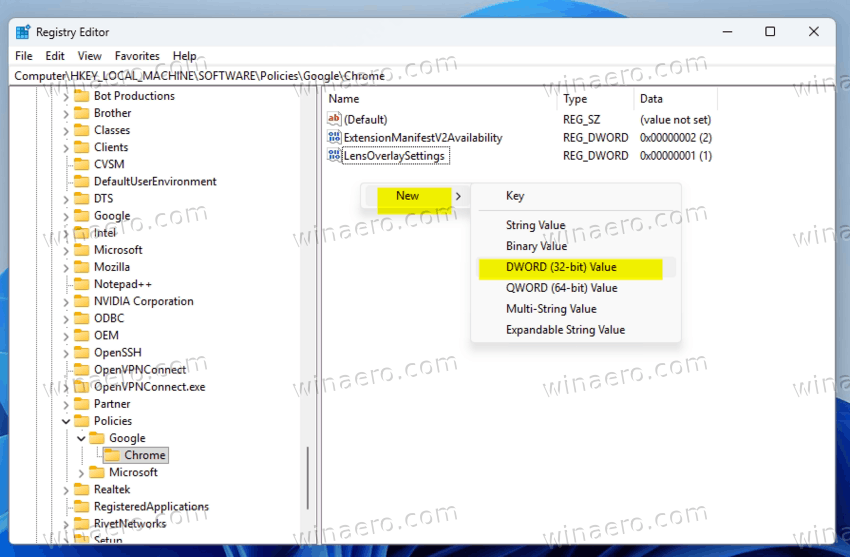
- Leave its value data 0.
- Optionally, create additional DWORD values:
-
AutoUpdateCheckPeriodMinuteswith value 0 -
DisableAutoUpdateChecksCheckboxValuewith value 1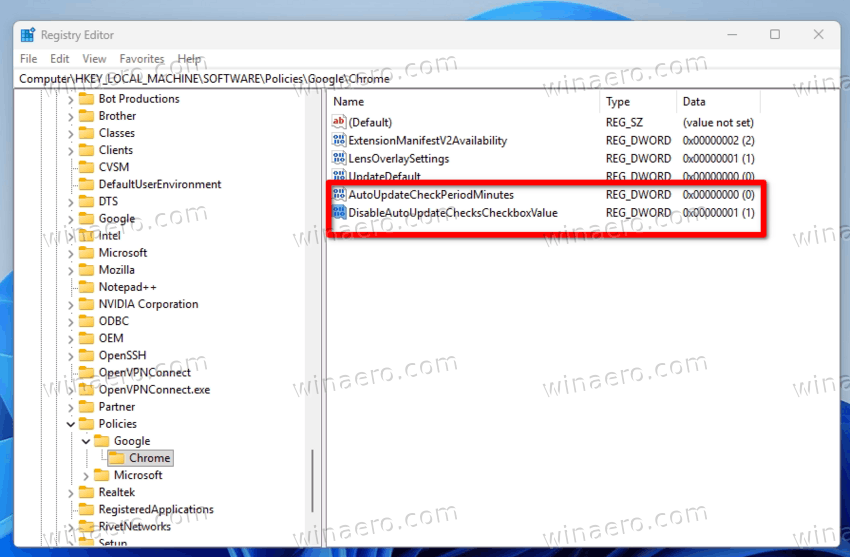
-
- Close the Registry Editor.
At this point, you have completed all the required actions. Chrome will no longer check for updates, and it will not install them automatically.
Rename the Chrome Update Folder (Windows)
- Navigate to the Chrome installation directory:
C:\Program Files (x86)\Google\Update. - Locate the Update folder within the Google directory.
- Open the folder and locate the
GoogleUpdate.exefile. - Change the filename to
GoogleUpdate1.exeor another variation.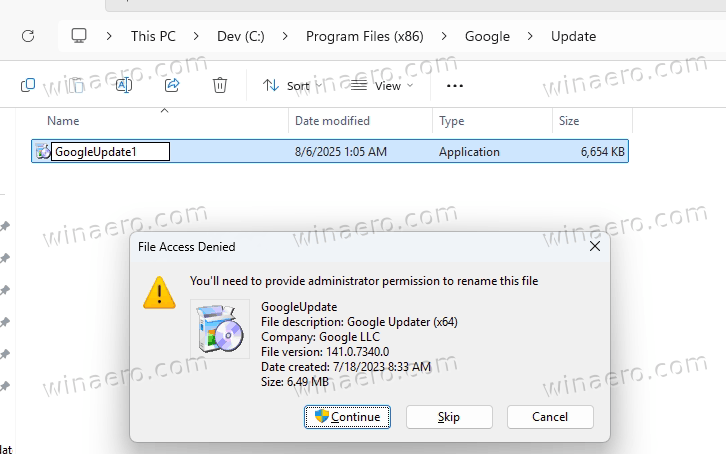
- If prompted, click on Continue or provide Administrator credentials to proceed.
- Now, navigate to
C:\Program Files (x86)\Google\GoogleUpdater\folder. - Find the folder with the most recent version, e.g.
141.0.7340.0, and open it. - Finally, rename the file
updater.exetoupdater1.exeor another variation.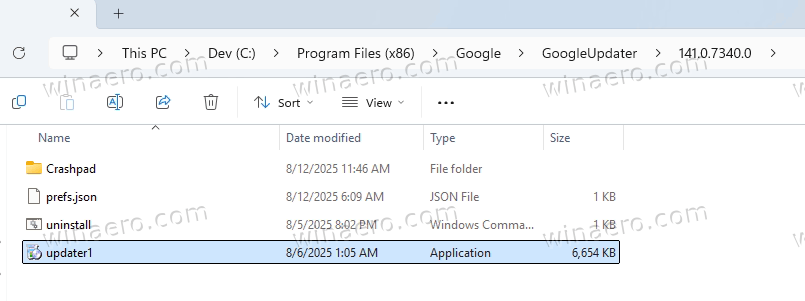
- After renaming, open Chrome and visit
chrome://settings/help. An update error should appear, confirming the change.
Note: This method is only applies to Windows.
Disable Chrome Update via Services (services.msc)
- Press Win + R, type
services.msc, and press Enter.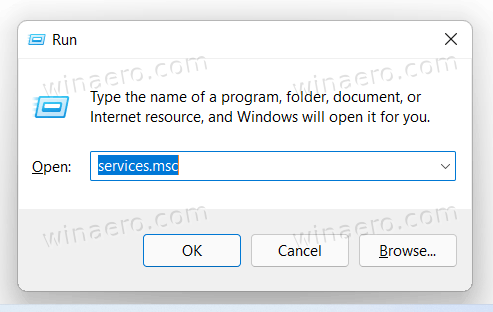
- In the right panel, locate the services named GoogleUpdaterService<installed Chrome version> and GoogleUpdaterInternalService<installed Chrome version>.
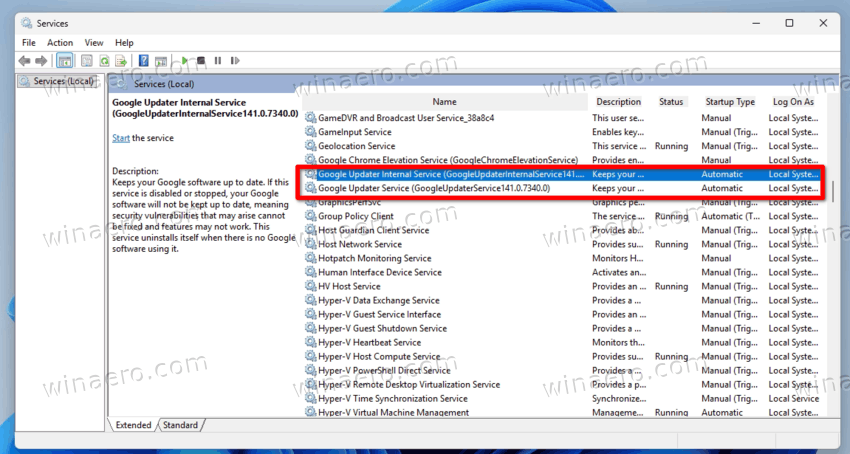
- Double-click each service and set the Startup type to Disabled.
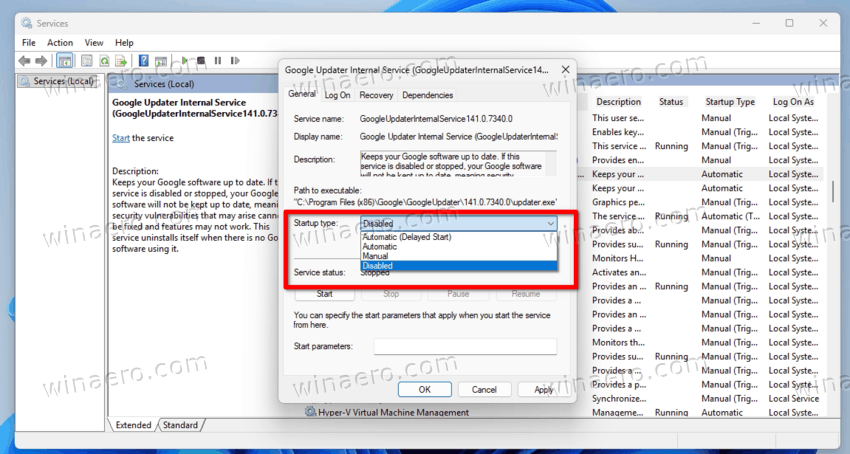
- Click OK to save the setting for each service.
- Restart the computer.
That's it. Once you restart your device, Google Chrome will no longer run its services to download and install the latest browser versions.
Disable Chrome Updates on Linux
Google Chrome on Ubuntu integrates with the system’s APT package management to automatically check for and install updates. By default, the browser adds a dedicated repository during installation, which enables ongoing update delivery. Users who require control over update timing or wish to prevent automatic updates can disable this mechanism using one of several methods, depending on whether Chrome is installed or not.
Prevent Chrome Updates Before Installation
To block automatic updates before installing Chrome, create a configuration file that disables repository registration:
- Open a terminal window.
- Create an empty configuration file using the following command:
sudo touch /etc/default/google-chrome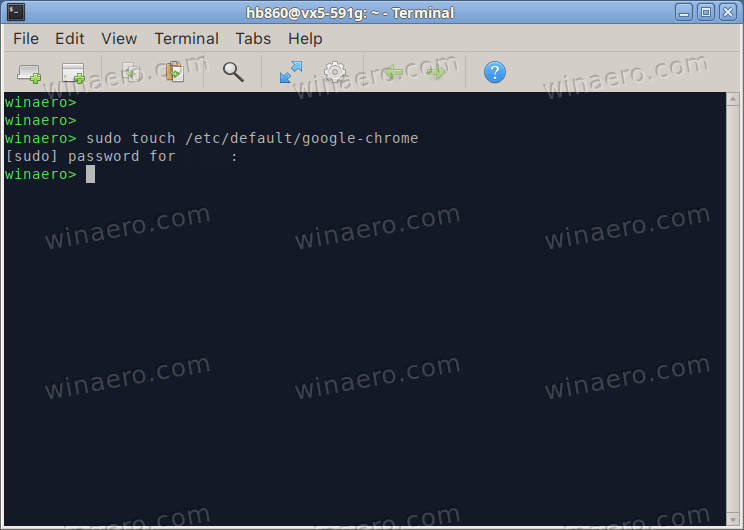
- Confirm the operation in the sudo prompt by entering your password.
- Edit the file to include the repository control directive:
echo "repo_add_once=false" | sudo tee /etc/default/google-chrome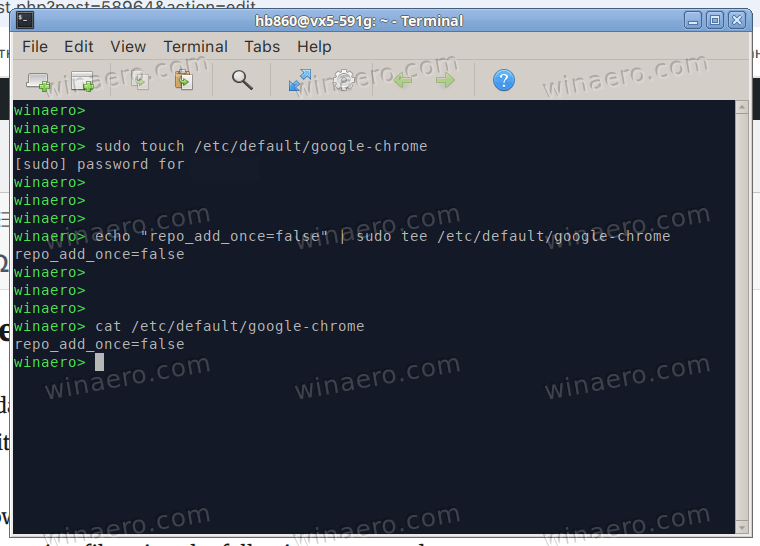
- Proceed with Chrome installation. The system will not register the Google Chrome repository, preventing future updates.
Disable Chrome Updates After Installation
If Chrome is already installed, disable updates by removing or deactivating the associated package repository.
Method 1: Using the Graphical Interface (GUI)
- Open Software & Updates from the system settings or application menu.
- Navigate to the Other Software tab.
- Locate the entry corresponding to Google Chrome:
http://dl.google.com/linux/chrome/deb/ stable main - Uncheck the box next to this entry to deactivate the repository.
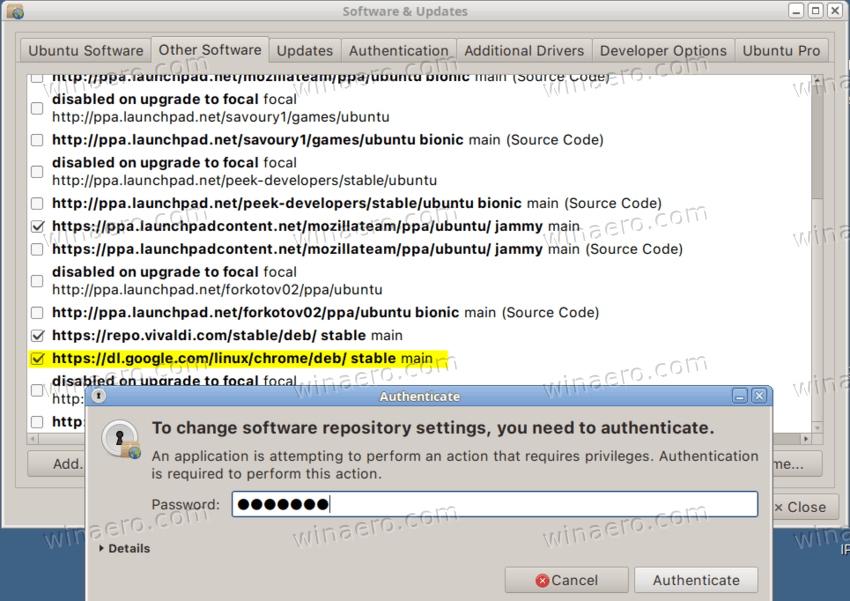
- Confirm any system prompts to reload the package list.
Method 2: Using the Terminal
- Open a terminal session.
- Access the Chrome repository configuration file with root privileges:
sudo nano /etc/apt/sources.list.d/google-chrome.list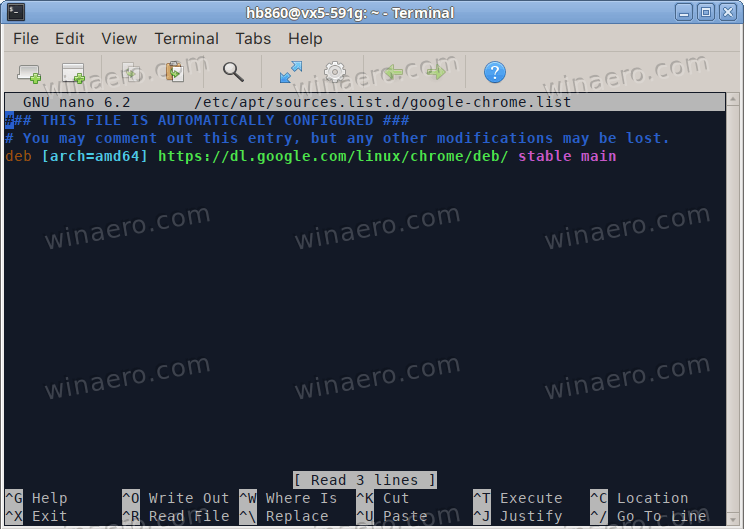
- Locate the active repository line, which appears as:
deb [arch=amd64] http://dl.google.com/linux/chrome/deb/ stable main - Comment out the line by adding a hash symbol (#) GoogleUpdaterInternalService<installed Chrome version>at the beginning:
# deb [arch=amd64] http://dl.google.com/linux/chrome/deb/ stable main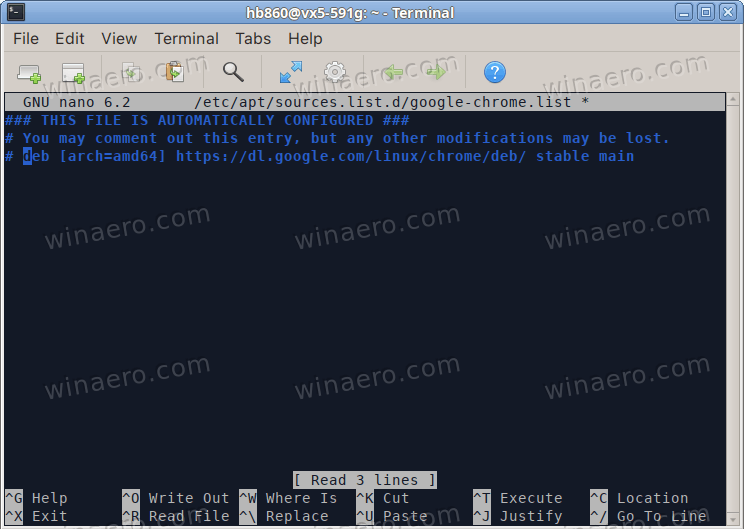
- Save the file (press Ctrl + O, then Enter) and exit the editor (press Ctrl + X for that).
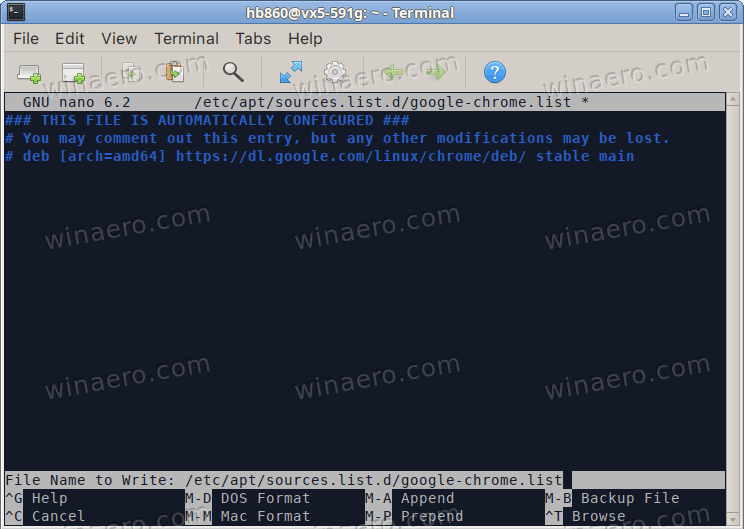
- Update the package index to reflect the change:
sudo apt update.
Disabling Automatic Google Chrome Updates on macOS
Unlike Windows, macOS doesn't include a Registry where you can disable services or apply policies. It is a different operating system where you must use some different methods. For that, you can change the update URL, modify the package information and/or login items, or add special lines to the hosts file. Let's dive into the details.
Modify the Auto-Update URL in Chrome on macOS
- GoogleUpdaterInternalService<installed Chrome version>Open Finder and navigate to the Applications folder.
- Right-click (or Control-click) on Google Chrome and select Show Package Contents.
- Open the Contents folder and locate
Info.plist. - Open the file using Xcode or another XML-compatible editor with write permissions.
- Find the key
KSUpdateURL. - Change the URL value (e.g.,
https://tools.google.com/service/update) to an invalid address. - Save the file and close the editor.
Adjust Update Interval in macOS Preferences
- Open Finder, click Go in the menu bar, and select Go to Folder….
- Enter the path:
~/Library/Preferences. - Locate the file
com.google.Keystone.Agent.plist. - Open it with Xcode or a compatible XML editor.
- Find the
checkIntervalkey and change its value to 0. - Save and close the file.
- Alternatively, use Terminal and run:
defaults write com.google.Keystone.Agent checkInterval 0.
Disable Google Updater in Login Items (macOS)
- Click the Apple logo and select System Settings….
- Navigate to General > Login Items.
- Locate Google Updater in the list under Allow in the Background.
- Click the toggle to disable it.
Block Chrome Update Domains via Hosts File
This works on Windows, Linux and macOS. You'll have to open the hosts file using administrative privileges under the following locations.
- Windows:
C:\Windows\System32\drivers\etc\hosts - Linux and macOS:
/etc/hosts
The hosts file is a system-level configuration file used to map hostnames to IP addresses. When present, entries in the hosts file take precedence over DNS resolution. This file is commonly used for blocking domains, testing websites, or redirecting network requests. Editing the hosts file requires administrative or root privileges on all operating systems.
The format for entries follows this structure:
IP_address hostname
Example:127.0.0.1 example.com
Block Chrome Auto Updates in Hosts File on Windows
- Press Win + S, type
Notepad, right-click on Notepad, and select Run as administrator.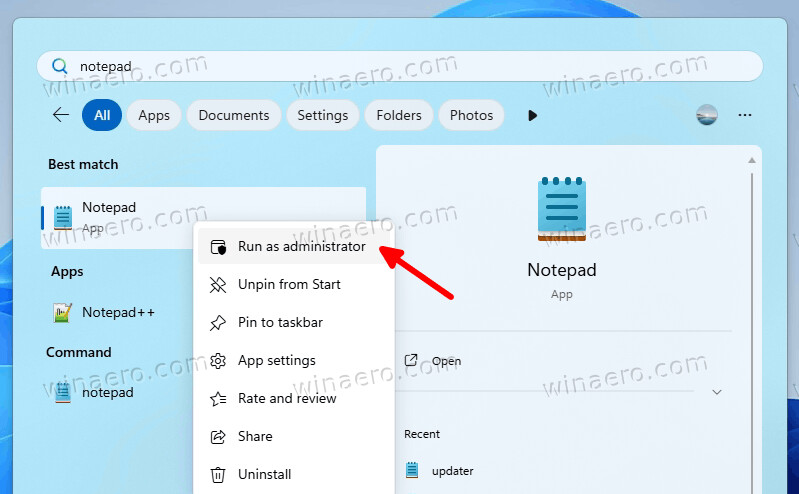
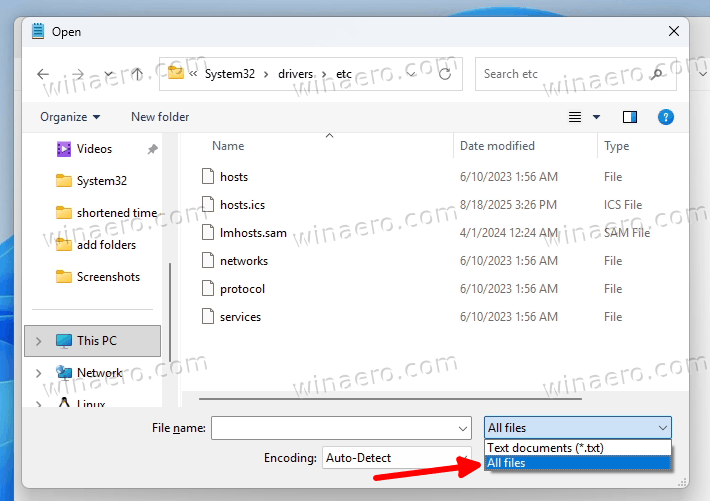
- In the elevated Notepad window, go to File > Open.
- Navigate to
C:\Windows\System32\drivers\etc. - In the file open dialog, change the file type filter from "Text Documents (*.txt)" to "All Files (*.*)".
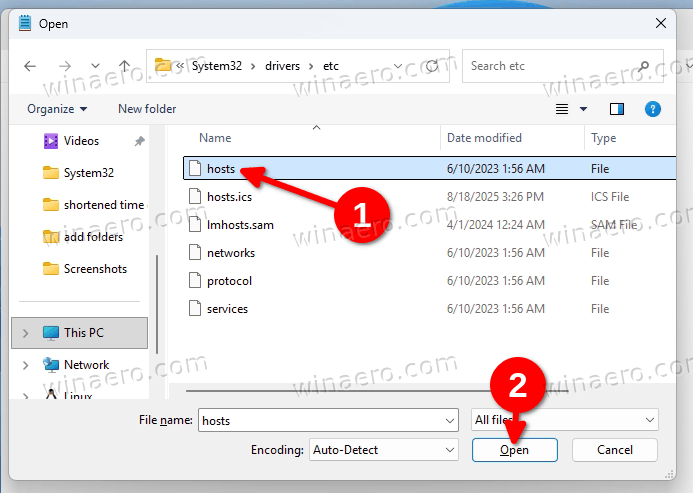
- Select the file named hosts and click Open.
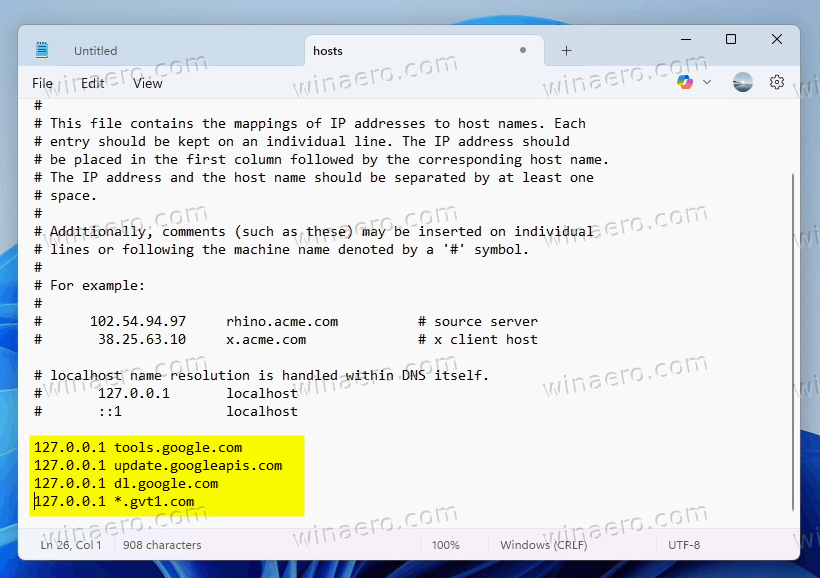
- Add the following lines to the end of the file redirect update domains to the local machine:
127.0.0.1 tools.google.com
127.0.0.1 update.googleapis.com
127.0.0.1 dl.google.com
127.0.0.1 *.gvt1.com
- Save the file by pressing Ctrl+ S or selecting Save from the menu.
Changing the Hosts file on Linux
On Linux distributions, the hosts file is accessible through the terminal using root privileges.
- Open a terminal window.
- Use a text editor such as
nanoto edit the file. For example:sudo nano /etc/hosts - Modify the file by adding the following Chrome domains used for automatic updates:
127.0.0.1 tools.google.com
127.0.0.1 update.googleapis.com
127.0.0.1 dl.google.com
127.0.0.1 *.gvt1.com
- Save the changes in nano: Press Ctrl + O, then Enter, then Ctrl + X to exit.
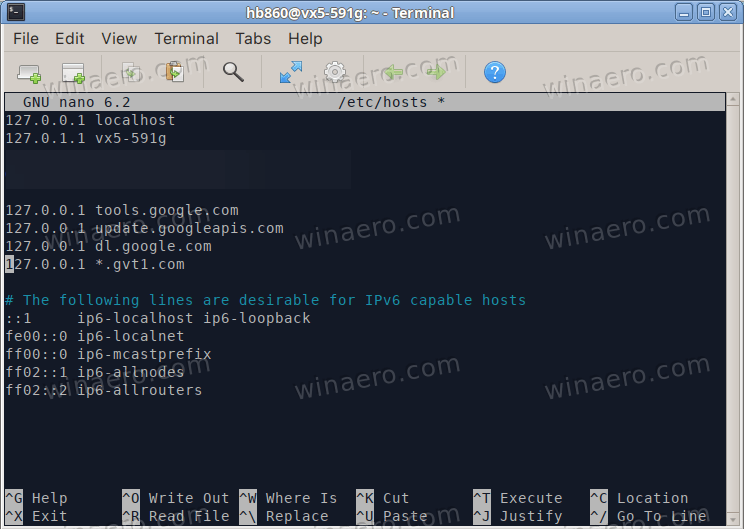
- The changes apply immediately; no system restart is required.
On macOS
macOS treats the hosts file similarly to Linux, requiring administrative access for modifications.
- Open the Terminal application. You can find it in Applications > Utilities or search using Spotlight (Cmd + Space).
- Launch a text editor with elevated privileges. Use the following command:
sudo nano /etc/hosts - Enter your administrator password when prompted.
- Make the desired changes to the file. Example entry:
127.0.0.1 tools.google.com
127.0.0.1 update.googleapis.com
127.0.0.1 dl.google.com
127.0.0.1 *.gvt1.com
- Save and exit: Press Ctrl + O to write the file, press Enter to confirm, then press Ctrl + X to exit.
That's it!
Support us
Winaero greatly relies on your support. You can help the site keep bringing you interesting and useful content and software by using these options:

I have a MikroTik router and block most of Google with the router with a block list from the nickspaargaren.
No-Google I think the list is called. Almost 7k domains from them. I can’t reach anything from Google, and they can’t reach me! Just the way I want it. I try to stay away from big tech as much as possible.