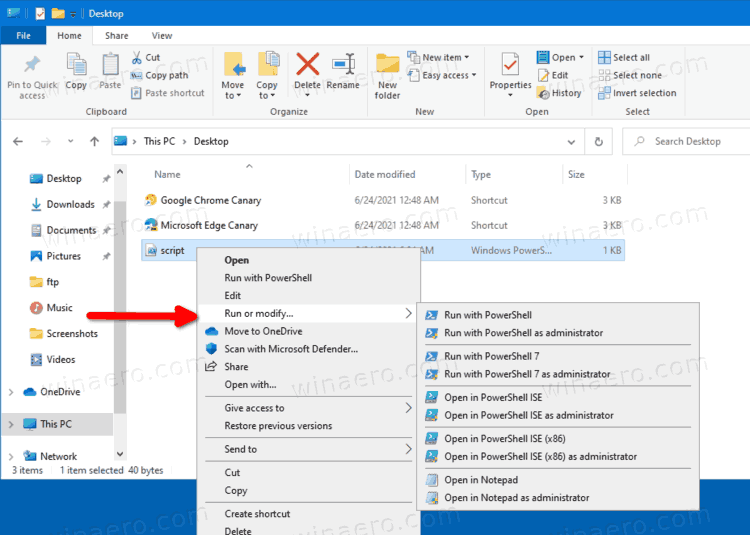
Here's how to add Run or modify context menu for PS1 files in Windows 10 which will allow you to quickly run and edit. Simply right-click a PS1 file and select one of the options to run it with either PowerShell or PowerShell 7, start it elevated with your preferred scripting language version, and more.
Advertisеment
PowerShell is a command line processor and scripting language for advanced users. It comes with a wide range of options, including built-in cmdlets for almost everything in Windows, the ability to create your own functions and modules. Also, PowerShell can be expanded with .NET classes, wrappers and functions, which is just impressive. Once you learn PowerShell, it will allow you to uplift your automation skills to previously unreachable heights.
The cascading context menu we are about to add will bring the following commands to the PS1 file right-click menu.
- Run with PowerShell
- Run with PowerShell as administrator
- Run with PowerShell 7
- Run with PowerShell 7 as administrator
- Open in PowerShell ISE
- Open in PowerShell ISE as administrator
- Open in PowerShell ISE (x86)
- Open in PowerShell ISE (x86) as administrator
- Open in Notepad
- Open in Notepad as administrator
See the following screenshot.
This post will show you how to add or remove the PowerShell cascading menu for PS1 files in Windows 10. Follow the steps below to add or remove it.
Add Run or modify Context Menu For PS1 Files
- Download this ZIP archive.
- Extract it to any folder of your choice.
- Double-click on the file 01_Add Run to Modify Cascading Context Menu for Ps1 files.reg to merge it and add the menu.
- If you have PowerShell 7 installed and want to add it to the same menu, double-click on 02_Add PowerShell 7 entries.reg. The undo tweak is
03_Remove PowerShell 7 entries.reg. - Finally, if you want to make the menu only appear when you Shift + right-click a PS1 file, apply the 04_Show PowerShell Cascading Context Menu with Shift key.reg file. The undo file is 05_Show PowerShell Cascading Context Menu normally.reg.
You are done. The changes go live instantly.
However, if you are not happy with the menu you just added, the ZIP archive includes an undo file. You need to double-click the Remove PowerShell Cascading Context Menu.reg file to instantly remove it.
That's it.
Support us
Winaero greatly relies on your support. You can help the site keep bringing you interesting and useful content and software by using these options:

Can you add an option for editing with the Registry Preview included in Windows PowerToys? That would be very nice as that tool is specifically made for viewing and editing registry files, including a preview of the registry tree.
But it adds itself by default to the context menu of the REG files. No extra actions required.
It is in the Shift+click extended menu.
On Windows 11 (22H2) this unfortunately doesn’t work, can you make a fix? I tried only option 02_Add PowerShell 7 entries.reg but without success. Of course, I have PowerShell 7 installed.
Sorry for the confusion, everything works as it should, it’s my bug. Everything works great on Windows 11 (22H2)