In Windows 10, the Settings app does not provide the user a simple way to change the WiFi connection priority. If you are coming from Windows 7, you are probably used to easily setting the priority of wireless networks using the special applet in the Control Panel. In Windows 10, that applet is missing in the classic Control Panel, and Settings does not offer any alternative. Let's see how to change WiFi network priority in Windows 10.
In Windows 10, the only way to change a WiFi network priority without using third party tools is the console tool netsh. Using netsh, you can change the connection order for all registered wireless networks. Here is how it can be done.
Change a WiFi network priority in Windows 10
To change a WiFi network priority in Windows 10, do the following.
- Open an elevated command prompt.
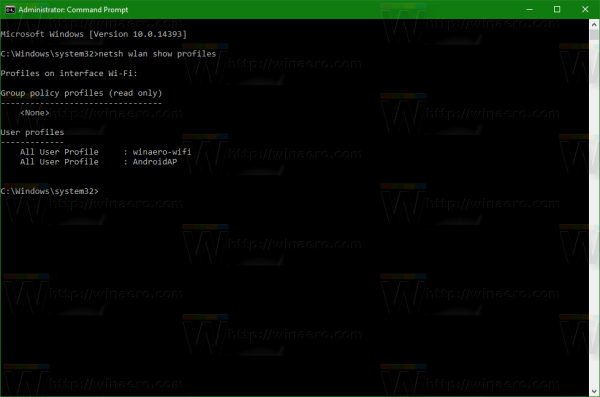
- Type or copy-paste the following command:
netsh wlan show profiles
This will show you all wireless network profiles stored on your PC. The command shows profiles according to their current priority set by the operating system.

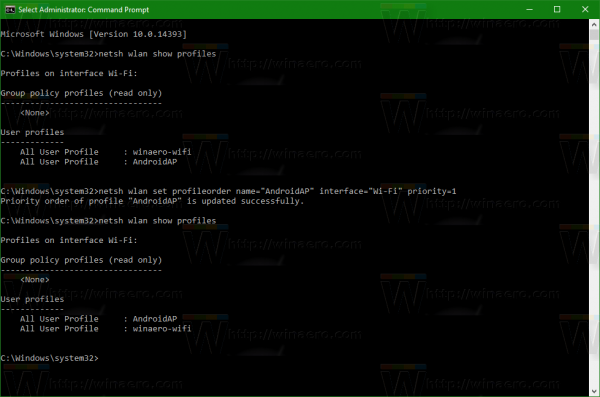
- To change the order in which your Windows 10 will connect to them, type the following:
netsh wlan set profileorder name="NETWORK NAME" interface="Wi-Fi" priority=1
netsh wlan set profileorder name="OTHER NETWORK NAME" interface="Wi-Fi" priority=2
And so on. Use the actual network names that you get in the previous step.

Now, if you run netsh wlan show profiles again, you will see that the list is re-ordered.
Tip: if you need to set Windows 10 to always prefer a specific network profile, set its priority to 1 and do not change other profile priorities.
That's it.
Support us
Winaero greatly relies on your support. You can help the site keep bringing you interesting and useful content and software by using these options:

When I entered the command, I got the following error:
C:\WINDOWS\system32>netsh wlan show profiles
The Wireless AutoConfig Service (wlansvc) is not running.
I started wlansvc ( it was set to “manual” not disabled, so why didn’t it just start?) and tried it again, but then got:
C:\WINDOWS\system32>netsh wlan show profiles
There is no wireless interface on the system.
We do have wireless, so I don’t understand the error? Can you help?
Thanks for all your great articles!
How is your wireless adapter displayed in the device manager?