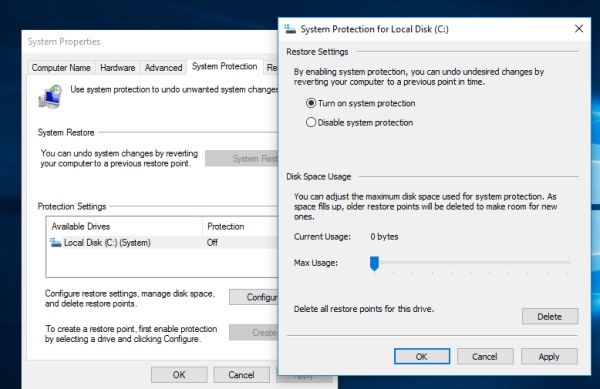
System Restore is a feature of Windows 10 and several previous versions of Windows, going back to Windows Me. If you use the System Restore function in Windows 10 occasionally to revert your operating system to the last known stable point when it was working correctly, you might be interested in changing the maximum disk space used for system protection. As space fills up, older restore points will automatically be deleted in order to allow new points to be created.
Advertisеment
System Restore isn't a new feature of Windows 10. This technology was introduced in 2000 with Windows Millenium Edition. It was created to help you fix the OS with just a few clicks when system files or settings get damaged. It automatically creates restore points, which are snapshots of system files, program files, drivers, and registry settings. Later, if you use System Restore to restore your computer to a point in time before some problem happened, System Restore will roll back your PC to a previous version of files and settings from the restore point that you specified. System Restore does not affect your personal documents or media. Plus, you can undo the last restore operation itself if does not resolve your issue.
Here are some System Restore-related topics of interest:
- How to enable System Restore in Windows 10
- Increase System Restore Point Frequency in Windows 10
- Create System Restore Point at Startup in Windows 10
You can use two methods to change the System Protection storage size in Windows 10. It can be changed per a drive. Ensure that your user account has administrative privileges before proceeding.
To Change System Protection Storage Size in Windows 10,
- Press Win + R keys together on the keyboard. The Run dialog will appear. Type the following in the Run box:
SystemPropertiesProtection
- The System Properties dialog will appear with the System Protection tab active. Under Protection Settings, select a drive (for example, C:) that you want to change the maximum storage size for.
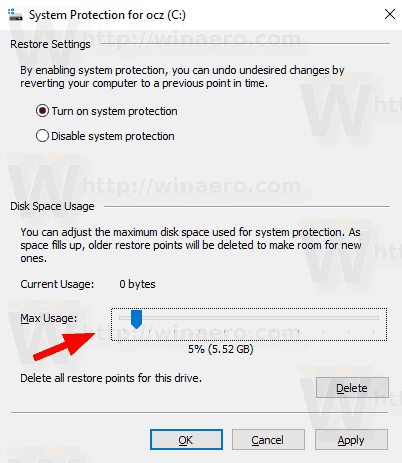
- Click the Configure button to open the following window:

- Adjust the Max Usage slider to the percentage you want, then click Apply and OK.

You are done.
Alternative, you can use the built-in console tool vssadmin to change the maximum disk space used for system protection.
Change System Protection Storage Size with vssadmin
- Open an elevated command prompt.
- Type or copy-paste the following command:
vssadmin list shadowstorage
In the output, you will see the current maximum usage size for all drives that have a shadow copy storage space.
- To change the System Protection storage size, type and run the following command: vssadmin resize shadowstorage /for=<Volume1> /on=<Volume2> /maxsize=<MaxSize>
- Substitute <Volume1> with the actual drive letter from the For volume line in the step 2.
- Substitute <Volume2> with the actual drive letter from the Shadow Copy Storage volume line in the step 2.
- Substitute <MaxSize> in the command above for the actual storage size you want to set.
The MaxSize value must be greater or equals to 1 MB, and specified in the following units: KB, MB, GB, TB, PB, or EB. Alternatively, it can be expressed in % percentage. If no unit is specified, MaxSize uses bytes by default. - Finally, to remove the limit (set the storage size to maximum available space), omit the /maxsize value.
For example,
vssadmin resize shadowstorage /for=C: /on=C: /maxsize=3%

Alternatively, you can run the following.
vssadmin resize shadowstorage /for=C: /on=C: /maxsize=20GB
That's it.
Articles of interest:
- How to run System Restore in Windows 10
- Create System Restore Wizard Shortcut In Windows 10
- How to create a Restore point in Windows 10
- Increase System Restore Point Frequency in Windows 10
- Create System Restore Point at Startup in Windows 10
- Create System Restore Point on Schedule in Windows 10
- Delete a System Restore Point in Windows 10
Support us
Winaero greatly relies on your support. You can help the site keep bringing you interesting and useful content and software by using these options:

