In this tutorial I will show you how to customize drive icons you see in This PC folder of File Explorer on Windows 11. This nice option exists in many Windows versions, but none of them allow changing drive icons with ease. It exists as a hidden option in the Registry.
Advertisеment
![]()
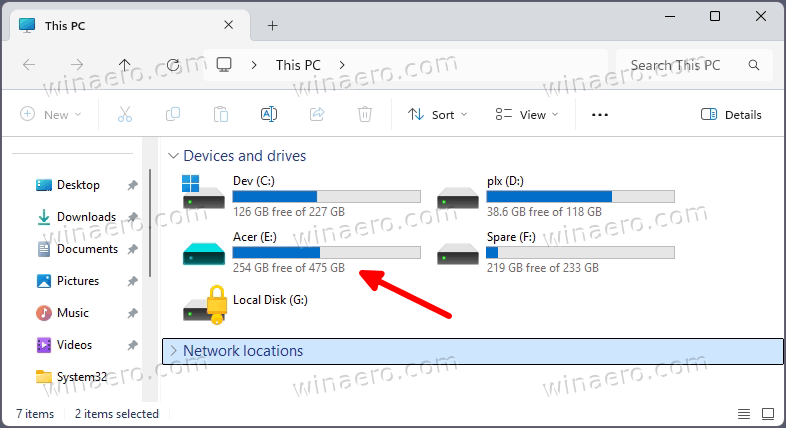
However, by default, Windows assigns standard icons to all local drives, removable drives, and network folders. By manually customizing them, you can replace them with custom icons of your choice. Custom icons can reflect the drive's purpose, such as backups, media storage, or development projects, making navigation more intuitive.
This guide explains provide step-by-step instructions on how to change drive icons with a simple Registry tweak. Th tweak works in all versions of Windows.
Change Drive Icon in Windows 11
- Press Win + R, type
regedit, and press Enter. This will open the Registry Editor.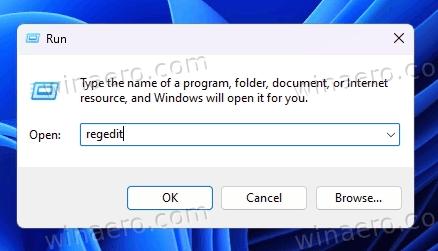
- When prompted by User Account Control, click Yes to allow the application to make changes.
- In the Registry Editor, browse to the following path:
HKEY_LOCAL_MACHINE\SOFTWARE\Microsoft\Windows\CurrentVersion\Explorer. You can copy and paste this path into regedit's address bar. - Right-click on the Explorer key, select New > Key, and name it DriveIcons.
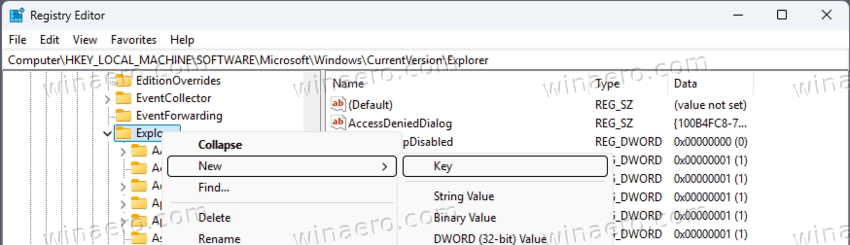
- Right-click on DriveIcons, select New > Key, and name it with the drive letter to customize the icon for (e.g.,
E).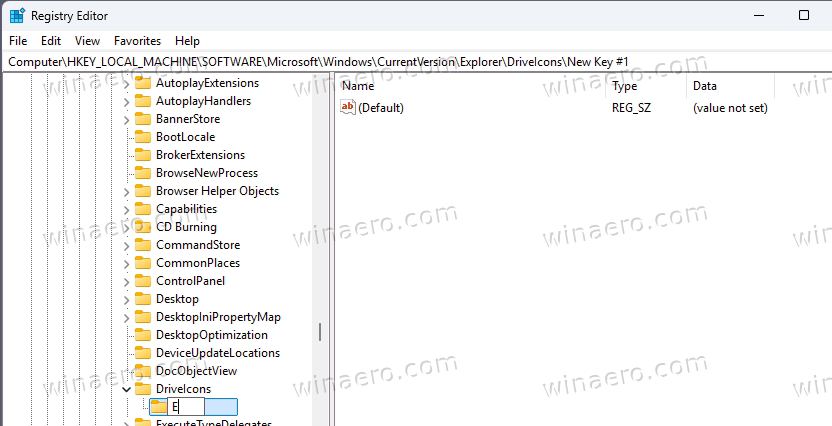
- Right-click the newly created drive letter key (e.g.,
E), select New > Key, and name it DefaultIcon.
- Click on the
DefaultIconkey. In the right pane, double-click the (Default) value to edit it, and enter the full absolute path to the desired icon file (e.g.,C:\mypath\myicon.ico). Click OK.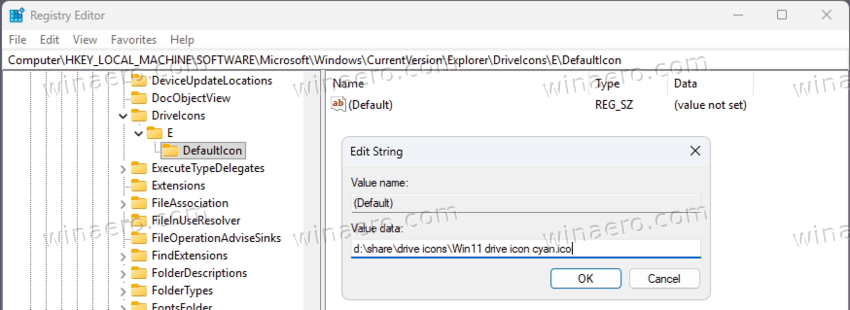
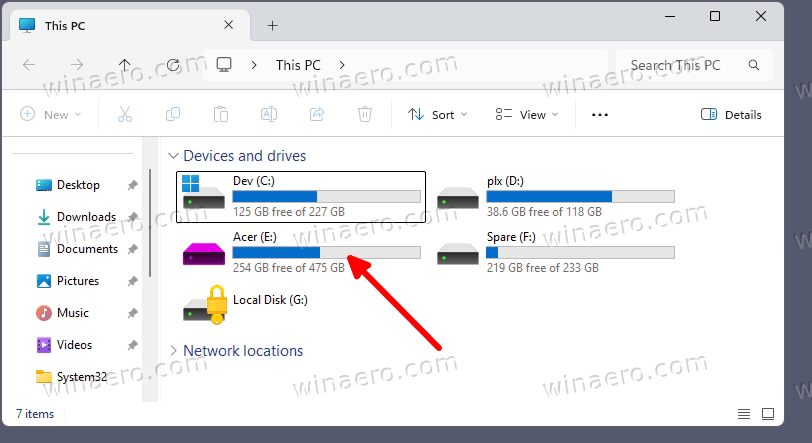
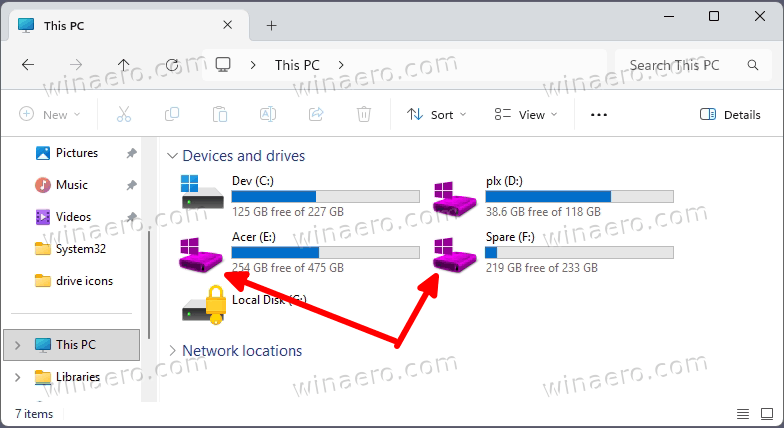
- Close all File Explorer windows and re-open one. Navigate to This PC: You now have a custom icon applied to the E drive!
The specified drive should now display the custom icon in File Explorer. Ensure the icon file remains accessible at the defined path for every user on your PC. Otherwise, the system will revert to the default icon.
To undo the change, you can simply delete the <drive letter> key under the DriveIcons path. See the screenshot.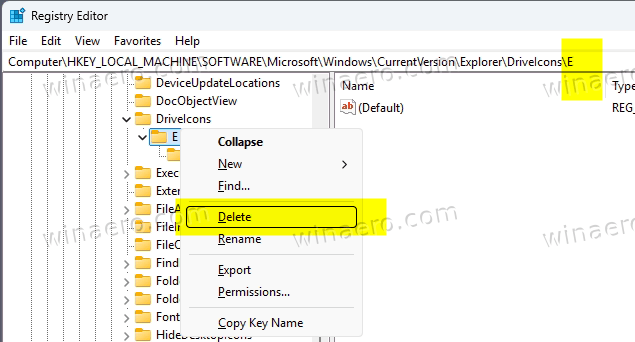
In addition to the reviewed method, Windows 11 supports one more registry tweak. It is exactly similar to the method above, but the location of the keys is different. Microsoft has created that very method for Windows 2000 exclusively, but it still works in NT-based system still. Here we go.
Alternative Registry Tweak
- Open Regedit by pressing Windows + R, typing
regedit, and hitting Enter. - Once you see the User Account Control prompt, click on the Yes button to launch the Registry Editor app.
- In the Registry Editor, browse to the following path:
HKEY_CLASSES_ROOT\Applications\explorer.exe.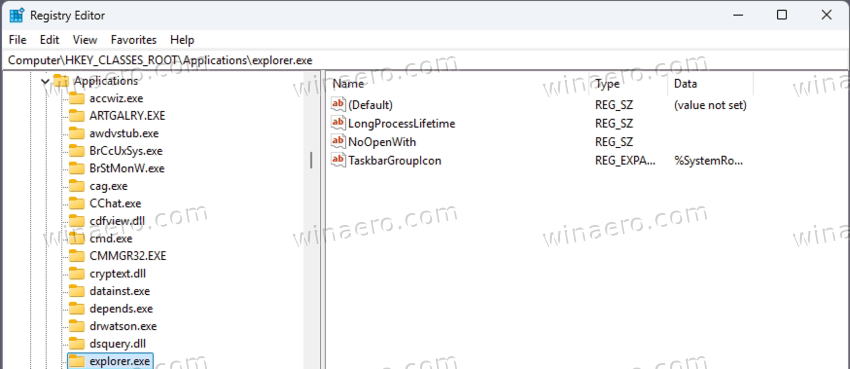
- Right-click on the Explorer.exe key, select New > Key, and name it Drives.
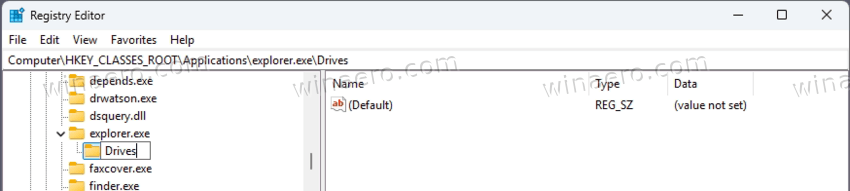
- Right-click on the Drives key, select New > Key, and name it with the drive letter to customize (e.g.,
E).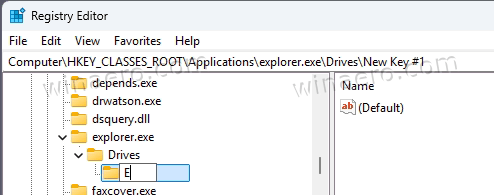
- Right-click the newly created drive letter key (e.g.,
E), select New > Key, and name it DefaultIcon.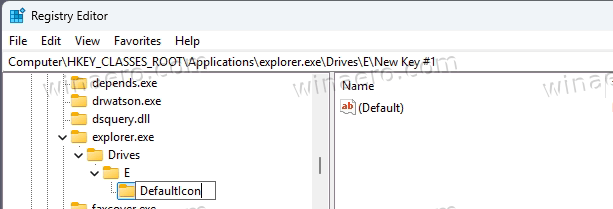
- Select (click on) the DefaultIcon key. In the right pane, open the (Default) value, and change its data to the full absolute path to the desired icon file (e.g.,
C:\mypath\myicon.ico). Click OK.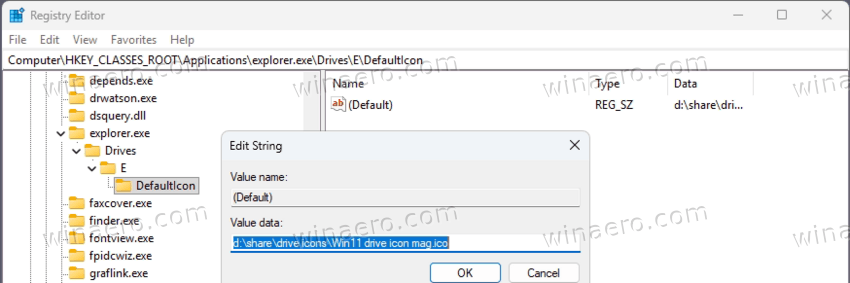
- Close all File Explorer windows and launch it again. Once you open This PC, it will display your custom drive icon!
Again, keep in mind that the icon must be stored in some location available for everyone on your PC. Otherwise other users won't see the changes.
Deleting the drive letter key from the Registry will restore the default drive icon for you.
![]()
Finally, in addition to individual drive icons, you can change the default drive icon. If no individual icon set, the default one will be used by File Explorer for all the drives.
Change Default Drive Icon
- Right-click the Windows logo button in the tasbkar, and select Run from the menu.
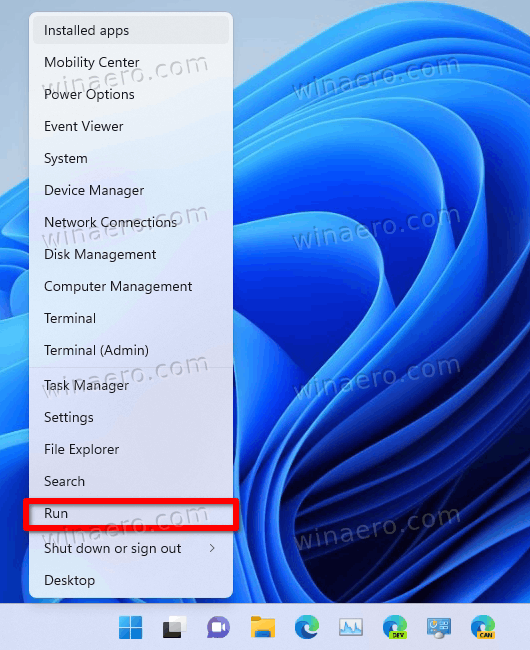
- Type
regeditin the Run box, and press Enter. When prompted by User Account Control, click Yes to allow the application to make changes.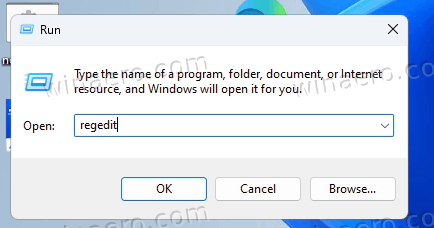
- Now, go to the following path in Registry Editor:
HKEY_LOCAL_MACHINE\SOFTWARE\Microsoft\Windows\CurrentVersion\Explorer\Shell Icons. - If the
Shell Iconskey does not exist, right-click the Explorer key on the left, select New > Key, and name itShell Icons. - Right-click in the right pane of the
Shell Iconskey, select New > Expandable String Value, and name the new value8.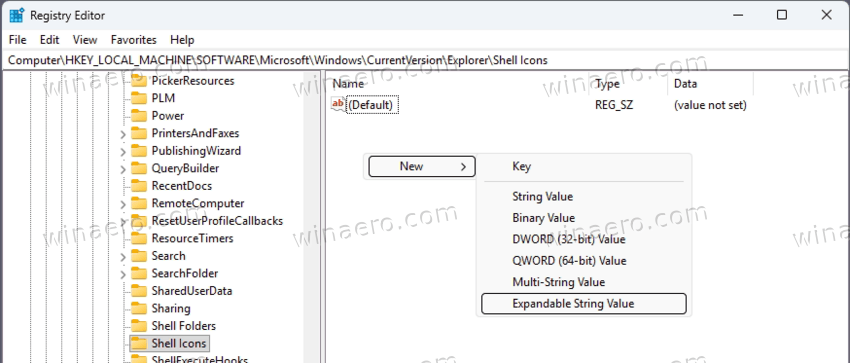
- Double-click the newly created
8value and set its data to the full absolute path of the desired icon file (e.g.,C:\Icons\DefaultDrive.ico). Click OK.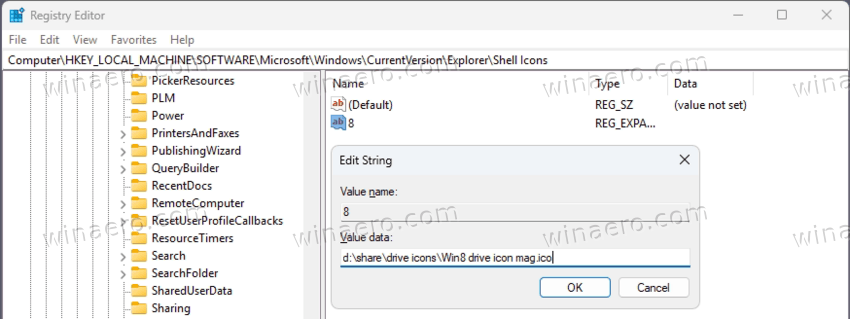
- Open the Start menu and click on your user name in the corner. There, click on Sign out.
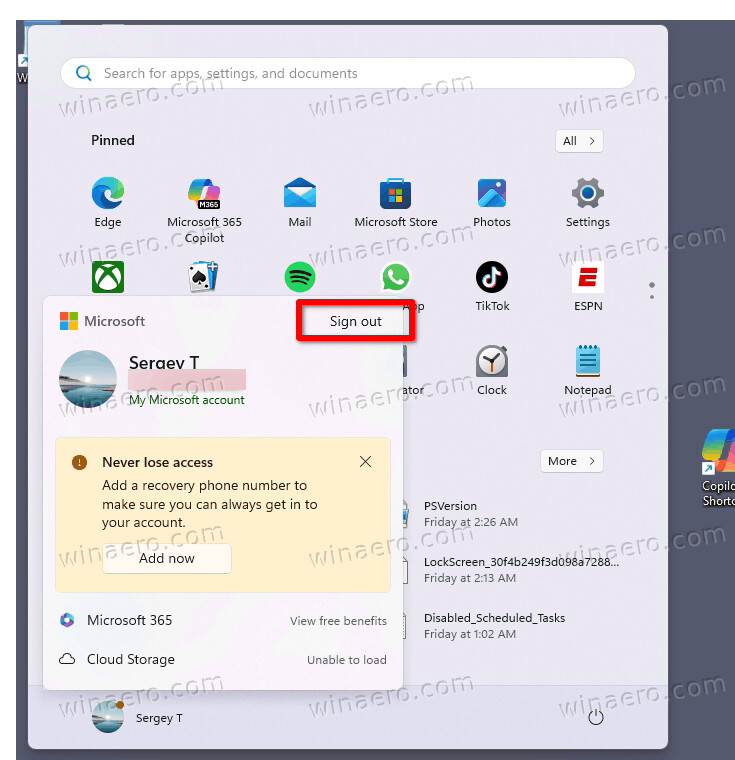
- Finally, sign in back to your user account. This will make File Explorer apply the custom drive icon as the default option.
That's it! To undo the change, it is fine enough to delete the "8" value from the Registry.
Finally, there is a GUI for everything reviewed, part of Winaero Tweaker. If you don't like editing the Registry manually, and prefer dealing with a convenient user interface, the following option can be your choice.
Using Winaero Tweaker
Starting in version 1.64, Wnaero Tweaker includes a special "tweak" that allows changing icons for any drive letter.
First of all, download Winaero Tweaker from here. Install and run the app, and select File Explorer > Customize Drive Icons from the left pane.
![]()
Clicking the "Change icon..." button after selecting a drive is all that you need to get done. It supports changing icons for individual drives as well as the default icon.
Download Colorful Drive Icons
Here are some icon samples for you. They are from different Windows eras and have different design. So you can some options that may or may not match your preferences.
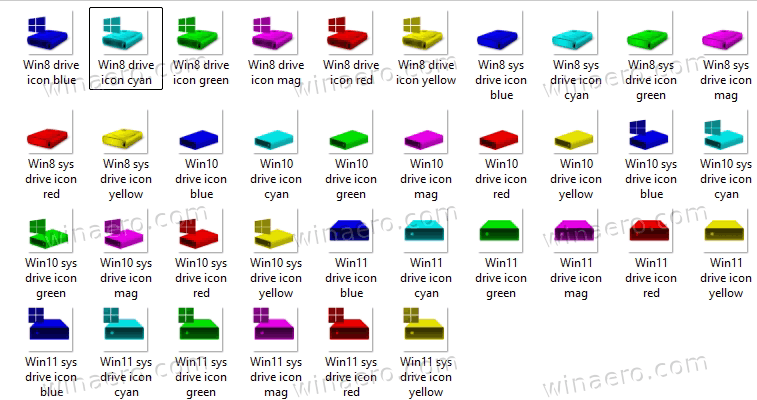
See the above screenshot.
Download the ZIP archive from here: Download Drive Icons.
In addition to fixed drive icons, you may want to set unique icons for all your flash drives (USB sticks). While you can set individual icons for them by the letter, there is a better way. There is a method of setting such icons to make them appear on every device.
How to Assign a Custom Icon to a Removable Drive in Windows
Step 1: Prepare the Icon File
Insert your removable drive into the computer. Copy the desired icon file, which must have the .ico extension, to the root directory of the drive, for example, to H:\.![]()
Step 2: Create the Autorun.inf File
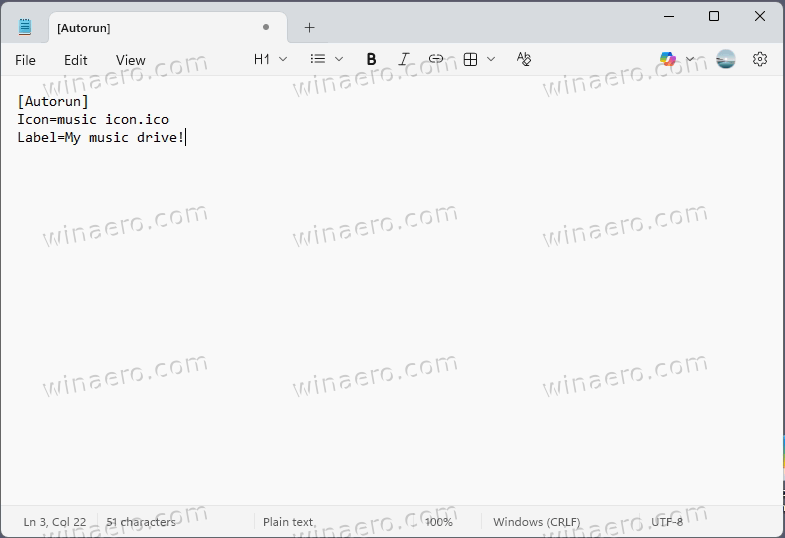
Open Notepad. Copy and paste the following lines into the document:
[Autorun]
Icon=icon_file_name.ico
Label=Drive Label
Replace icon_file_name.ico with the exact name of your icon file. The Label line is optional and may be omitted if you do not wish to assign a custom name to the drive. The drive label will appear in This PC.
Step 3: Save the Configuration File
In Notepad, click File > Save. Navigate to the root of your removable drive (e.g., F:\) and enter the file name as "autorun.inf" including the quotation marks. This ensures the file saves with the correct extension and not as a .txt file.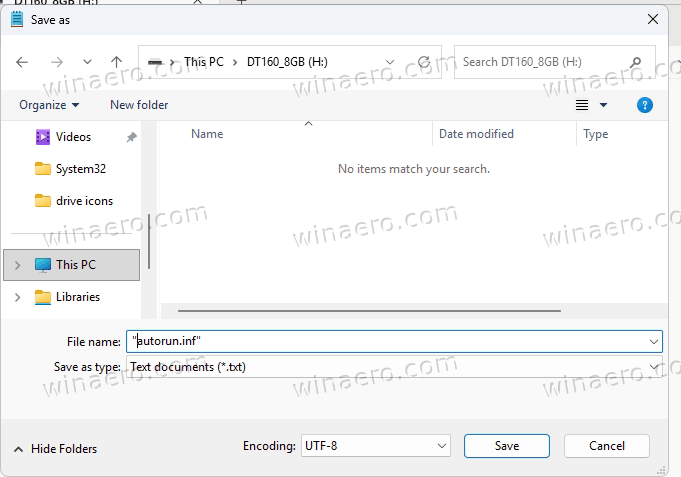
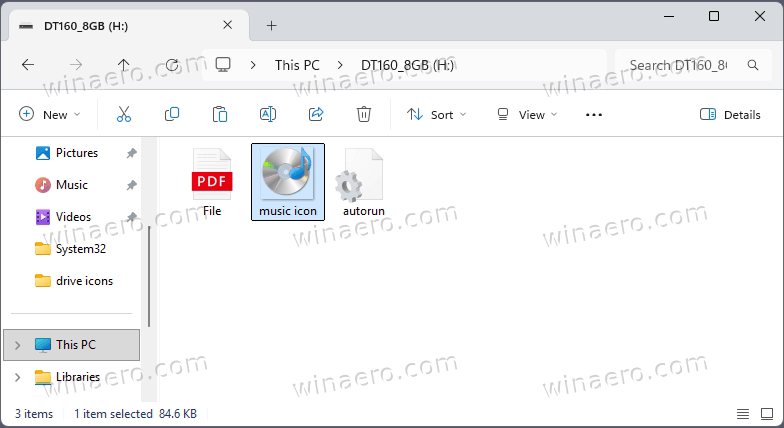
Step 4: Apply the Changes
Eject the drive and reconnect it to the computer. Windows will now display the custom icon and, if specified, the custom label in This PC!![]()
Step 5: Hide Configuration Files (Optional)
To keep the drive’s contents uncluttered, you may hide both the icon file and the autorun.inf file:
- Open the drive in File Explorer.
- Right-click the icon file and select Properties.
- In the General tab, under Attributes, check the Hidden option and click OK.
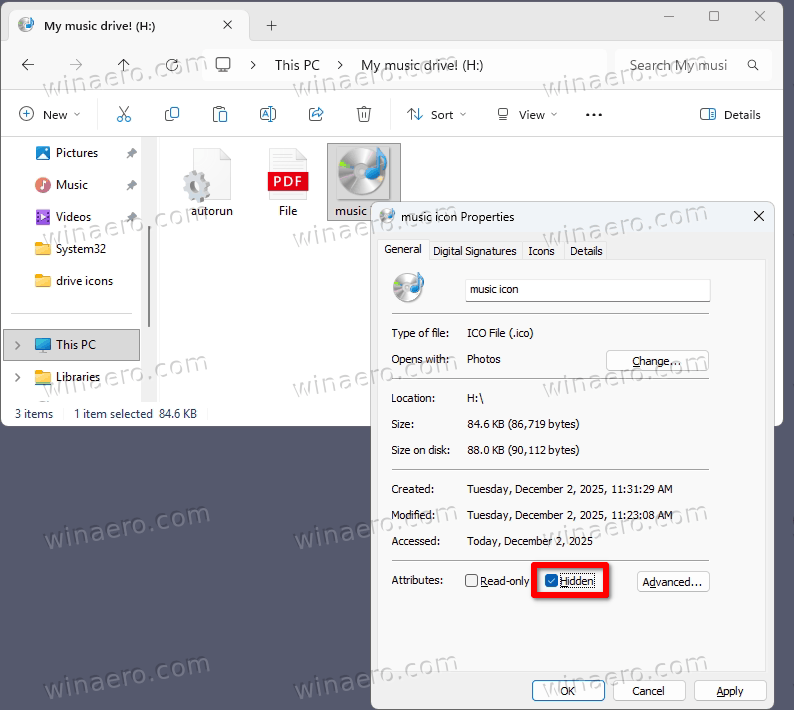
- Repeat the same steps for the autorun.inf file.
Hidden files do not appear in File Explorer by default, so these files will remain invisible on most systems while still functioning as intended.
That's it!
Support us
Winaero greatly relies on your support. You can help the site keep bringing you interesting and useful content and software by using these options:

An autorun.inf file may work for C: and other hard drives too, but you may need to create it elsewhere and copy/move it to the drive’s root folder. Could be easier and safer than the other methods.