Previously, I showed you how to install Windows 10 using a bootable USB stick. This method is suitable for devices which boot using the legacy BIOS mode. If you need a UEFI bootable USB stick, the earlier-mentioned method will not work. In this article, we will see how to create a bootable UEFI USB drive containing Windows 10 Setup.
It is a good idea to use the Rufus tool to prepare the bootable UEFI Windows 10 USB drive. Rufus is free and works without any issues. Also, it is a portable app so it does not require itself to be installed. Here are the step-by-step instructions:
- Download the latest version of Rufus from HERE.
- You need a USB drive with at least 4 GB available. All data on this drive will be erased, so it is a good idea to backup everything from this USB drive before proceeding.
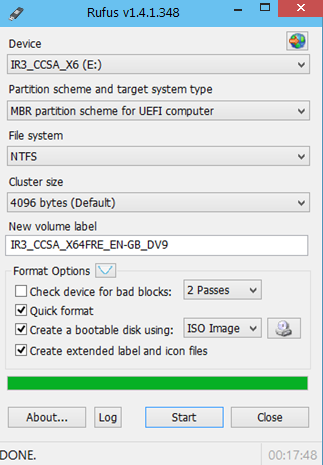
- Run the Rufus utility and pick your USB drive under the Device section.
- Select the partition scheme for UEFI computers with MBR. If your PC has a GPT partition scheme (GUID Partition Table), then pick the appropriate option from the combobox.
- Click on the CD/DVD drive icon to browse to the Windows 10 ISO image file. Select the Windows 10 ISO image file - 32-bit or 64-bit - whichever you downloaded.
If you do not have the ISO image, here's how you can build your own: Get ISO image for Windows 10 build 9860 for a clean install.
After you click the Start button in Rufus, it will create a bootable UEFI USB stick with Windows 10. That's it. You are done.
Support us
Winaero greatly relies on your support. You can help the site keep bringing you interesting and useful content and software by using these options:

Dear sir
In the same way which you explained above method using rufus software to boot from usb only.
Then how to boot windows 10 from cd/dvd using same way as above or any software needed?
To boot in UEFI mode from CD/DVD, you need to set it as USEFI boot device in BIOS.
ASUS provides such option in the fly. If you are running the ASUS device or motherboard, you can try to press F8 to open the boot menu and select UEFI: DVD in there.
I struggled with errors for the longest time in trying to install Win 10 on a separate partition as I did not want to loose my Win 7.
I copied my Windows 10 ISO to the USB formatted in several different ways and it still would not install.
I kept getting firmware errors and was just about ready to give up when I came across your suggestion to use Rufus to format a USB to UEFI.
This was a very helpful article. Thank you for posting.
i have created uefi bootable(fat32) usb but its not booting
That did not work I followed your steps and my flash drive is only non-UEFI.
Thanks for writing the post on How to make windows 10 bootable USB from ISO. all explained in a simple and understandable way!
Use PowerShell to create a bootable multi-partition USB drive which handles images over 4GB
CLS
Get-Disk
$diskNumber = Read-Host “`r`nSelect which disk is the USB Drive you would like to put the image on?”
$disk = Get-Disk $diskNumber
# Clean drive.
$disk | Clear-Disk -RemoveData
# Create FAT32 partition as bootable
New-Partition -DiskNumber $disk.Number -Size 1GB -IsActive -DriveLetter Q | Format-Volume -FileSystem FAT32 -NewFileSystemLabel USB-FAT32 | Out-Null
# Create NTFS volume for the large Install.wim file
New-Partition -DiskNumber $disk.Number -UseMaximumSize -DriveLetter R | Format-Volume -FileSystem NTFS -NewFileSystemLabel USB-NTFS | Out-Null
Write-Host -ForegroundColor Green “`r`nIf you haven’t mounted the ISO, do so now by right clicking the image file and selecting mount”
[char]$imageDrive = Read-Host “What is the drive letter of the mounted ISO?”
$command = “xcopy {0}:\boot\*.* Q:\boot\ /s /y /f” -f $imageDrive
Invoke-Expression -Command $command
$command = “xcopy {0}:\efi\*.* Q:\efi\ /s /y /f” -f $imageDrive
Invoke-Expression -Command $command
$command = “xcopy {0}:\support\*.* Q:\support\ /s /y /f” -f $imageDrive
Invoke-Expression -Command $command
$command = “xcopy {0}:\*.* Q:\ /y /f” -f $imageDrive
Invoke-Expression -Command $command
$command = “xcopy {0}:\sources\boot.wim Q:\sources\ /y /f” -f $imageDrive
Invoke-Expression -Command $command
# Copy over the install.wim image file
mkdir R:\sources | Out-Null
$command = “xcopy {0}:\sources\* R:\sources\ /s /y /f” -f $imageDrive
Invoke-Expression -Command $command
sleep 10
$eicfgFile = “R:\sources\ei.cfg”
New-Item -Path $eicfgFile -ItemType File | Out-Null
Add-Content -Value “[CHANNEL]” -Path $eicfgFile
Add-Content -Value “retail” -Path $eicfgFile
LakeBrat,
Thank you for posting the Powershell commands. Will have to try this next as Rufus does not seem to be working for making a bootable USB Flash drive from the Windows 10 InsiderPreview_x64_19041 ISO file.
I can only imagine that some of the attempts that do not work might be operator errors? As I have previously tried to do this same thing and it not worked. Then I came upon the instructions in this article and it worked 1st time (albeit, on a different computer system)…had to change boot drive in setup before initiating the installation. I simply did this as a test (took out the system SSD and stuck a new/blank SSD in it’s spot, so the only startup had to come from the bootable USB that was made according to the above). Now I’m writing an SOP to keep on in my ‘computer’ folder so I don’t forget how I did this :-).