How to Create Bootable USB For Windows 10 Install.wim Larger Than 4GB
The days of burning operating system ISO images to a disc are long gone. Today most PCs can boot from USB so it's just easier to update and more convenient to install Windows from a USB flash drive. Another good reason to install this way is the installation speed, which is significantly faster than setup running from an optical drive. Many modern devices do not come with an optical drive.
Advertisеment
There are a number of methods we have already covered here, including Rufus for UEFI, the classic DiskPart, and PowerShell.
However, if you have an install.wim file in your Windows 10 distribution which is larger than 4GB in size, you may need to take extra steps to create a bootable USB drive. Your flash drive must have two partitions instead of the single one.
- One of them must be formatted in FAT32. This will allow you to use the flash drive for both classic BIOS and modern UEFI devices.
- The second one must be formatted in NTFS. It will be able to store large files.
Before proceeding, backup any important data from you flash drive. The procedure will erase all files and folders from it.
The steps below assume that you already have a Windows distro, and you are able to mount it in order to copy its files.
To Create Bootable USB For Windows 10 Install.wim Larger Than 4GB,
- Connect you flash drive to the computer.
- Press Win + R on your keyboard and type
diskpartinto the Run box. Hit the Enter key. - In the DiskPart console, type
list disk. It will show a table with all your disks, including the currently connected USB stick. Note the number of the USB stick drive. For example, it is Disk 1.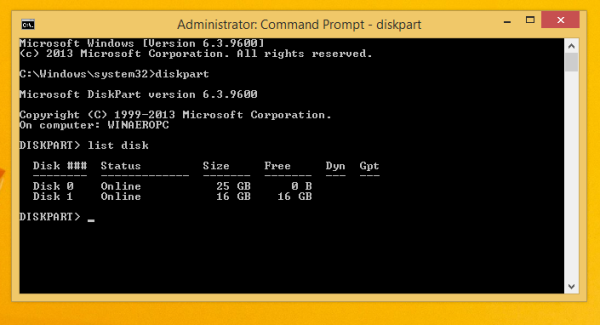
- Type
sele disk #,where # is the number of your USB stick drive. For our example the commands issele disk 1. - Type
cleanto erase the drive contents. - Type
create partition primary size=1000to create a new partition of 1GB. - Type create partition primary to create yet another partition that will take the rest of the remaining drive space.
- Type
select partition 1to select the first (1GB) partition. - Format it in FAT32 as follows:
format fs=fat32 quick - Assign it the X letter:
assign letter=X. - Make it bootable with the command
active. - Now, select the second partition:
select partition 2. - Format it in NTFS:
format fs=ntfs quick. - Assign the Y letter to the second partition with the command:
assign letter=Y. - Leave DiskPart with the command
exit.
You are done with the flash drive layout. The drive X: is a bootable small partition, and the drive Y: is a large NTFS partition to host the install.wim file. Now, let's copy Windows files properly.
Copy Windows Setup Files
- Open your Windows setup files in File Explorer.
- Copy everything except the
sourcesfolder to theX: drive(the FAT32 one). - Copy the sources folder to the
Y: drive(the NTFS partition). - On the X: partition, create a new
sourcesdirectory. It will contain a single file,boot.wim. - Copy
boot.wimfromY:\sourcestoX:\sources. - In the
Y:\sourcesfolder, create a new text file with the following contents:[CHANNEL]Retail - Save it as
ei.cfg.
You are done. We have created 2 partitions: A FAT32 partition (X:) and an NTFS partition (Y:). We have placed the sources folder on Y:. On X: we store everything else of the original distro. We have also created a new sources folder on X: with a single file BOOT.WIM. The last step is required to start the setup program when booting from our USB drive.
Now you will be able to install Windows using the flash drive you just created without reducing the install.wim file size. This is useful when you have a customized large install.wim file.
That's it.
Support us
Winaero greatly relies on your support. You can help the site keep bringing you interesting and useful content and software by using these options:

I used the program “ISO2USB” to make bootable USB disk for Windows 10 version 1909 and I can easily choose whether to boot BIOS or UEFI.
I have used this USB stick to boot more than 100 computers (HP, Lenovo and Dell). Never had any problem to choose boot mode. The USB stick has a single FAT32 partition and is MBR formatted.
A FAT32 partition cannot have files larger than 4GB. This works well for default install.wim.
A custom wim file can include extra apps and drivers. It may not fit on FAT32.
Do you need to disable secure boot for this? I am aware that some 3rd party tools can do this but they require secure boot to be off to boot from the USB drive.
No, disabling secure boot is not required. You are using the signed Windows bootloader in this case.
The Rufus FAQ says:
“UEFI does NOT force the use of FAT32 for boot. As a matter of fact, you can just go out there and buy an Intel NUC PC, and you’ll find that it’ll boot an NTFS drive, in pure UEFI mode, just fine, with no need whatsoever for a FAT32 partition to exist anywhere.”
SOURCE: https://github.com/pbatard/rufus/wiki/FAQ#Blah_UEFI_Blah_FAT32_therefore_Rufus_should_Blah
Conclusion: A bootable WIM larger than 4GB should work on an NTFS-formatted flashdrive.
Hey guys hav u tested this??
I hav tested this . When I installed windows through this method it doesn’t installed as uefi .. rather than it installed as legacy..
Many sites are saying about dual partition..
That’s y i decided to test this.. I followed all steps. Even created that file and saved it..
It boots .bt after windows installation when I checked I can see it installed as legacy.
Great article!
I’d suggest the following improvements:
“The last step is required to start the setup program when booting from our USB drive.”
The last step appears to be saving ei.cfg, which I don’t think is anything to do with starting the setup program – it’s to tell setup the channel, be it OEM or RETAIL (and optionally preseed setup with a Windows product key)
Also, I’m curious to know exactly how this multi-partition method works. Specifically, how does the setup program know to find install.wim in sources on the NTFS partition? Does is simply scan every readable partition containing a sources folder in the root?
Up for this question.
This is brilliant. Everything else I tried was ridiculously difficult. Splitting install.wim… and I always ended up back at the beginning with no secure boot. I used a 1 TB drive with a 1 GB fat32 and a 10 GB ntfs and a boatload of unallocated space formatted in Linux Disks and it was the only configuration I got to work as UEFI on boot in secure boot mode. I suppose I could have done it on a 16 GB usb. My brain wasn’t making the connection between fat32 and secure boot. I had it in my head I needed to boot from ntfs which gave me legacy every time.
Simple, smart and I learned something. Thank you.
The ei.cfg [CHANNEL] Retail allows you to choose which of the 11 versions of Windows from the install.wim that you want to install.
i have an Alienware 17R2 and im new to the system. heard alota great things about Alienware and im happy to say it was a gift. unfortunately, gifts dont come with directions or a problems list so im in need of help. when i turn it on, it says insert windows disk… it dont have a disk drive. my usb stick dont have enough memory to do the whole step you listed above. BUT when the boot menu comes on it wants the windows install disk, my reading language, then click repair my computer… it also states that the boot selection cannot occur because a required device is inaccessible!!! every time same 3 step program, well just like the 12 step progam, this isnt working. so if anyone can help by letting me know what i can,if any, options i have… thankx for your time and help
Thank you very much, you helped so much, just a little note, for ci.cfg file the text should be written each line spritely, like this:
[CHANNEL]
Retail
thanks for the tip
Very important one I’ve lost track first and then read the comments and thank again man
You are the man!
Tried this and it worked like a charm! Thank you!
My question is, I have more than one .wim file, one English that I used to make the boot key and one French. Is there a method I could use to swap the wim files on the same key depending upon which language I want to install, or do I need to make 2 different keys?