Starting with Windows 10 version 1809, also known as "October 2018 Update", Microsoft implemented a new option - screen snipping. A new Snip & Sketch app has been added to Windows 10 to quickly snip and share a screenshot. In this article, we will see how to backup and restore its settings. This is very useful, because you can restore them when required or transfer them to another PC or user account.

Using the new Screen Snip tool, you can capture a rectangle, snip a freeform area, or take a full screen capture, and copy it directly to the clipboard. Immediately after taking a snip you’ll now get a notification that will take you and your snip to the Screen & Sketch app where you can annotate and share away. Screenshots can be opened in the Screen & Sketch app, which adds extra options like Ink Color and Delay. It allows adding annotations using a pen, touch, or mouse. The images can be shared with other apps. The following article covers various methods you can use to launch the Screen Snip tool:
Advertisеment
Take a Screenshot with Screen Snip in Windows 10
In short, you can Press the Win + Shift + S keys or use a special quick action button in the Action Center pane.
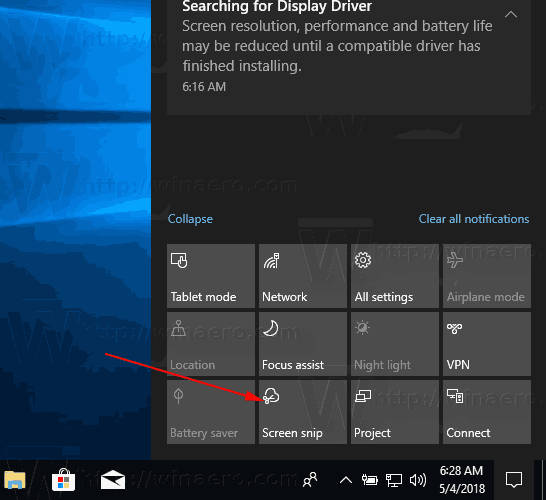
Also, for convenience, you can create a special Screen Snip taskbar button. See
Add Screen Snip To Taskbar in Windows 10
To backup Snip & Sketch settings in Windows 10
- Close the Snip & Sketch app. You can terminate it in Settings.
- Open the File Explorer app.
- Go to the folder
%LocalAppData%\Packages\Microsoft.ScreenSketch_8wekyb3d8bbwe. You can paste this line to the address bar of File Explorer and hit the Enter key.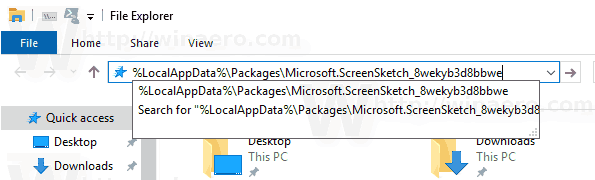
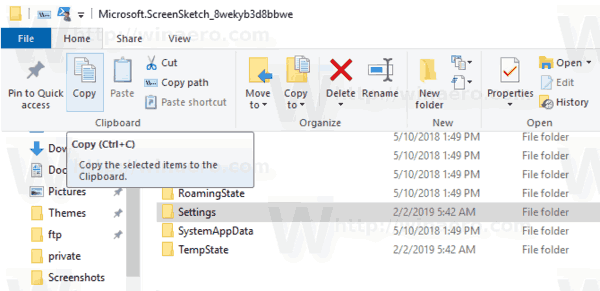
- Copy the Settings subfolder. Right-click on it and select Copy from the context menu, or press the Ctrl + C key sequence to copy the folder.
- Paste the folder to some safe location where you want to keep it as your backup.
Restore Snip and Sketch Settings in Windows 10
- Close the Snip & Sketch app. You can terminate it in Settings.
- Open the File Explorer app.
- Go to the location where you store the backed up Settings folder and copy it.
- Now, open the folder
%LocalAppData%\Packages\Microsoft.ScreenSketch_8wekyb3d8bbwe. - Paste the copied Settings folder here. When prompted, click on the button Replace the files in the destination to restore the settings.
Now you can start the app. It should appear with all your previously saved settings.
Note: The same method can be used to backup and restore options for other Windows 10 apps. See the articles
- Backup and Restore Sticky Notes Settings in Windows 10
- Backup and Restore Sticky Notes in Windows 10
- Backup and Restore Alarms & Clock in Windows 10
- Backup and Restore Photos App options in Windows 10
- Backup and Restore Groove Music Settings in Windows 10
- Backup and Restore Weather App Settings in Windows 10
Support us
Winaero greatly relies on your support. You can help the site keep bringing you interesting and useful content and software by using these options:
