If you came to Windows 10 directly from Windows 7, you might have noticed that ad hoc Wi-Fi (routerless) connections are no longer available. The user interface for setting up an ad hoc connection does not exist any more in the Network and Sharing Center nor in the Settings app. However, there is a way to make your Windows 10 PC behave like a wireless access point/hotspot.
Advertisеment
You need to use the Wireless Hosted Network feature. The Wireless Hosted Network is a WLAN feature supported on Windows 10. This feature implements two major functions:
- The virtualization of a physical wireless adapter into another virtual wireless adapter sometimes referred to as Virtual Wi-Fi.
- A software-based wireless access point (AP) sometimes referred to as a SoftAP that uses a designated virtual wireless adapter to create a wifi hotspot.
As you can see, this can fully serve as the replacement for ad-hoc connections feature in Windows 10!
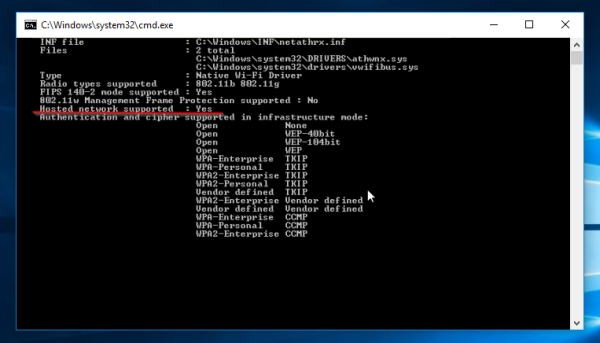
Start by opening the command prompt as administrator in Windows 10. Before you set up the Hosted Network, you must ensure that your wi-fi network card meets the requirements to support it. It must have the correct drivers installed for this feature to be enabled. At the elevated command prompt, type this:
netsh wlan show drivers
Notice the string "Hosted network supported". It must contain "Yes". Otherwise, you are out of luck - your wireless adapter drivers do not support the hosted network feature.
 As the image shows above, my WLAN adapter supports it and has everything necessary to get the Hosted Network working.
To set up the Hosted Network, type the following command:
netsh wlan set hostednetwork mode=allow ssid="DESIRED_NETWORK_NAME" key="YOUR_PASSWORD"
You just created a hosted network. It is as simple as that. Now, you have to start it. The following command will do this for you:
netsh.exe wlan start DESIRED_NETWORK_NAME
Once started, when other devices scan for available Wi-Fi networks, this one will show up and you can connect to it.
When you are finished with it, you can stop the connection using this command:
netsh.exe wlan stop DESIRED_NETWORK_NAME
Note that the network will not be started permanently and will disappear after reboot until you start it again. However, by default, the stored passphrase/key will be persistent. So once you have created it, for subsequent regular use, you only need the commands to start and stop it.
You can get detailed information about the network you started with this command:
netsh wlan show hostednetworkname
That's it. Although Microsoft has removed the ad hoc wireless networking feature from modern Windows versions, this simple trick can make up for the missing feature for everyone who quickly needs to get two wireless devices to connect. Windows 7 users can do this too.
Support us
Winaero greatly relies on your support. You can help the site keep bringing you interesting and useful content and software by using these options:
