
How Turn On or Off Hardware-Accelerated GPU Scheduling in Windows 10
If you GPU comes with a driver that supports hardware acceleration in Windows 10, you can turn on the Hardware-accelerated GPU scheduling option. This should help reduce latency and improve video output system performance.
Hardware acceleration is a great feature that allows using your computer's graphic card the to perform video (and some other) calculations more efficiently than is possible in software mode, that always utilizes CPU, a general-purpose unit. Graphics card drivers usually implement hardware acceleration to allow quicker, smoother playback of videos and games. Graphics cards are also better at physics and fast mathematical calculations than a CPU.
Before proceeding, ensure that your user account has administrative privileges. Now, follow the instructions below.
To Turn On or Off Hardware Accelerated GPU Scheduling in Windows 10,
- Open the Settings app.
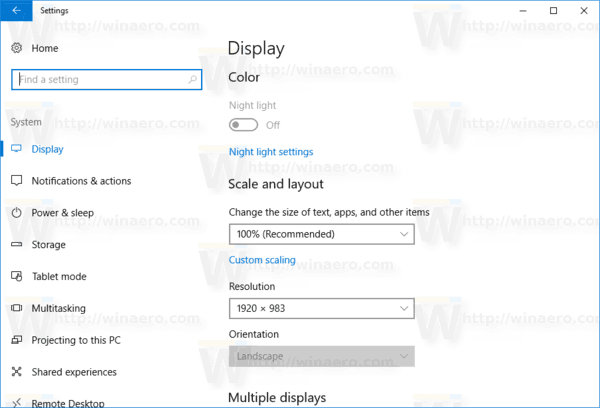
- Go to System > Display.
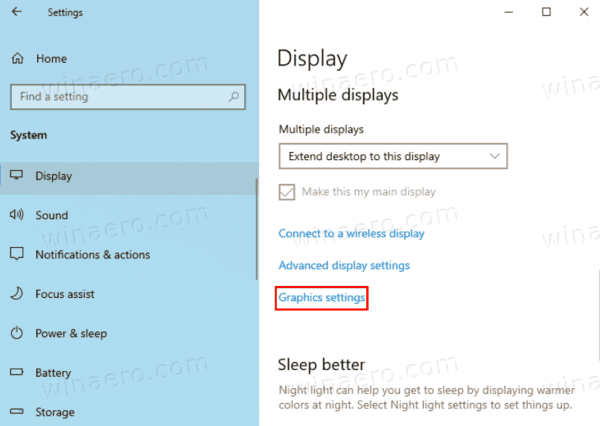
- On the right, click on the link Graphics settings. See notes below if you don't have it.
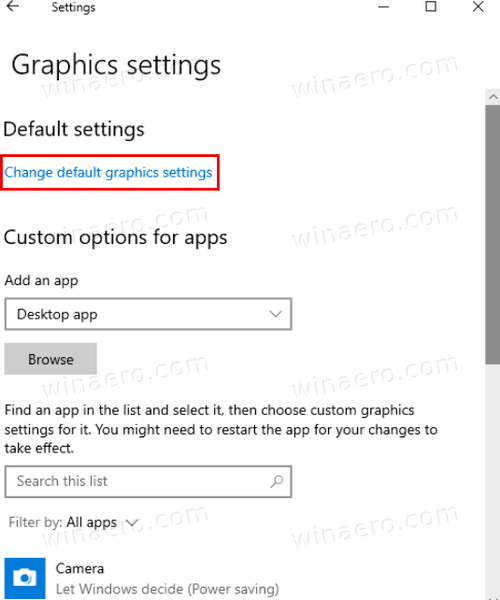
- On the next page, click on Change default graphics settings.
- Finally, turn on of off the Hardware-accelerated GPU scheduling toggle option on the next page.
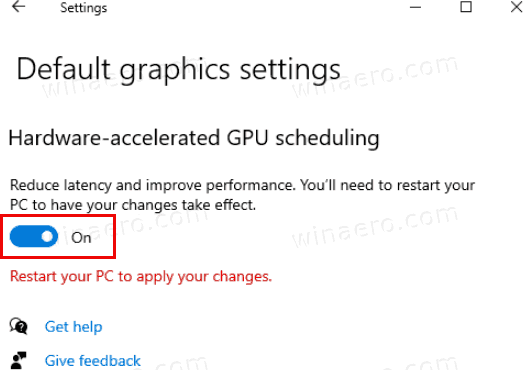
- Restart Windows 10.


You are done.
Note: The Graphics settings won't appear if you GPU drivers or device doesn't support hardware acceleration in Windows 10.
Alternatively, you can apply a Registry tweak.
Turn On or Off Hardware-Accelerated GPU Scheduling in Registry
- Download the following ZIP archive: Download ZIP archive.
- Extract its contents to any folder. You can place the files directly to the Desktop.
- Unblock the files.
- Double click on the
Turn On Hardware-Accelerated Gpu Scheduling.regfile to merge it.
- To undo the change, use the included file
Turn Off Hardware-Accelerated Gpu Scheduling.reg.

You are done!
How does it work
The Registry files above modify the Registry branch
HKEY_LOCAL_MACHINE\SYSTEM\CurrentControlSet\Control\GraphicsDrivers
Tip: See how to go to a Registry key with one click.
To add the Customize tab, create a new 32-bit DWORD value HwSchMode under the mentioned path. Note: Even if you are running 64-bit Windows you must still create a 32-bit DWORD value.
- Set its value data to 1 to Disable the feature.
- Set its value data to 2 to Enable the feature.
That's it.
Support us
Winaero greatly relies on your support. You can help the site keep bringing you interesting and useful content and software by using these options:
Забыли важные уточнения.
1. Требуется инсайдерская сборка Windows 10 от 19041 и выше.
2. Требуется видеодрайвер с поддержкой WDDM 2.7.
which version of windows 10 does this work on? Does it work with amd radeon rx 570?
Build 19041+
WDDM 2.7
How to check if my graphics card support this feature ?
PS 1.0 — Unreleased 3dfx Rampage, DirectX 8.
PS 1.1 — GeForce 3, DirectX 8.
PS 1.2 — 3Dlabs Wildcat VP, DirectX 8.0a.
PS 1.3 — GeForce 4 Ti, DirectX 8.0a.
PS 1.4 — Radeon 8500-9250, DirectX 8.1.
Shader Model 2.0 — Radeon 9500-9800/X300-X600, DirectX 9.
Shader Model 2.0a — GeForce FX/PCX-optimized model, DirectX 9.0a.
Shader Model 2.0b — Radeon X700-X850 shader model, DirectX 9.0b.
Shader Model 3.0 — Radeon X1000 and GeForce 6, DirectX 9.0c.
Shader Model 4.0 — Radeon HD 2000 and GeForce 8, DirectX 10.
Shader Model 4.1 — Radeon HD 3000 and GeForce 200, DirectX 10.1.
Shader Model 5.0 — Radeon HD 5000 and GeForce 400, DirectX 11.
Shader Model 5.1 — GCN 1.0 and Fermi+, DirectX 12 (11_0 and 11_1) with WDDM 2.0.
Shader Model 6.0 — GCN 2.0+ and Maxwell 2+, DirectX 12 (12_0 and 12_1) with WDDM 2.1.
Shader Model 6.1 — GCN 2.0+ and Maxwell 2+, DirectX 12 (12_0 and 12_1) with WDDM 2.3.
Shader Model 6.2 — GCN 2.0+ and Maxwell 2+, DirectX 12 (12_0 and 12_1) with WDDM 2.4.
Shader Model 6.3 — GCN 2.0+ and Maxwell 2+, DirectX 12 (12_0 and 12_1) with WDDM 2.5.
Shader Model 6.4 — GCN 5.0+, Maxwell 2+ and Skylake+, DirectX 12 (12_1) with WDDM 2.6.
Shader Model 6.5 — Pascal+ and Skylake+, DirectX 12 (12_1) with WDDM 2.7.