User Account Control, or just UAC is a part of the Windows security system which prevents apps from making unwanted changes on your PC. By default, the UAC prompt appears on a the dimmed secure desktop when you get an security request by the User Account Control. Here is how to enable or disable this feature in Windows 10.
Advertisеment
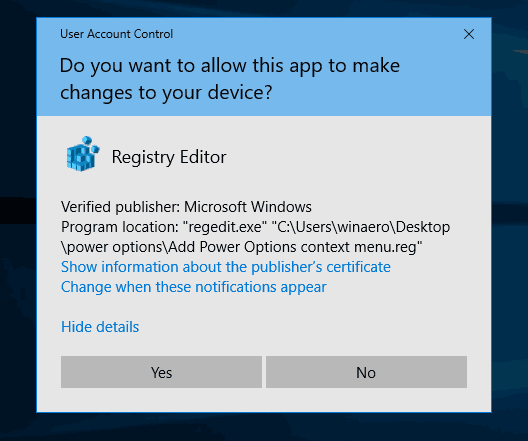
Since Windows Vista, Microsoft added a new security feature called User Account Control (UAC). It tries to prevent malicious apps from doing potentially harmful things on your PC. When some software tries to change system-related parts of the Registry or the file system, Windows 10 shows an UAC confirmation dialog, where the user should confirm if he really wants to make those changes. Usually, the apps that require elevation are related to the management of Windows or your computer in general. A good example would be the Registry Editor app.
The UAC comes with different security levels. When its options are set to Always notify or Default, your Desktop will be dimmed. The session will be temporary switched to the secure Desktop without open windows and icons, containing only an elevation prompt by the User Account Control (UAC).
Members of the Administrators user group have to confirm or reject the UAC prompt without providing extra credentials (UAC consent prompt). Users without administrative privileges have to additionally enter valid credentials for a local administrator account (UAC credential prompt).
Note: There is a special security policy in Windows 10 that allows hiding the available local administrative accounts from a UAC prompt. See
Hide Administrator Account From UAC Prompt in Windows 10
When Windows shows a UAC prompt, by default it appears on the dimmed secure desktop. Both consent and credential prompts are displayed on the secure desktop in Windows 10. Only Windows processes can access the secure desktop.
The secure desktop is enabled: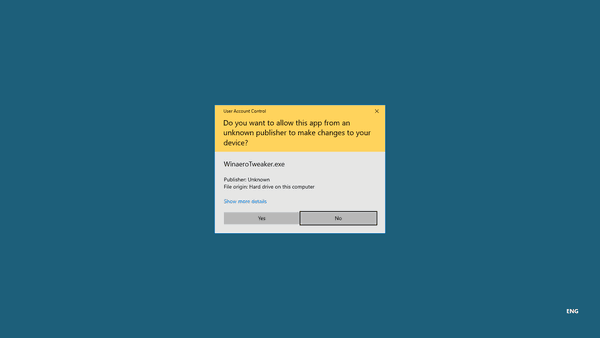
The secure desktop is disabled: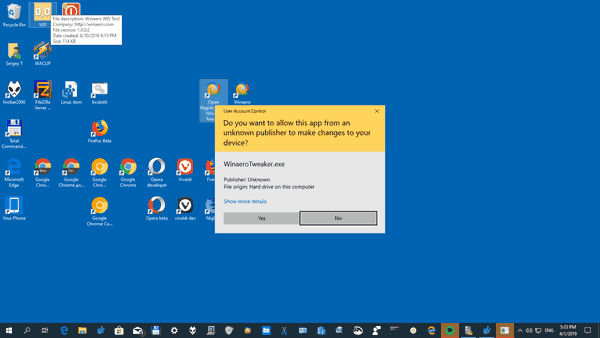
If you have a reason to disable the secure desktop feature, here is how it can be done.
Before proceeding please keep in mind that disabling the secure desktop feature will allow third-party apps interfere with the UAC dialog. This is a security risk!
To Disable Dimmed Secure Desktop for UAC Prompt in Windows 10,
- Open the classic Control Panel.
- Navigate to Control Panel\System and Security\Security and Maintenance.
- Click on the Change User Account Control settings link. Tip: You can launch the file C:\Windows\System32\UserAccountControlSettings.exe directly!
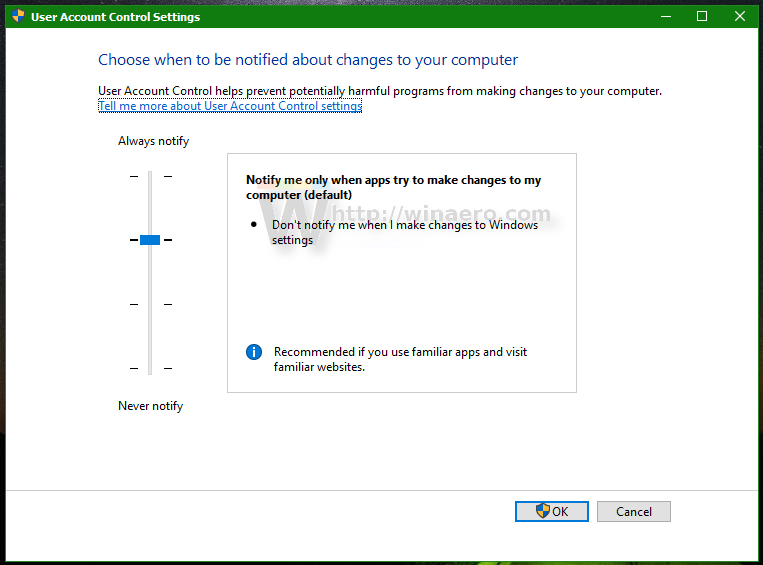
- Move the slider position down to the option Notify me only when apps try to make changes to my computer (don't dim my desktop).
Note: The option Never notify me (turn off UAC) disables the UAC prompt (not recommended, a security risk). The option Always notify me increases frequency of UAC prompts. You will see them even for built-in signed apps. The option Notify me only when apps try to make changes to my computer is the default option.
Also, the secure desktop feature can be disabled or enabled separately from the User Account Control settings. There is special Local Security option User Account Control: Switch to the secure desktop with prompting for elevation you can configure to achieve the desired behavior.
Note: If you are running Windows 10 Pro, Enterprise, or Education edition, you can use the Local Security Policy app to enable the option User Account Control: Switch to the secure desktop with prompting for elevation. All editions of Windows 10 can use a special Registry tweak.
Disable Dimmed Secure Desktop with Local Security Policy
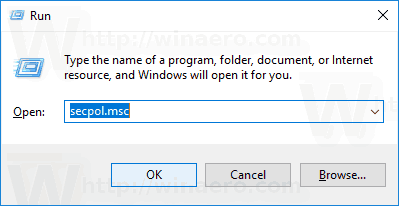
- Press Win + R keys together on your keyboard and type:
secpol.msc
Press Enter.
- Local Security Policy will open. Go to User Local Policies -> Security Options.
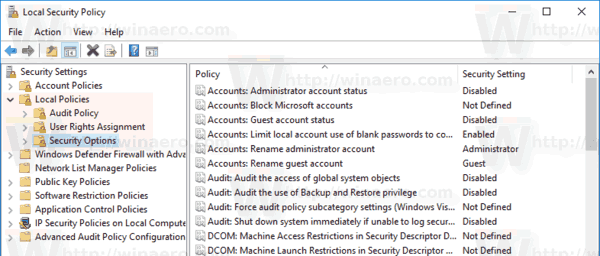
- On the right, scroll to the option User Account Control: Switch to the secure desktop with prompting for elevation.
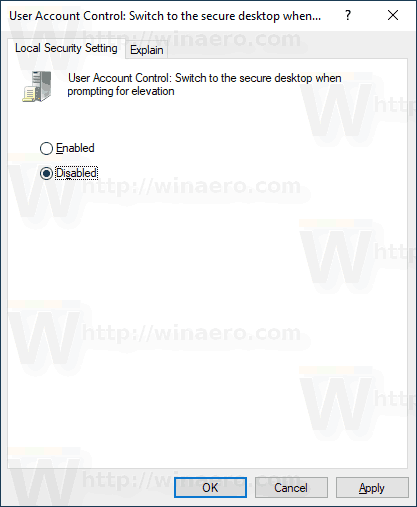
- Disable this policy, and click on Apply and OK to apply the change.
If your Windows edition doesn't include the secpol.msc tool, you can apply a Registry tweak as described below.
Enable UAC Prompt for Built-in Administrator with a Registry Tweak
- Open Registry Editor.
- Go to the following Registry key:
HKEY_LOCAL_MACHINE\SOFTWARE\Microsoft\Windows\CurrentVersion\Policies\System
Tip: See how to jump to the desired Registry key with one click.
If you do not have such a key, then just create it.
- Here, modify or create a new 32-bit DWORD value PromptOnSecureDesktop. Note: Even if you are running 64-bit Windows you must still create a 32-bit DWORD value. Set its value data to 0 to disable the secure desktop.
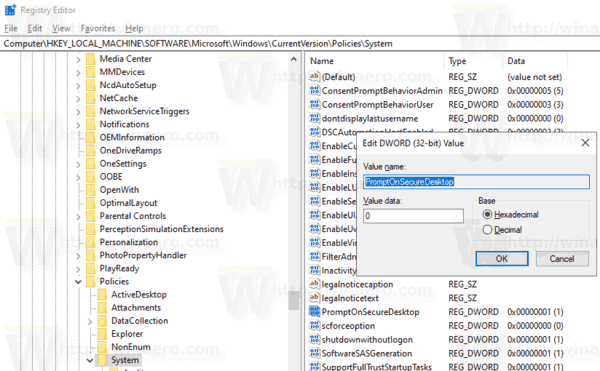
- A value data 1 will enable it. This is the default behavior.
- Restart Windows 10.
To save your time, you can download the following ready-to-use Registry files.
The undo tweak is included.
That's it.
Related articles:
- Hide Administrator Account From UAC Prompt in Windows 10
- Enable CTRL+ALT+Delete Prompt for UAC in Windows 10
- Create elevated shortcut to skip UAC prompt in Windows 10
- How to change UAC settings in Windows 10
- Fix Yes button disabled in UAC dialogs in Windows 10, Windows 8 and Windows 7
- How to turn off and disable UAC in Windows 10
Support us
Winaero greatly relies on your support. You can help the site keep bringing you interesting and useful content and software by using these options:
If you like this article, please share it using the buttons below. It won't take a lot from you, but it will help us grow. Thanks for your support!
Advertisеment
