
How to Mount or Unmount a VHD or VHDX File in Windows 10
Windows 10 allows mounting a VHD file (*.vhd or *.vhdx), so it appears under its own drive letter in the This PC folder. By default, you can mount such a file by double-clicking on it in File Explorer if your account has administrative privileges. Here are a number of alternative methods you can use to mount a VHD file you may find useful.
Windows 10 supports virtual drives natively. It is able to recognize and use ISO, VHD and VHDX files. For ISO files, Windows 10 creates a virtual disk drive. For VHD and VHDX files, Windows 10 creates a new drive accessible via the This PC folder in File Explorer. Also, these files can be used in Hyper-V machines.
What are VHD and VHDX files
The Virtual Hard Disk (VHD) file format allows encapsulation of the hard disk into an individual file for use by the operating system as a virtual disk in all the same ways physical hard disks are used. These virtual disks are capable of hosting native file systems (NTFS, FAT, exFAT, and UDFS) while supporting standard disk and file operations. The maximum size of a VHD file is 2,040 GB.
VHDX is a new version of the VHD format which has a much larger storage capacity than the older VHD format. It also provides data corruption protection during power failures and optimizes structural alignments of dynamic and differencing disks to prevent performance degradation on new, large-sector physical disks. It supports for virtual hard disk storage capacity of up to 64 TB.
Virtual disk types
Windows 10 supports two virtual disk types:
- Fixed—The VHD image file is pre-allocated on the backing store for the maximum size requested.
- Expandable—Also known as "dynamic", "dynamically expandable", and "sparse", the VHD image file uses only as much space on the backing store as needed to store the actual data the virtual disk currently contains. When creating this type of virtual disk, the VHD API does not test for free space on the physical disk based on the maximum size requested, therefore it is possible to successfully create a dynamic virtual disk with a maximum size larger than the available physical disk free space.
There are number of methods you can use to create a VHD file. I've reviewed them all in the following blog post: Create a New VHD or VHDX File in Windows 10.
Assuming that you have a VHD file, let's review the methods you can use to mount it.
To Mount a VHD or VHDX File in Windows 10,
- Open File Explorer.
- Browse for the VHD file you want to mount.
- Double-click on it.
- Alternatively, right-click on it and select Mount from the context menu.
- This will directly mount the VHD(X) file in your system.
This is most known method of mounting VHD files in Windows 10. Here are the number of lesser known alternatives.
Mount a VHD or VHDX File using Disk Management
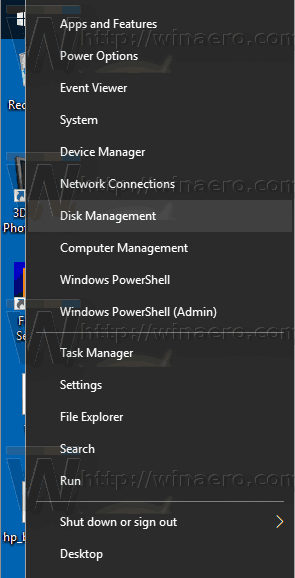
- Press the Win + X keys together the keyboard.
- From the menu, select Disk Management.
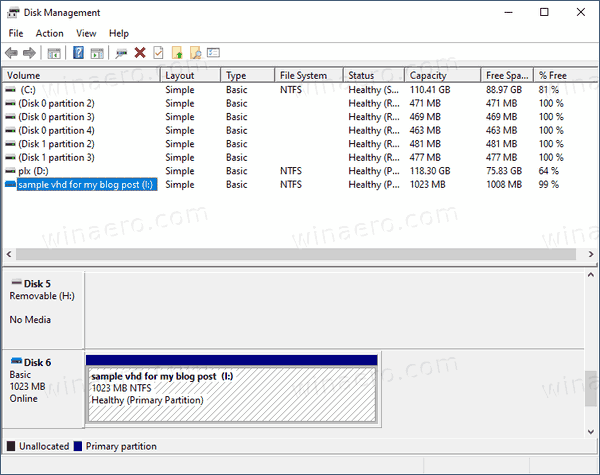
- In Disk Management, select Action > Attach VHD.
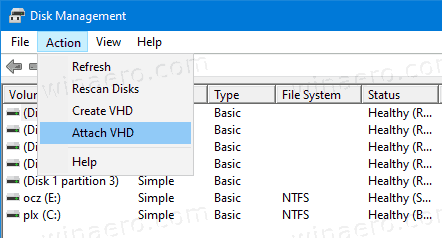
- Browse for you VHD file and click OK. Do not check the "read only" option if you want to perform some data modifications for the VHD file.

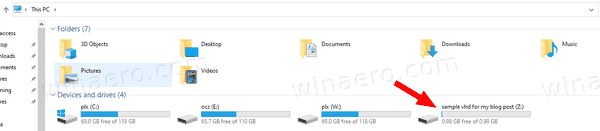
- The VHD file will appear as a new drive in the list.


Also, you can use PowerShell to mount a drive.
Note: These PowerShell commands work only when the Hyper-V feature is enabled.
Mount a VHD or VHDX File with PowerShell
- Open PowerShell as Administrator.
- Execute the following command:
Mount-VHD -Path "Full\path\to\vhd\file". - Substitute
Full\path\to\vhd\filewith the actual full path of the .vhd or .vhdx file you want to mount. - The disk is now mounted.

Alternatively, the classic console tool DiskPart can be used to mount a VHD file. Here we go.
Mount a VHD or VHDX File with DiskPart
- Press Win + R shortcut keys on the keyboard to open the Run dialog.
- Type
diskpartinto the Run box and hit the Enter key. Confirm the UAC prompt. - In the diskpart prompt, type and run the command
select vdisk file="Full path of .vhd or .vhdx location".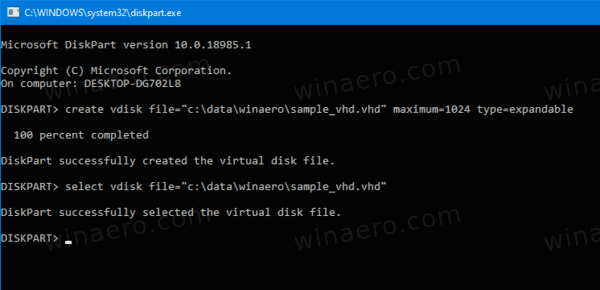
- Type and run the command
attach vdisk.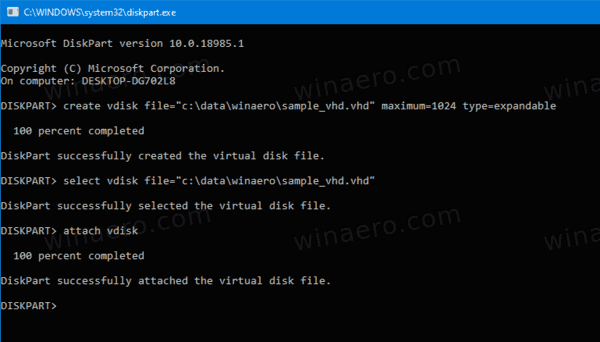
- The disk is now attached to the system.


You are done.
Similarly, you can use the GUI and console tools mentioned above to dismount a VHD file.
To Unmount a VHD File in Windows 10,
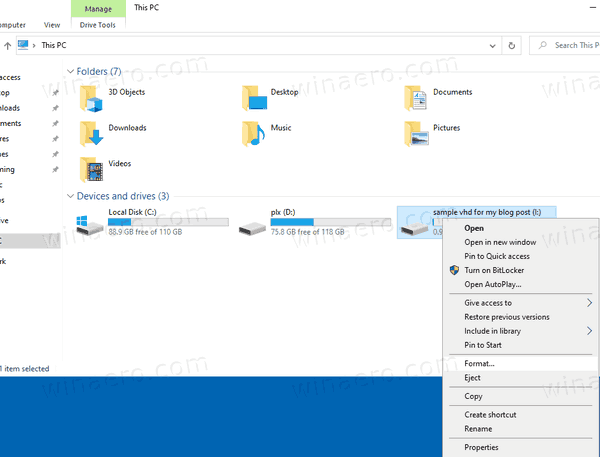
- In File Explorer > This PC, right-click on your VHD and select 'Eject' from the context menu.
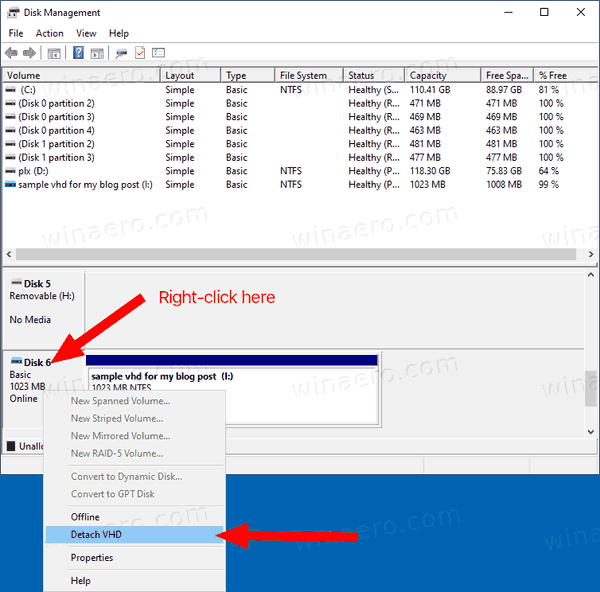
- In Disk Management, right-click on the drive and select Detach VHD from the context menu.
- Finally, just reboot your PC! All the mounted VHD files will be detached (except for those that you have enabled to auto-mount at startup).


For the console tools, let's review both DiskPart and PowerShell in detail.
Unmount a VHD File with DiskPart
- Press Win + R shortcut keys on the keyboard to open the Run dialog.
- Type
diskpartinto the Run box and hit the Enter key. Confirm the UAC prompt. - In the diskpart prompt, type and run the command
select vdisk file="Full path of .vhd or .vhdx location". - Type and run the command
deattach vdisk.
- You are done.

For the PowerShell, the sequence involves two new cmdlets, Get-VHD and Dismount-VHD.
Unmount a VHD File with PowerShell in Windows 10
- Open PowerShell as Administrator.
- Execute the following command:
Get-VHD -Path "Full\path\to\vhd\file". - Substitute
Full\path\to\vhd\filewith the actual full path of the .vhd or .vhdx file you want to dismount.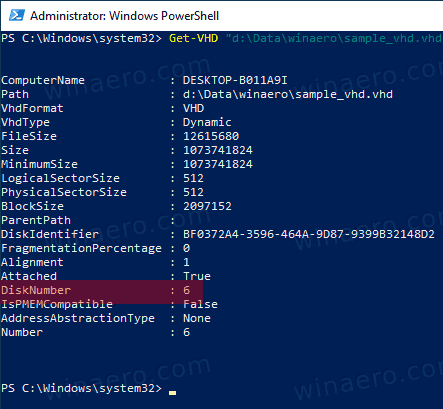
- Note the
DiskNumberline value from the output of the command above. E.g.DiskNumber 6<-- the number is6. - Now, issue the following command to unmount it:
Dismount-VHD -DiskNumber <number>. - Substitute
<number>in the command above with disk number you have noted.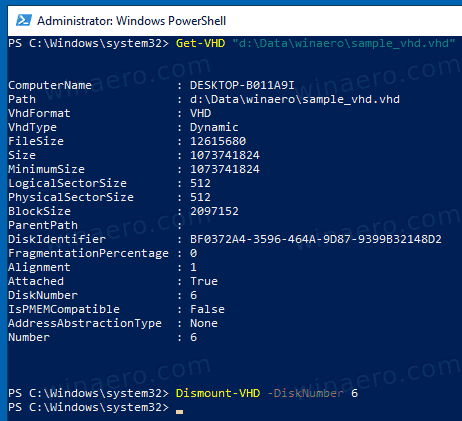


That's it!
Articles of interest:
- Create a New VHD or VHDX File in Windows 10
- Automatically Mount VHD or VHDX File on Startup in Windows 10
Support us
Winaero greatly relies on your support. You can help the site keep bringing you interesting and useful content and software by using these options:
This was great – thaks very much