To fix various problems with the OS, Windows 10 comes with a number of built-in troubleshooters. Sometimes they are really useful and can resolve the issue quickly. Starting in Windows 10 build 17704, Microsoft introduced the ability to automatically apply the recommended troubleshooting fixes for known problems. Here is how to enable or disable this feature.
Advertisеment
In Windows 10, Microsoft has added all the available troubleshooters to the Settings app. The link from the classic Control Panel also opens the new Settings page.
Troubleshooters in Windows 10
To run a troubleshooter in Windows 10, you can use a new page in the Settings app. You will find them under Settings \ Update & security \ Troubleshoot.
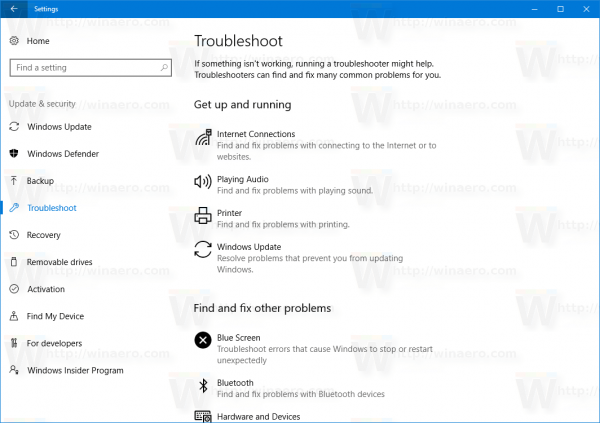
The following troubleshooters are available.
- Internet connections
- Playing Audio
- Printer
- Windows Update
- Blue Screen
- Bluetooth
- Hardware and Devices
- HomeGroup
- Incoming Connections
- Keyboard
- Network Adapter
- Power
- Program Compatibility Troubleshooter
- Recording Audio
- Search and Indexing
- Shared Folders
- Speech
- Video Playback
- Windows Store Apps
If the new Automatic Recommended Troubleshooting feature doesn't work properly for you or gives issues, you can disable it. Here is how it can be done.
To disable Automatic Recommended Troubleshooting in Windows 10, do the following.
- Open the Settings app.

- Navigate to Update & security -> Troubleshoot.
- On the right, disable the option Recommended troubleshooting. It is enabled by default.
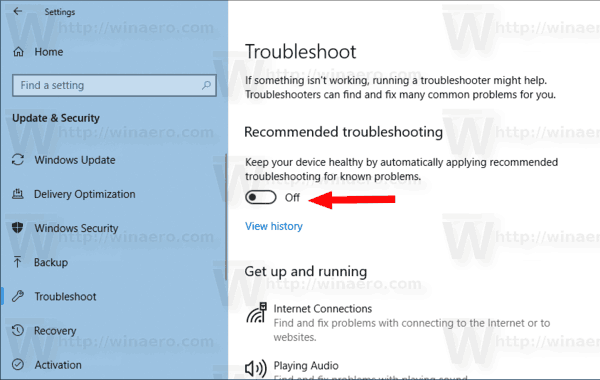
- The Automatic Recommended Troubleshooting is now disabled.
Alternatively, you can apply a Registry tweak to enable or disable this feature.
Disable Recommended Troubleshooting with a Registry tweak
- Open the Registry Editor app.
- Go to the following Registry key.
HKEY_LOCAL_MACHINE\SOFTWARE\Microsoft\WindowsMitigation
See how to go to a Registry key with one click.
- On the right, modify or create a new 32-Bit DWORD value UserPreference.
Note: Even if you are running 64-bit Windows you must still create a 32-bit DWORD value.
Supported values: 1 - enabled, 3 - disabled.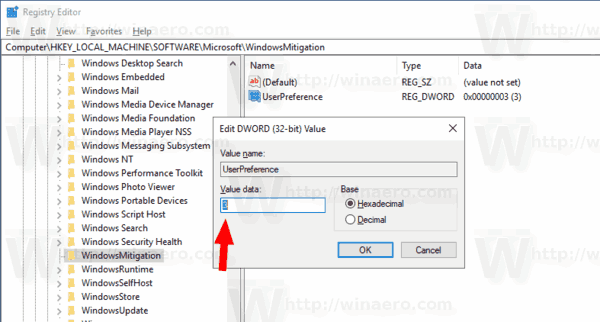
- To make the changes done by the Registry tweak take effect, restart Windows 10.
To save your time, you can download the following ready-to-use Registry files.
That's it.
Related articles:
- Clear Troubleshooting History in Windows 10
- View Troubleshooting History in Windows 10
- How to Run a Troubleshooter in Windows 10 to Resolve Problems
- How to access recovery and troubleshooting options via reboot in Windows 10
- Backup Security and Maintenance Notification Settings in Windows 10
Support us
Winaero greatly relies on your support. You can help the site keep bringing you interesting and useful content and software by using these options:
If you like this article, please share it using the buttons below. It won't take a lot from you, but it will help us grow. Thanks for your support!
Advertisеment
