Today, we will see how to set a custom icon for your removable drive, e.g. your USB flash drive, SD Card or an external HDD drive to quickly differentiate these kinds of devices when you connect them to your computer. All you need is Notepad and some nice icon file. Here we go.
Advertisеment
By default, all removable drives have the same icon when you connect them to your computer.
![]()
If you created a bootable USB Flash drive with Windows 10, you might have noticed that it has a special "Windows Setup" icon.
![]()
Tip: Windows 10 displays removable drives in the navigation pane of File Explorer, but you can remove them from there. They will appear only in This PC, as implemented in previous Windows versions.
The custom icon of a flash drive can be set with a special file, autorun.inf. Initially, it was developed to start apps from CD drives automatically, for example, to launch the Microsoft Office setup program automatically when you inserted its compact disc into the optical drive. It is a very old feature, first implemented in Windows 9x. However, the AutoRun ability itself was superseded by the more secure AutoPlay. The icon changing ability of Autorun.inf was kept intact though. It is less popular, because it was often utilized by various malware and viruses along with AutoRun's ability to directly launch an executable without prompting. However, with AutoRun disabled, it is now a safe feature and can be used for only customizing the appearance of the drive in This PC.
Another feature of the autorun.inf file is the ability to set a custom label for a drive. Here is how you can change the icon or set a label.
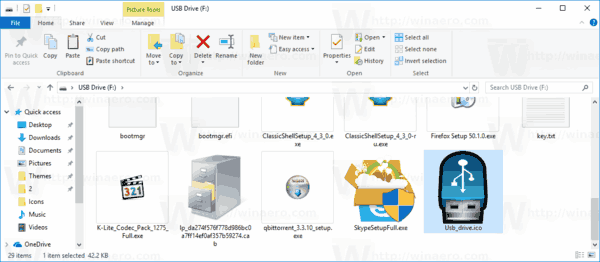
First, obtain a nice ICO file which will be used for your external storage.![]()
To set a custom icon for a removable drive in Windows 10, do the following.
- Insert your removable drive into the computer and copy the icon file to its root, e.g. F:.
- Run Notepad, and type or copy-paste the following text into the document:
[Autorun]
Icon=icon file name.ico
Label=Drive Label
Substitute the icon file name with the actual icon name's path. The drive label line is optional, so you can omit it.
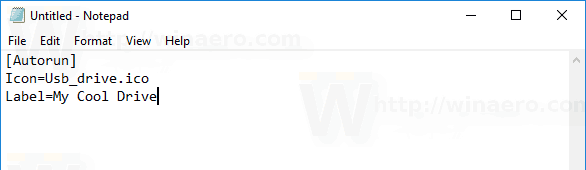
For example,[Autorun] Icon=usb.ico Label=My backup drive
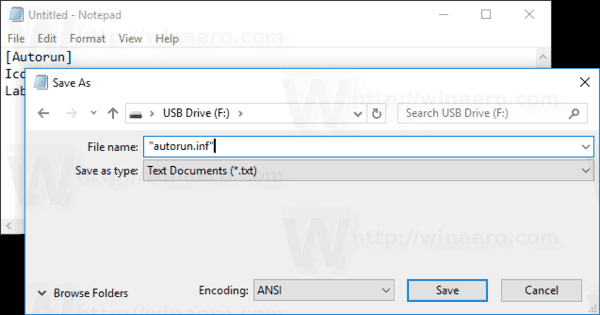
- In Notepad, click on the File menu - Save and save the file to the root of your removable drive, that is, if your drive letter is F:, then save it as F:\Autorun.inf. In the Save dialog, type the file name as "autorun.inf" including quotes to ensure that you are saving it with the correct file extension as autorun.inf and not as autorun.inf.txt.
You are done!
Now, disconnect the drive from your computer and plug it back. It will reflect the changes you made. Since the icon file is stored on your flash drive, it will be displayed on every Windows PC you plug your drive to!
![]()
Additionally, you can hide the icon file and autorun.inf. By default, File Explorer doesn't show hidden files and folders, so they won't appear on most PCs. This will help you to focus on the important files on the drive.
Hide Extra Files On The Drive
- Open your removable drive in File Explorer.
- Right click the icon file and select Properties from the context menu.
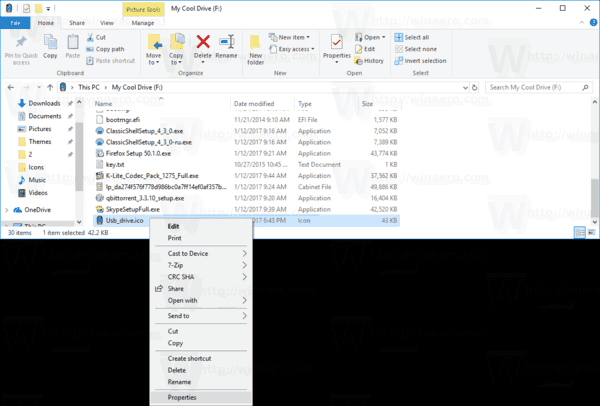
- Check the option Hidden in the Attributes section on the General tab and click OK.
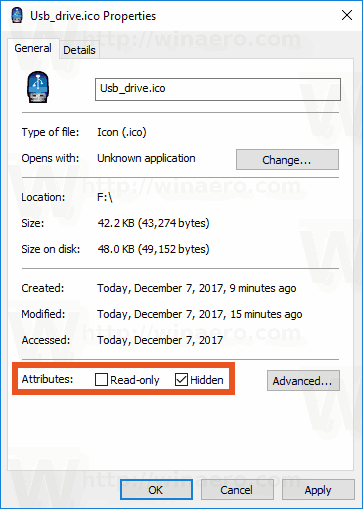
- Repeat the same for the file autorun.inf
For a more detailed procedure on this, see the article How to hide files and folders in Windows 10.
That's it.
Support us
Winaero greatly relies on your support. You can help the site keep bringing you interesting and useful content and software by using these options:
If you like this article, please share it using the buttons below. It won't take a lot from you, but it will help us grow. Thanks for your support!
Advertisеment

You should also set the Autorun.inf file properties to Read Only to prevent any malware on a device you plug it into hi-jacking the file to spread itself to other devices.
I am afraid that the read-only attribute can’t stop malware.
This method no longer works. I don’t recall exactly when, but sometime in the past several months (probably with one of MS updates), all my custom icon files on my USB, SD cards and µSD cards fail to display in “My Computer” or any other window of “File Explorer”. Whereas my custom icon files used to show up, windows explorer now shows the generic “refrigerator” (that’s what it looks like to me) icon. I have long used a simply 3-line autorun.inf file to display the label (that still works) and the custom icon (which does not work). I played around with the icon size on the off-chance that MS no longer supports the larger icon files; I used icons of 128×128, but I saw a reference that icons must be 48×48 or smaller to work. That didn’t work either. If anyone comes up with a reason, send me an email, mrhabilis@gmail.com
Same here, no luck these days with this method. I created my .inf files way back in Win 7 but no luck of it working with current versions of Win 10. Only thing I noticed was when I updated to the 3 line (I only ever used top 2 lines from Win 7) version in this article it prompted me to scan and fix my drive when I plugged it back in. The scan finds nothing wrong but still no icon. I too would also like to know the reason or a fix as its nice to see what drive I need to access instead of labels.
If this method is not working for you then you’re doing something wrong.
I just used this method to customize the icon of my flash drive and it works perfectly.
I ran into 0 problems using this method.
So maybe just start from scratch instead of re-using (pre-historic) Win 7 autorun files. (it litterally takes less then a minute to make.
I am running Windows 10 build 20H2.
I used a 256*256 Icon file and stored it in the root of the drive.
I then made the autorun file and saved it as an .inf file.
Still 0 problems at this point, so if its not working for you, you did something wrong.
Did it properly, unknown file logo shows up instead