

In early Windows versions, if your hard drive partition was marked dirty due to an improper shutdown, or due to corruption or bad sectors, Chkdsk ran while Windows was booting to fix any drive errors. You had a choice to cancel the disk check and continue to boot Windows, before it started scanning and fixing errors. In Windows 10, the Chkdsk timeout is set to 0 by default so it no longer allows you to cancel the disk check. Also, the automatic repair mechanism kicks in by default which we showed can be disabled. In this article, we will look at how to set the timeout before Chkdsk starts so you get time to cancel the disk check.
To change the Chkdsk timeout at Windows 10 boot, you need to apply a simple Registry tweak. Follow the instruction below to change it.
- Open Registry Editor (Tip: see our detailed tutorial about Registry Editor).
- Navigate to the following key:
HKEY_LOCAL_MACHINE\SYSTEM\CurrentControlSet\Control\Session Manager
Tip: You can access any desired Registry key with one click.
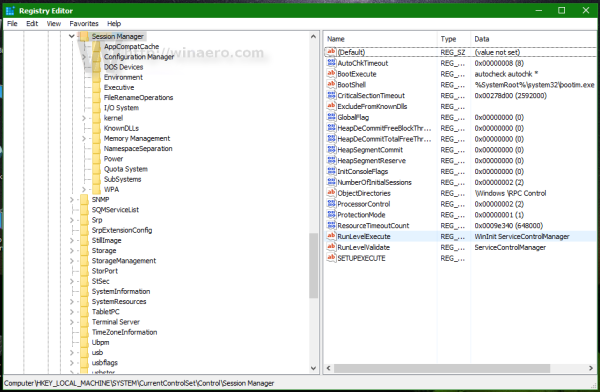
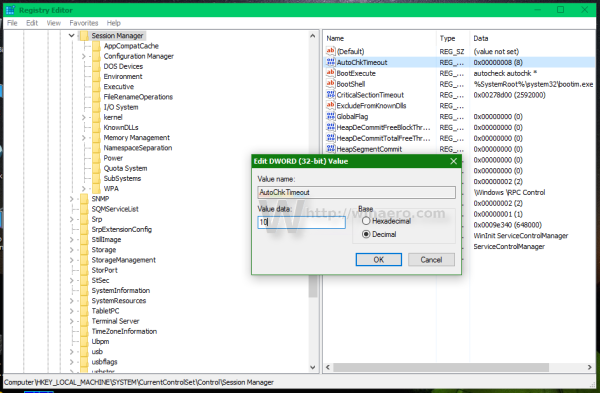
- In the right pane of Registry Editor, create or modify a DWORD value named AutoChkTimeout. Even if you are running 64-bit Windows, you still need to create a 32-bit DWORD value. Its value data means the timeout in seconds, which must be specified in decimals.


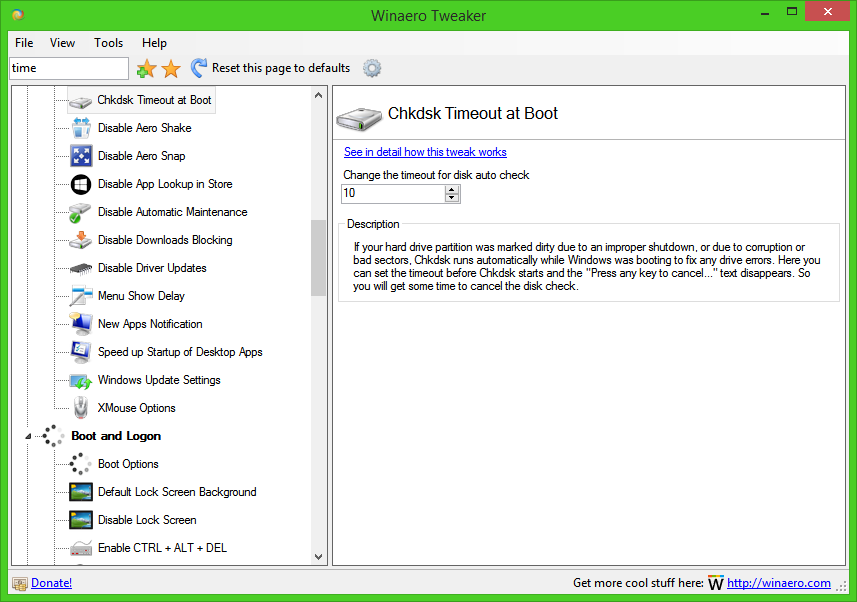
The same can be done with Winaero Tweaker:
That's it.
Support us
Winaero greatly relies on your support. You can help the site keep bringing you interesting and useful content and software by using these options:
chkntfs /t:10
Good point.
However, the method described in the article sets that timeout PERMANENTLY.
chkntfs /t: also sets the same key, so it is PERMANENT too.
Very useful tip, thank you Mr. Tkachenko. For me, in both Windows 8 and Windows 10, scheduled checks of the system drive at boot time would always, without fail, automatically cancel whenever autochk brought up its “press any key to cancel” prompt without me pressing anything. I explicitly set this key to 0 and now checks run fine (and with SSDs these days, I don’t find running chkdsk a long and daunting prospect).
Great.
Personally, I would like to have the cancel ability.
Set it to 10 everywhere.