When you are not using your PC, Windows 10 performs automatic maintenance. It is a daily scheduled task that runs out-of-the-box. When enabled, it performs various tasks like app updates, Windows updates, security scans and many other things. Occasionally, the OS displays notifications about Windows Update, Windows Defender, Disk Cleanup, and more. Today, we will see how to backup and restore security and maintenance notification settings in Windows 10.
Advertisеment
By default, maintenance is configured to perform the following actions:
- Broken shortcuts removal. If you have more than 4 broken shortcuts in the Start menu and on the Desktop, Windows 10 will remove them. Such shortcuts usually point to executable files which do not exist any more, for example, after you delete the app's folder from Program Files manually.
- Desktop icons which have been unused in 3 months will be removed.
- System clock will be checked and synchronized with a time server.
- Hard disks will be checked for file system errors.
- The troubleshooting history and error reports which are older than 1 month will be removed.
Tip: There are a number of maintenance tasks configured to start automatically in Windows 10. You might be interested in finding them. See the article
Find All Automatic Maintenance Tasks in Windows 10
Windows 10 automatically checks for various security and maintenance issues and displays a notification if a problem is found. Once you customized these notifications, you may want to backup your settings to quickly restore the later or apply to another Windows 10 PC.

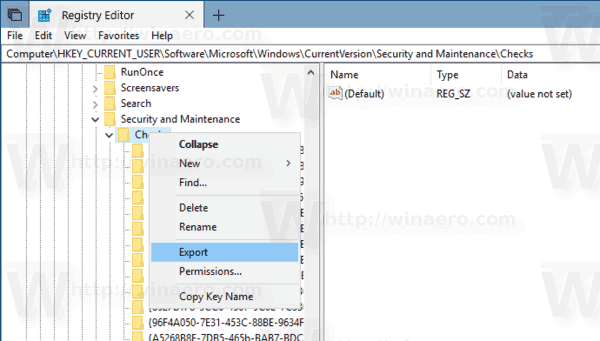
To backup Security and Maintenance notification settings in Windows 10, do the following.
- Open the Registry Editor app.
- Go to the following Registry key.
HKEY_CURRENT_USER\Software\Microsoft\Windows\CurrentVersion\Security and Maintenance\Checks
See how to go to a Registry key with one click.
- Right-click on the Checks key and select Export from the context menu.
- Browse for the folder where you want to store your settings and click on the Save button.
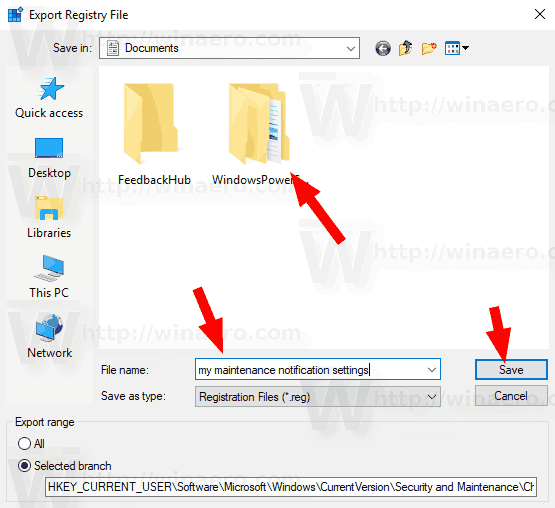
You are done!
To restore the notification settings later, just double-click on the REG files you created above and confirm the merge operation. If you haven't disabled UAC, you may be prompted to permit the operation.
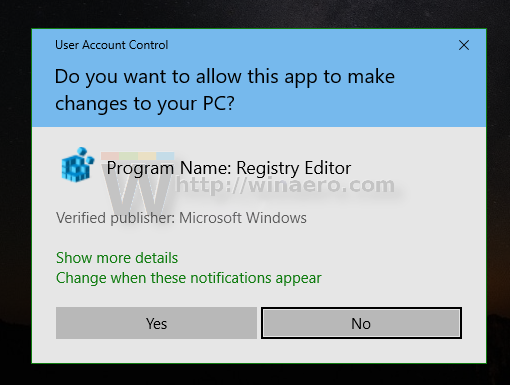
After that, you need to sign out and sign in to your user account. Alternatively, you can restart Windows 10.
That's it.
Support us
Winaero greatly relies on your support. You can help the site keep bringing you interesting and useful content and software by using these options:
If you like this article, please share it using the buttons below. It won't take a lot from you, but it will help us grow. Thanks for your support!
Advertisеment

Is it possible to customize WHICH maintenance tasks are allowed to run?
For example, I’d rather NOT have Windows 10 delete seldom used icons from my desktop. If they’re there, it’s because I want them there – no matter how often I use them. If I change my mind, I can easily delete them manually myself. This isn’t something I want Windows 10 making its own decisions about.
Do you not monitor or respond to questions in comments to your posts?