If your new computer came with UEFI instead of the legacy BIOS, you are able to get a significantly faster boot time of your Windows OS. UEFI is designed to initialize the hardware faster and then delegate the boot process to the OS. To enjoy the benefits of UEFI, you need to install Windows correctly in UEFI mode. Here is what you need to do for Windows 10.
Advertisеment
Microsoft started supporting EFI installation of Windows, with the release of 64-bit Windows Vista. This means that you can install 64-bit versions of Windows Vista, Windows 7, Windows 8 and 8.1 and Windows 10 using this method. Additionally, starting with Windows 8, UEFI 2.0 support is also added for 32-bit editions besides 64-bit. Follow these instructions below to set up Windows correctly in UEFI mode.
- Obtain the proper installation media. The official DVD of Windows 10 already supports UEFI installation. If you do not have a DVD drive in your system, then you need to create a bootable UEFI USB stick. See the article on How to create a bootable UEFI USB drive with Windows 10 Setup
- Boot your PC from the setup media. You might need to change some advanced boot related settings for your PC to configure this, however, most modern systems have a special key using which you can boot. Usually it is F8, F9, F11 or F12. Refer to your hardware manual or observe the boot screen carefully as your PC turns on to learn the proper key. You can also try searching on Google for your brand and model of the PC to learn which key it uses.
- When Windows Setup starts, you will need to reformat your hard drive using the GPT partition table. If you did this already, you can install Windows using the existing partition layout. In that case, go to the next step. Otherwise, delete all partitions until you get the "Unallocated space" label for your hard drive partitions. Click Next.
- You will get the following partitions:
- Recovery
- System - this EFI partition contains the core OS files like NTLDR, HAL, Boot.txt and so on, which are required to boot the operating system.
- MSR - the Microsoft Reserved (MSR) partition that reserves space on each hard drive for internal use by Windows.
- Primary - this is usual partition where Windows and all user data will be stored.
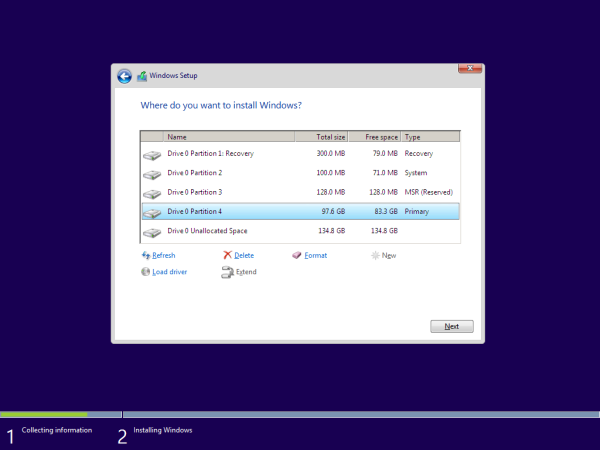
- Click the Primary partition and setup Windows 10 as usual.

That's it.
Support us
Winaero greatly relies on your support. You can help the site keep bringing you interesting and useful content and software by using these options:
If you like this article, please share it using the buttons below. It won't take a lot from you, but it will help us grow. Thanks for your support!
Advertisеment

I installed it on my Surface Pro 3 and now I cant downgrade back to Windows 8.1
I figured it out. My flash drive needed to be formatted to FAT32. Now I can boot my Surface Pro 3 into my recovery disk.