Some time ago, we covered how to get the Photo Viewer app back in Windows 10. While that trick works perfectly, the only thing missing was the "Preview" context menu verb in File Explorer. In previous Windows versions, you were able to right click an image in Explorer and pick "Preview" to see it quickly. Today, we will revive this option for Windows 10. The benefit of adding a Preview verb is that even if you use some other image viewer as the default, you can quickly open any image in Windows Photo Viewer whenever required.
Advertisеment
To get the Preview context menu item for Photo Viewer in Windows 10, all you need to do is apply a simple Registry tweak as described below.
- Open Registry Editor.
- Go to the following Registry key:
HKEY_CLASSES_ROOT\SystemFileAssociations\image\shell
Tip: You can access any desired Registry key with one click.
If you do not have such a key, then just create it. - At this key, create a new subkey named Image Preview to get the following path
HKEY_CLASSES_ROOT\SystemFileAssociations\image\shell\Image Preview
- Under it, create a new subkey named Command to get the following path
HKEY_CLASSES_ROOT\SystemFileAssociations\image\shell\Image Preview\Command
- Set the default (unnamed) parameter to the following value:
%SystemRoot%\System32\rundll32.exe "%ProgramFiles%\Windows Photo Viewer\PhotoViewer.dll", ImageView_Fullscreen %1
(You can copy paste the text above)
You will get something like this: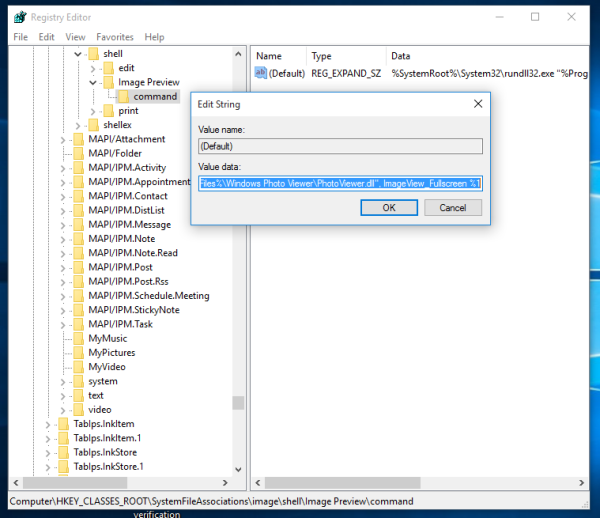

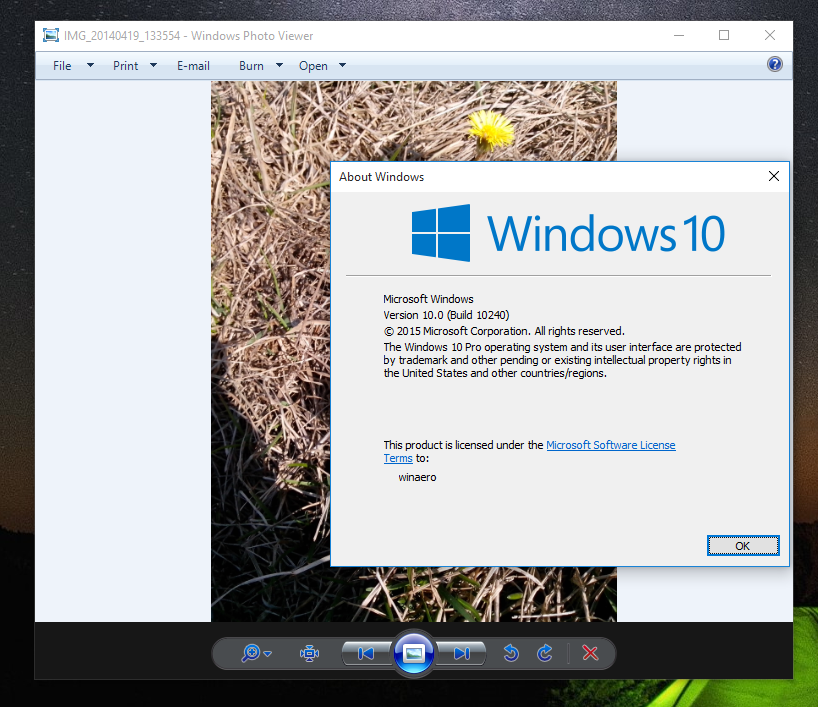
Now, right click any image in File Explorer. A new "Image Preview" item will appear:

If you click it, the Photo Viewer app will open.
 That's it.
I prepared Registry files so you can get the context menu entry with one click:
Double click the file "Image Preview.reg" to get the context menu item in your File Explorer. The Undo file is included. Thanks to our reader "ThePhinx" for sharing this tip.
Support us
Winaero greatly relies on your support. You can help the site keep bringing you interesting and useful content and software by using these options:
If you like this article, please share it using the buttons below. It won't take a lot from you, but it will help us grow. Thanks for your support!
Advertisеment

I do not see why this differs from Preview at top of menu, it opens the exact same.
If you’re on the desktop, or just prefer not to turn on the preview page, this is necessary and much quicker.
This tweak works well on new build 10532
Thank you very much
You are welcome
Can you please explain why it is different from what I said above (in case I am missing something)?
(I already did your tweak to use the Photo Viewer and that is great).
I agree with @melmutcheese, I see no point in this tutorial as the ‘Preview’ option is at the top of the right click menu already. Likewise once the image is opened in Photo Viewer the user can press the next button at the bottom of the window to view the next image in that folder.
this works great to preview one image file at a time; is there any way to preview multiple selected files? in previous versions of windows, i could select a group of files and preview them all in windows photo viewer, flipping through very easily. would like this functionality to be restored. thanks!
Hi cj4soccer,
Yes, there is a way to preview multiple selected files with the Windows Photo Viewer (context menu) for Windows 10. To be fair, I forgot to add a step in my original tip to restore the Image Preview context menu. To restore this functionality:
1) First, follow Sergey’s steps outlined above to get the Image Preview context menu working in Windows 10.
2) Then, in Regedit, navigate to:
“HKEY_CLASSES_ROOT\SystemFileAssociations\image\shell\Image Preview”
3) Create a new Key under “Image Preview” named DropTarget
4) With the new DropTarget key selected, on the right hand side, now create a new String named CLSID and set its value to {FFE2A43C-56B9-4bf5-9A79-CC6D4285608A}
5) Close Regedit.
That’s it. Scrolling through multiple selected files using the Image Preview context menu now works in Windows 10. Sergey, feel free to update this blog entry to include this extra Registry key required to get scrolling through multiple selected files working again.
– ThePhinx
Thank you. I will update the article tomorrow :)
How about a reply to my question since you seem to be replying to others.
I cannot see any difference in the 2 Menu Choices.
The simple truth is that there is no difference! This tutorial only duplicates what is already available at the top of the right-click context menu. If people look at the second image of this tutorial they can see that ‘Preview’ is already shown in BOLD type, what’s the point of adding it again?? I think the preview option has moved up the list in Windows 10, maybe that’s why Sergey over-looked it?? LOL!!!
I only asked n case I was missing something not to be smartarse but think the OP may have though so.
I wondered if it was different as you could hover and not click or something but the descriptions clearly states you click and its no different to what I already have by default.
I don’t know about everyone, but for me, ther is NOT a PREVIEW option in the Right-Click Context Menu in my Windows 10 Enterprise Edition. this gives me back the capability to just preview images without invoking a program like Photoshop which is set as my default for numerous types of image files. HTH
Hello,
I followed strictly your tutorial but when I click on Image preview for a photo situéedans a directory of the record(disk) C:/, I have the following message:
“Windows does not succeed in reaching the ring road(peripheral), the access path(road) or the specified file. You do not maybe arrange authorizations suited to have access to the element.”
Have you an idea of the reason of this message?
I am the administrator of my PC.
Regards
B. Delassus
Same as above comment. A fix would be appreciated!
I had the same problem. Following the steps in ThePhinx’s reply to cj4soccer on August 30, 2015 fixed it for me. :)
Thanks for the “Image preview” registry hack. It works great!!!! Cheers.
don’t mention it.
Ran the .reg file you provided, worked perfectly. Been trying to find this for a month. Thank you!!!
You are welcome.
Hello. When I add this to the registry, and try the ‘Image Preview’ context menu, I get: “Windows cannot access the specified device, path, or file. You may not have the appropriate permissions to access the item.” Thoughts?
I must have typed something incorrect, as the reg download file works great!
There’s an easy way to make it work the old way.
Open any folder with an image file – ie *.jpg
Right click on the file, and select “Properties” from the menu.
Under the “General” tab, you’ll see an “Opens with” option. Click “Change”. In the list of options is “Windows Photo Viewer”. Select this, then click “Apply”.
This will give you back the right-click Preview option, which works just like it did in Windows 7/8.
If I follow the listed instructions, I get a REG_SZ value and I get the same error as Paul above. If I run the downloaded *.reg file, I get a REG_EXPAND_SZ value, and it works. Something’s not right.
to begin: the new key “command” must be typed all lower case
in the key “command” the default (unnamed) parameter must be deleted
instead create a new “Expendable String Value”
rename it in (Default)
and set its parameters as described
works perfect, I have been searching fo this for ages
I don’t know why this is so difficult to understand what is being asked. The issue is NOT that preview is not a default option in the context menu, The issue is that in earlier versions of Windows, If you right clicked on an image file in Windows explorer, a thumbnail image appeared in the context menu, along with the standard options. Are the MS engineers trying to confuse the issue are are they just that thick headed?