If you use the System Restore function in Windows 10 to revert your operating system to the last known stable point when it was working correctly, you might be interested in having the ability to quickly create a restore point with one click. This can be done by creating a shortcut to a command which creates the restore point. In modern Windows versions, it is especially useful because System Restore has been scaled back to create restore points far less frequently, even as low as once a week!
Advertisеment
Before you begin, make sure you have System Restore enabled.
To create a restore point in Windows 10 with one click, you need to do the following:
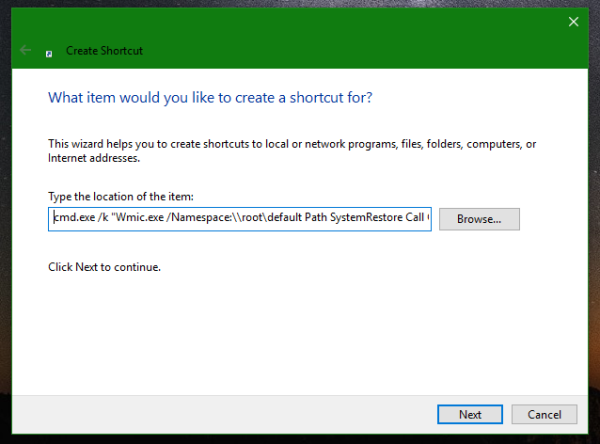
- Right click on the Desktop and select the command "New -> Shortcut" from the context menu.
- In the shortcut target, type or copy-paste the following text:
cmd.exe /k "Wmic.exe /Namespace:\\root\default Path SystemRestore Call CreateRestorePoint "%DATE%", 100, 7"
- Give this shortcut the desired name and icon.
 Tip: An appropriate icon is in the following file:
C:\Windows\System32\rstrui.exe
You can use it:

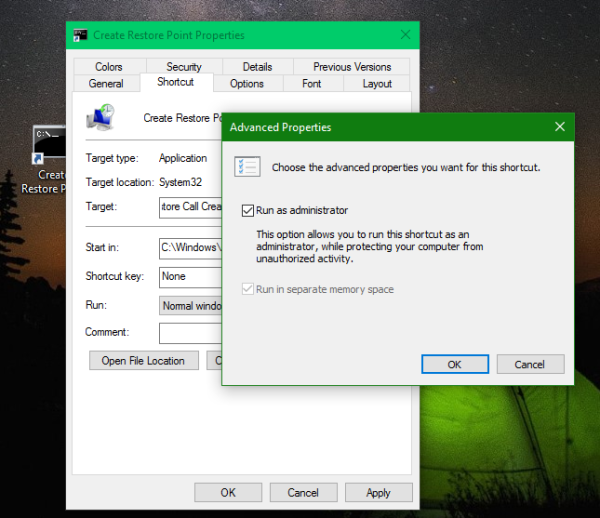
- Now, open the shortcut's properties by right clicking it and click the Advanced... button on the Shortcut tab of its Properties. Check the option to run as administrator in the shortcut's properties -> Advanced and click OK everywhere to save settings:


Now, all you need to do is run this shortcut to create the restore point. The result will be as follows:
The line "Method execution successful." indicates that everything is OK. You can use the mentioned WMIC command in batch files as well:
Wmic.exe /Namespace:\\root\default Path SystemRestore Call CreateRestorePoint "%DATE%", 100, 7
Just remember to execute it from an elevated command prompt.
That's it.
Support us
Winaero greatly relies on your support. You can help the site keep bringing you interesting and useful content and software by using these options:
If you like this article, please share it using the buttons below. It won't take a lot from you, but it will help us grow. Thanks for your support!
Advertisеment

This is a good one! Thanks.
Thank you for your kind words :)
Thank you, big help for the users. :)
you are welcome.
This is a cool fast solution. Thanks
Don’t mention it.
thank you, a very big help for me.
You are welcome
This works in Windows 7 and Windows 8.1 too.
Yep, you are right.
cmd.exe /k “Wmic.exe /Namespace:\\root\default Path SystemRestore Call Enable “C:\””
This works, but when I go to restore, each restore point is called “Automatic Restore Point”. Nothing I put in for the name gets saved (i.e. “%DATE%” as shown here).
Thank you very much for this!! I am making a bat file with lots of commands in one…. Like a one click fix See below and paste it on your desktop in a .bat file
Wmic.exe /Namespace:\\root\default Path SystemRestore Call CreateRestorePoint “%DATE%”, 100, 7
echo Del /S /F /Q %temp%\*
Del /S /F /Q %Windir%\Temp\*
RunDll32.exe InetCpl.cpl,ClearMyTracksByProcess 1
RunDll32.exe InetCpl.cpl,ClearMyTracksByProcess 8
RunDll32.exe InetCpl.cpl,ClearMyTracksByProcess 2
RunDll32.exe InetCpl.cpl,ClearMyTracksByProcess 32
RunDll32.exe InetCpl.cpl,ClearMyTracksByProcess 16
RunDll32.exe InetCpl.cpl,ClearMyTracksByProcess 255
RunDll32.exe InetCpl.cpl,ClearMyTracksByProcess 4351
DEL /S /Q “%TMP%\*.*
DEL /S /Q “%TEMP%\*.*
DEL /S /Q “%WINDIR%\Temp\*.*
DEL /S /Q “%USERPROFILE%\Local Settings\Temp\*.*
DEL /S /Q “%LOCALAPPDATA%\Temp\*.*
powercfg.exe /hibernate off
powercfg -h off
del /q /f /s “%USERPROFILE%\AppData\Local\Microsoft\Windows\Temporary Internet Files\*.*
del /q /f /s “%USERPROFILE%\AppData\Local\Microsoft\Windows\INetCache\*.*
del /q /f /s “%temp%\*.*
del /q /f /s “%systemroot%\Prefetch\*.*
bcdedit /set recoveryenabled NO
bcdedit /set {default} recoveryenabled No
bcdedit /set {default} bootstatuspolicy IgnoreAllFailures
powercfg -h off
bcdedit /set {default} bootmenupolicy legacy
bcdedit /set {default} bootstatuspolicy IgnoreAllFailures
del /q /f /s “%USERPROFILE%\AppData\Local\Microsoft\Windows\Temporary Internet Files\*.*”
del /q /f /s “%USERPROFILE%\AppData\Local\Microsoft\Windows\INetCache\*.*”
del /q /f /s “%temp%\*.*”
del /q /f /s “%systemroot%\Prefetch\*.*”
del /q /f /s “%systemroot%\Temp\*.*”
del /q /f /s “%USERPROFILE%\AppData\Roaming\Microsoft\Windows\Cookies\*.*”
del /q /f /s “%USERPROFILE%\AppData\LocalLow\Microsoft\Internet Explorer\DOMStore\*.*”
del /q /f /s “%USERPROFILE%\AppData\Local\Microsoft\Windows\History\*.*”
del /q /f /s “%USERPROFILE%\AppData\Local\Microsoft\Internet Explorer\Recovery\Active\*.*”
del /q /f /s “%USERPROFILE%\AppData\Local\Microsoft\Internet Explorer\Recovery\Last Active\*.*”
del /q /f /s “%USERPROFILE%\AppData\Roaming\Microsoft\Windows\PrivacIE\*.*”
del /q /f /s “%USERPROFILE%\AppData\Roaming\Microsoft\Windows\IECompatCache\*.*”
del /q /f /s “%USERPROFILE%\AppData\Roaming\Microsoft\Windows\IETldCache\*.*”
del /q /f /s “%USERPROFILE%\AppData\Local\Microsoft\Windows\WER\ReportArchive\*.*”
del /q /f /s “%USERPROFILE%\AppData\Roaming\Macromedia\Flash Player\*.*”
del /q /f /s “%USERPROFILE%\AppData\Local\Microsoft\Terminal Server Client\Cache\*.*”
del /q /f /s “%USERPROFILE%\AppData\Local\Temp\*.*”
pushd “%USERPROFILE%\AppData\Local\Mozilla\Firefox\Profiles\*.default\”
del /q /f /s “Cache\*.*”
popd
del /q /f /s “%USERPROFILE%\AppData\LocalLow\Adobe\Acrobat\9.0\Search\*.*”
del /q /f /s “%USERPROFILE%\AppData\LocalLow\Adobe\Common\Media Cache Files\*.*”
del /q /f /s “%USERPROFILE%\AppData\LocalLow\Adobe\Common\Media Cache\*.*”
del /q /f /s “%USERPROFILE%\AppData\Roaming\Microsoft\Office\Recent\*.*”
del /q /f /s “%USERPROFILE%\AppData\Roaming\Microsoft\Office\*.tmp”
del %systemdrive%\$Recycle.bin\*.* /f /s /q
del /q /f /s “%USERPROFILE%\AppData\Roaming\Microsoft\Windows\Recent\*.tmp”
del /s /f /q c:\windows\temp\*.*
rd /s /q c:\windows\temp
md c:\windows\temp
del /s /f /q C:\WINDOWS\Prefetch
del /s /f /q %temp%\*.*
rd /s /q %temp%
md %temp%
deltree /y c:\windows\tempor~1
deltree /y c:\windows\temp
deltree /y c:\windows\tmp
deltree /y c:\windows\ff*.tmp
deltree /y c:\windows\history
deltree /y c:\windows\cookies
deltree /y c:\windows\recent
deltree /y c:\windows\spool\printers
del c:\WIN386.SWP
echo
cls
netsh winsock reset
netsh int ip reset
netsh int ipv4 reset
ipconfig /release
ipconfig /renew
ipconfig /flushdns
ipconfig /registerdns
shutdown /r /t 060
exit
January 2, 2019
Work only AFTER to have install a new software.
It’s a method and not a script.
I tried the shortcut but got the message “Access Denied”. Don’t know what to do next.
Make sure you go back to the shortcut and mark it “Run as administrator” (see above directions). That will fix it.
I created the desktop shortcut as explained and the results were successful, just as shown above. However, when I go to System Restore afterward, the restore point(s) that I just made do not show on the list of available restore points. What is happening? Thanks.